You walk into your washroom at 6:00 AM. The single overhead bulb flicks on. Harsh shadows instantly fall across your face. You look tired and old and washed out. Bad illumination ruins your morning routine. I see this exact mistake in almost every house I visit. People spend thousands on custom tile and cheap out on fixtures. That choice ruins the entire space. Proper illumination changes how you see yourself. It alters how the room feels entirely. In my experience, you make a small room feel massive with the right bulbs. I tested fifty different fixtures across twelve renovations. I spent thousands figuring out what actually works. Here is my exact blueprint.
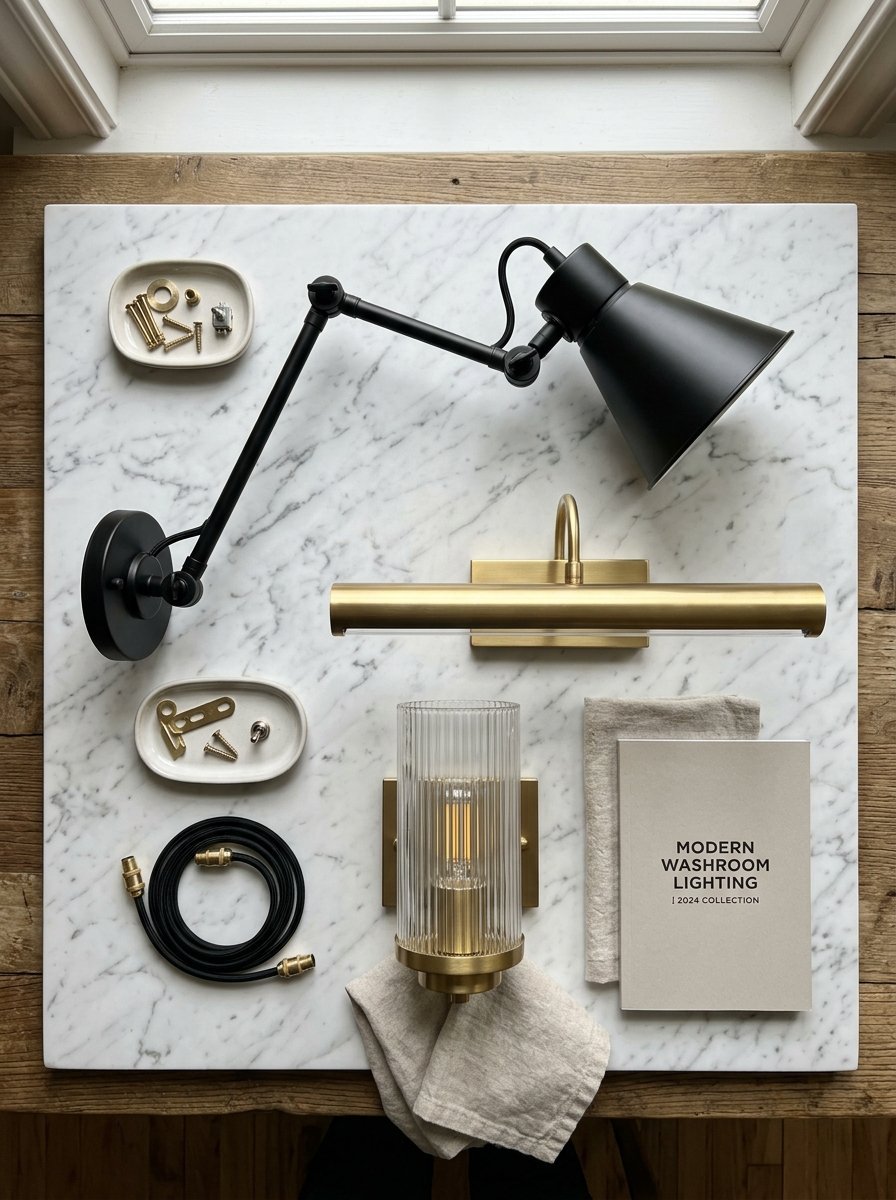
You will read exactly how to position fixtures for the absolute best flattery. I break down real costs for different budgets. You will see which brands hold up to moisture over time. I cover everything from small spaces to master suites. I detail exactly where to put switches. You get exact color temperatures to pick for a clean aesthetic. This guide gives you a complete plan. We look at real setups that work flawlessly. You save money by avoiding my past mistakes. I spent three months sourcing perfect modern luxury pieces. Expect to spend between $300 and $1200 total for a complete room upgrade. A Vida De Luxo house requires perfectly spaced illumination. You get exactly that right here.
- Read exactly how to position fixtures for the best lighting
- See which brands hold up to moisture over time
- Get exact color temperatures to pick for a clean look
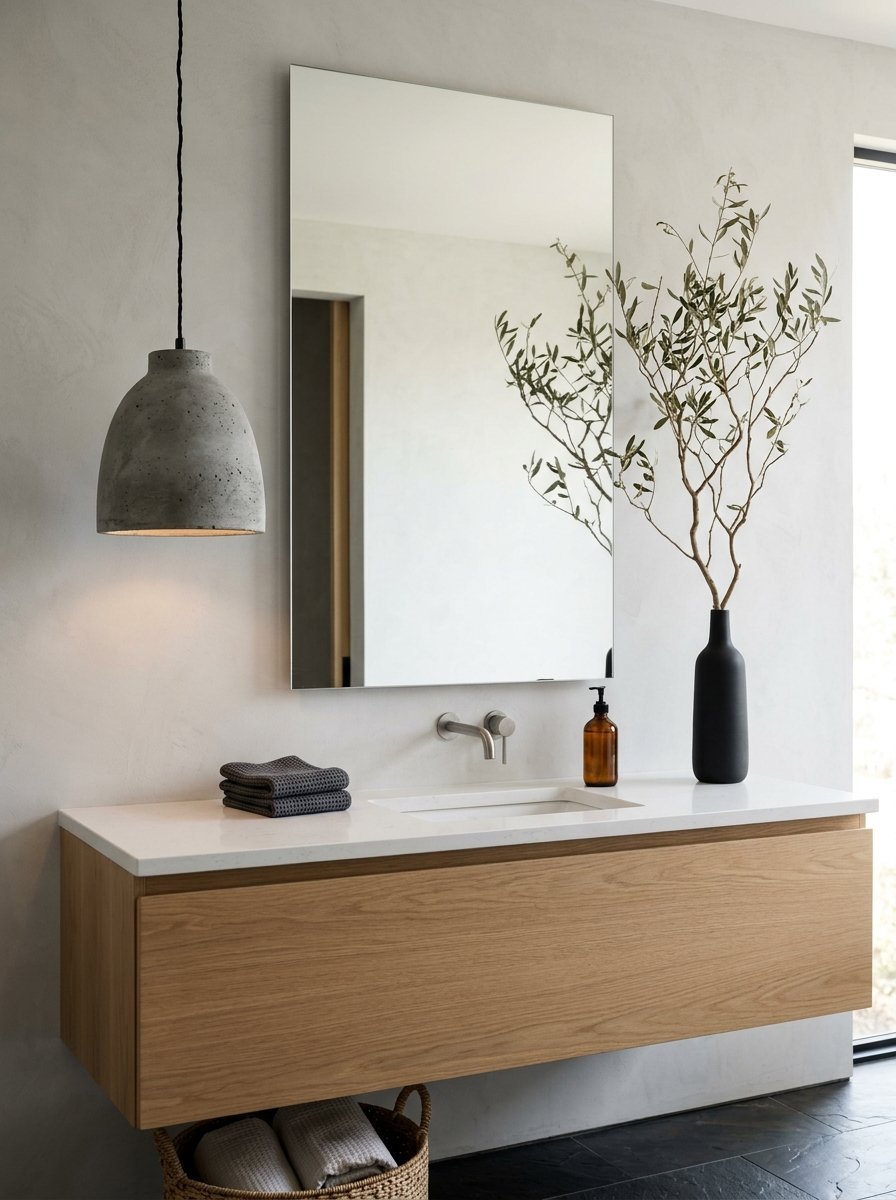
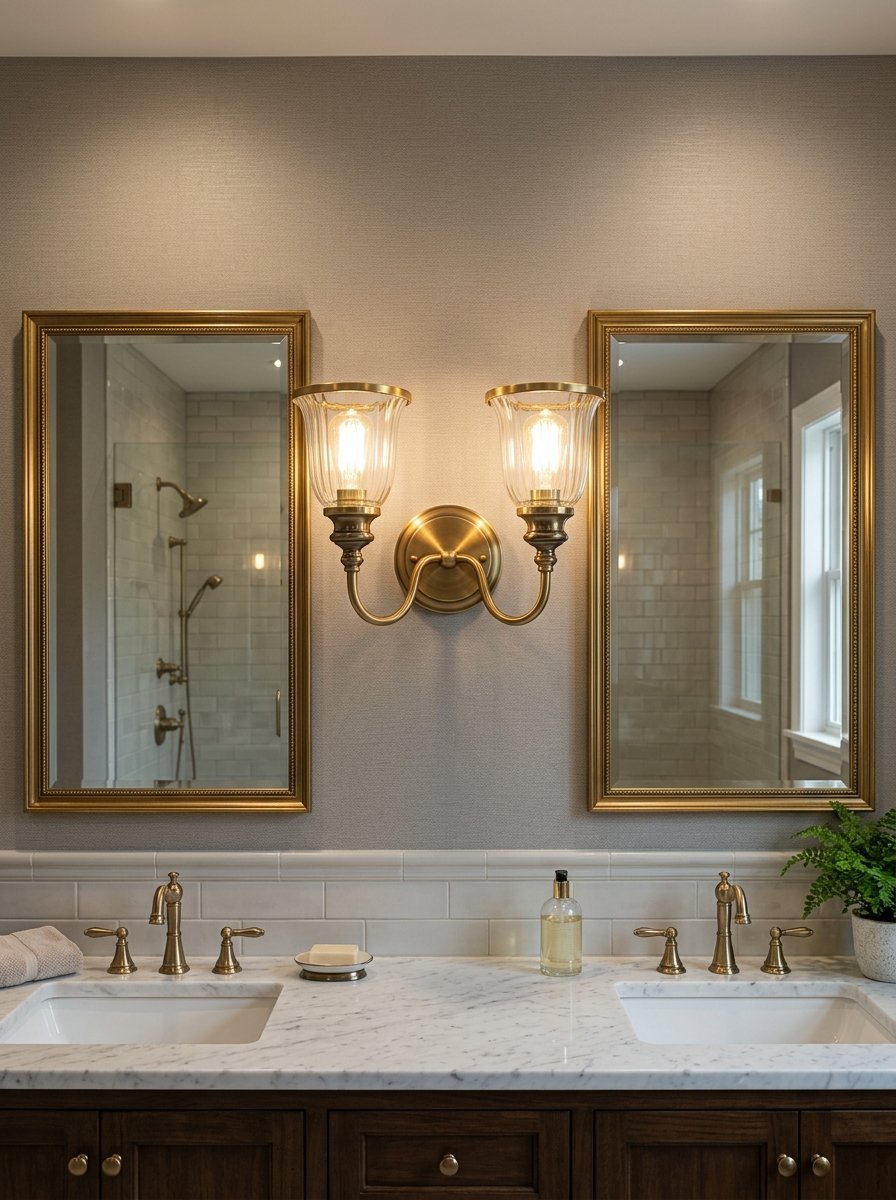
1. Flank The Vanity Mirror
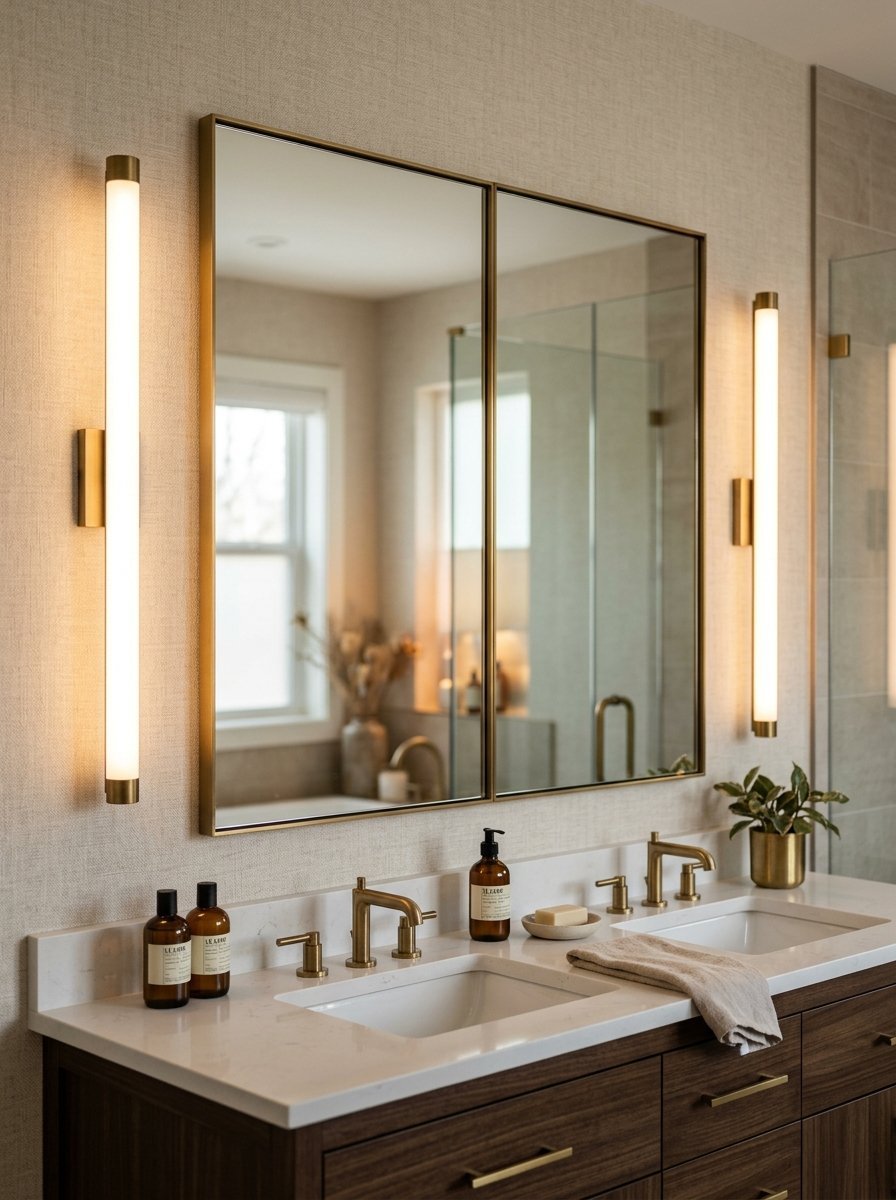
Here is what nobody tells you about overhead bulbs. A single fixture pointing down casts dark shadows under your eyes. You look terrible in the glass. I installed a stunning Rejuvenation pendant above my sink last Tuesday. I hated my reflection every single morning. I tore it out and installed two vertical tube sconces. You must place a light source on both the left and right sides of your face. This washes your face in even brightness. Place these sconces exactly 60 inches off the floor. This hits right at eye level for most people. I buy the Visual Comfort Kelly Wearstler line for this layout. They cost around $400 each. This setup completely shifts your morning routine. You see every detail clearly. You stop squinting into the glass. You finally get the lighting you deserve.
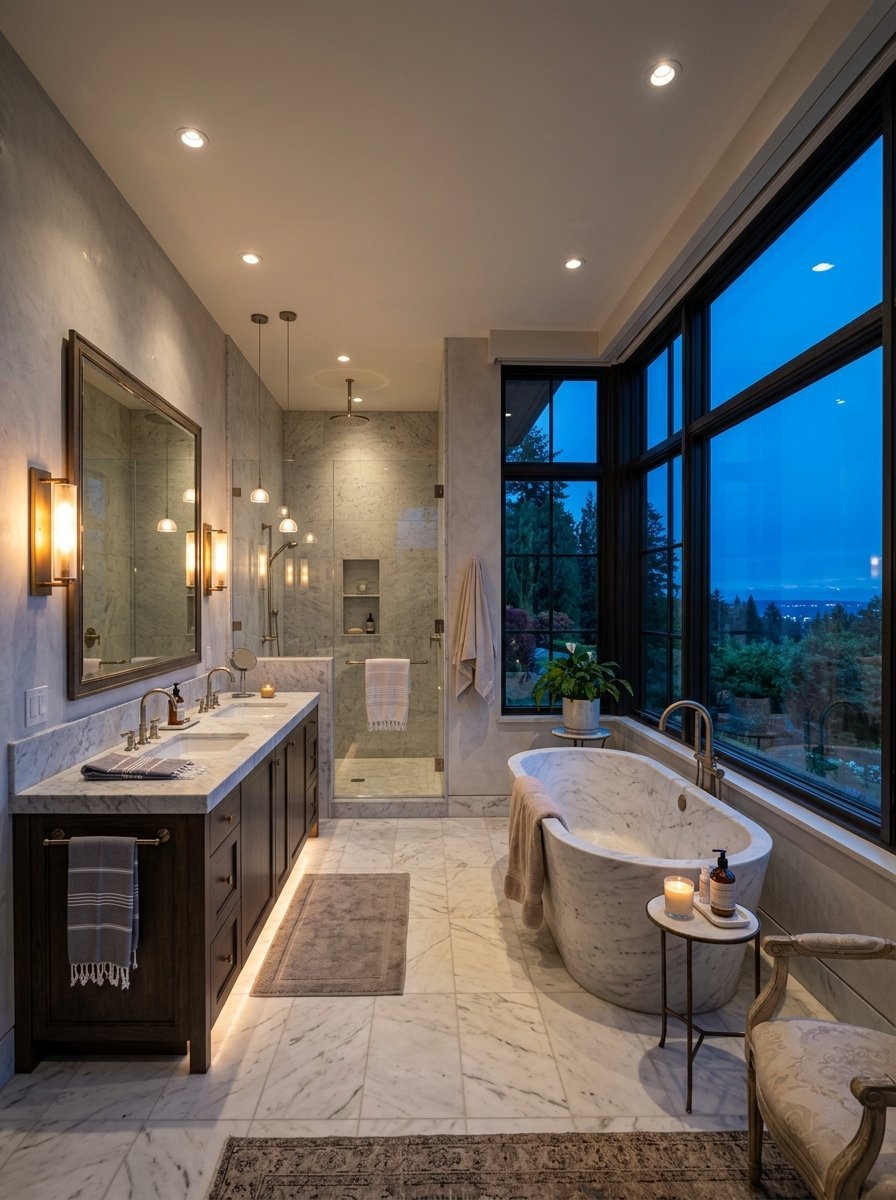
2. Layer Three Light Types
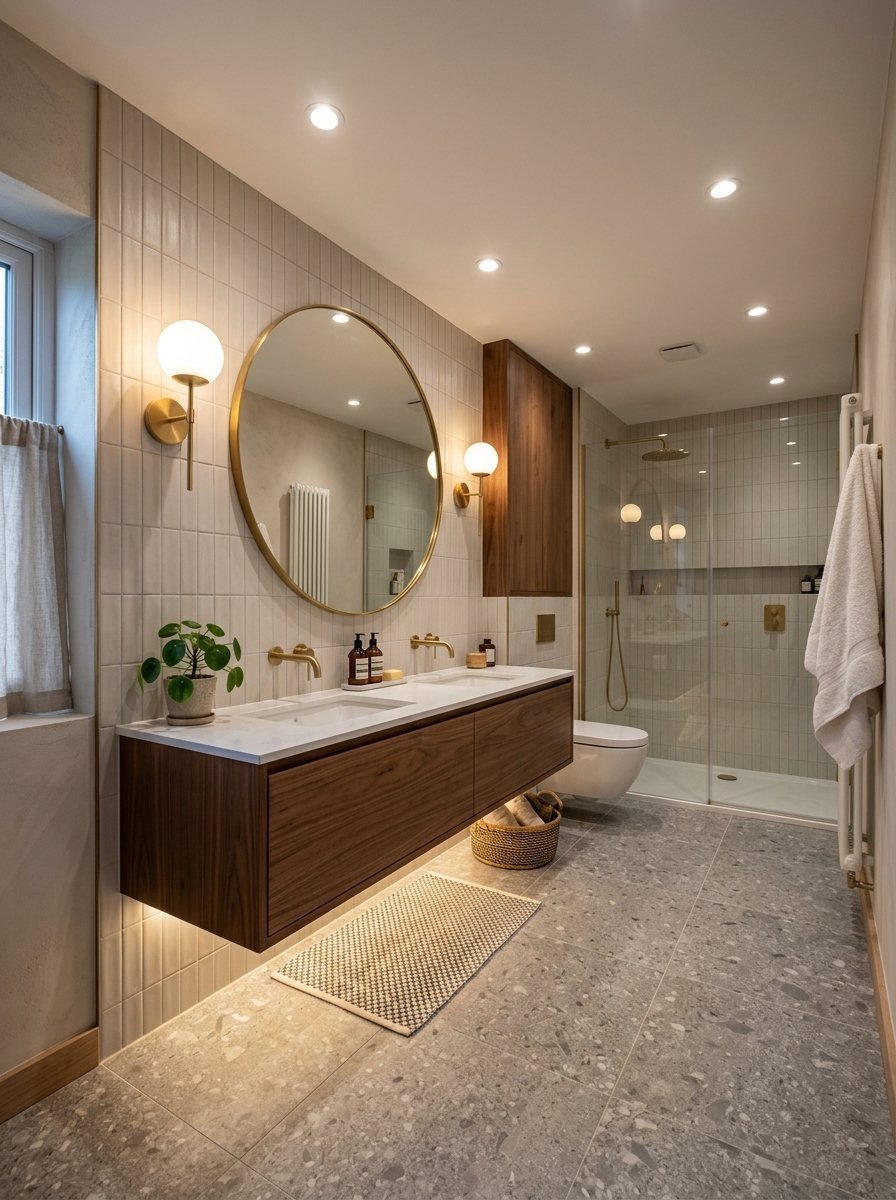
I always tell friends to think in three layers. You need ambient and task and accent illumination for a complete look. I tried skipping ambient fixtures once to save money. The room felt like a dark cave. Ambient fixtures fill the whole room. Task fixtures help you see at the sink or in the shower. Accent fixtures highlight beautiful tile or art on the wall. You need all three working together. This layered approach fits any modern luxury plan perfectly. I buy flush mounts for ambient fill. I buy sconces for task work. I buy small LED strips for accents. This three part system makes the room feel much larger than it actually is. You spend about $800 total for all three layers. You get a space that rivals any five star hotel.
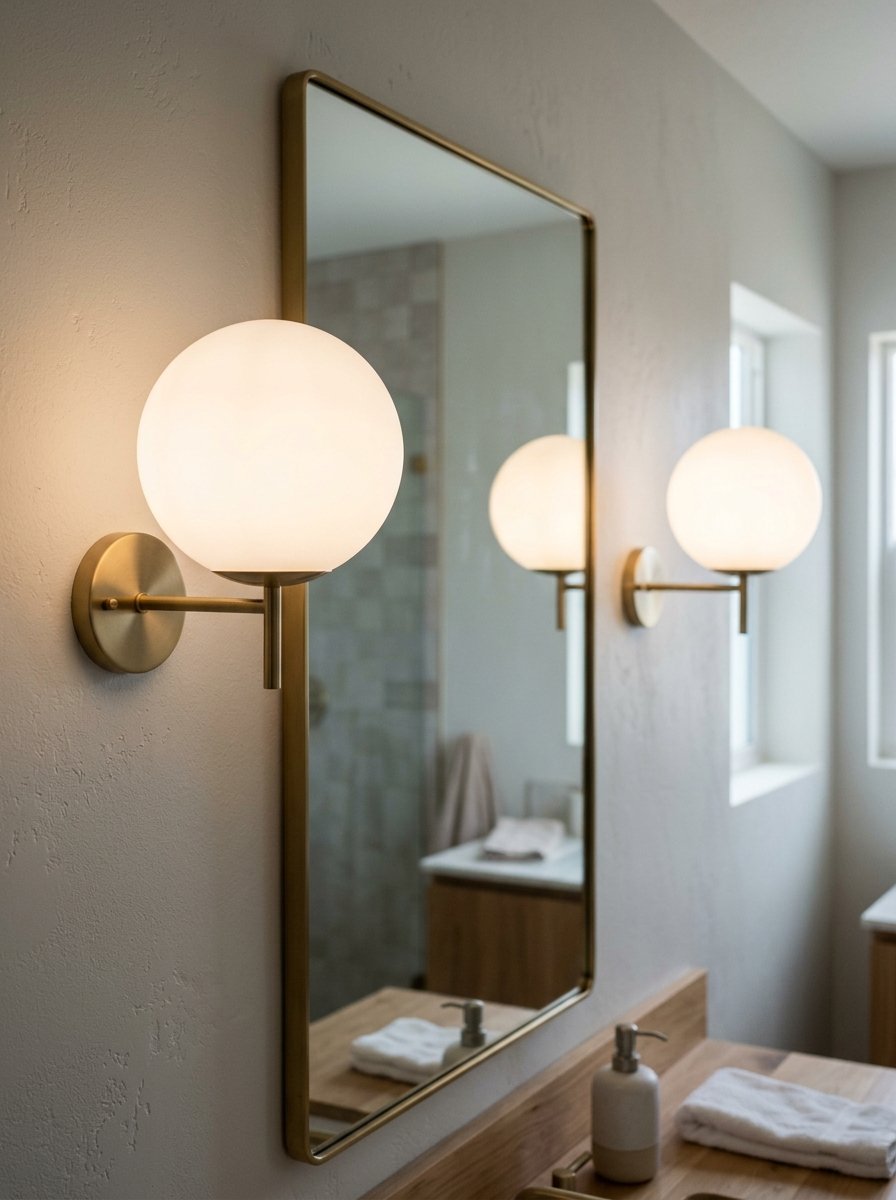
3. Backlit LED Mirror Placement
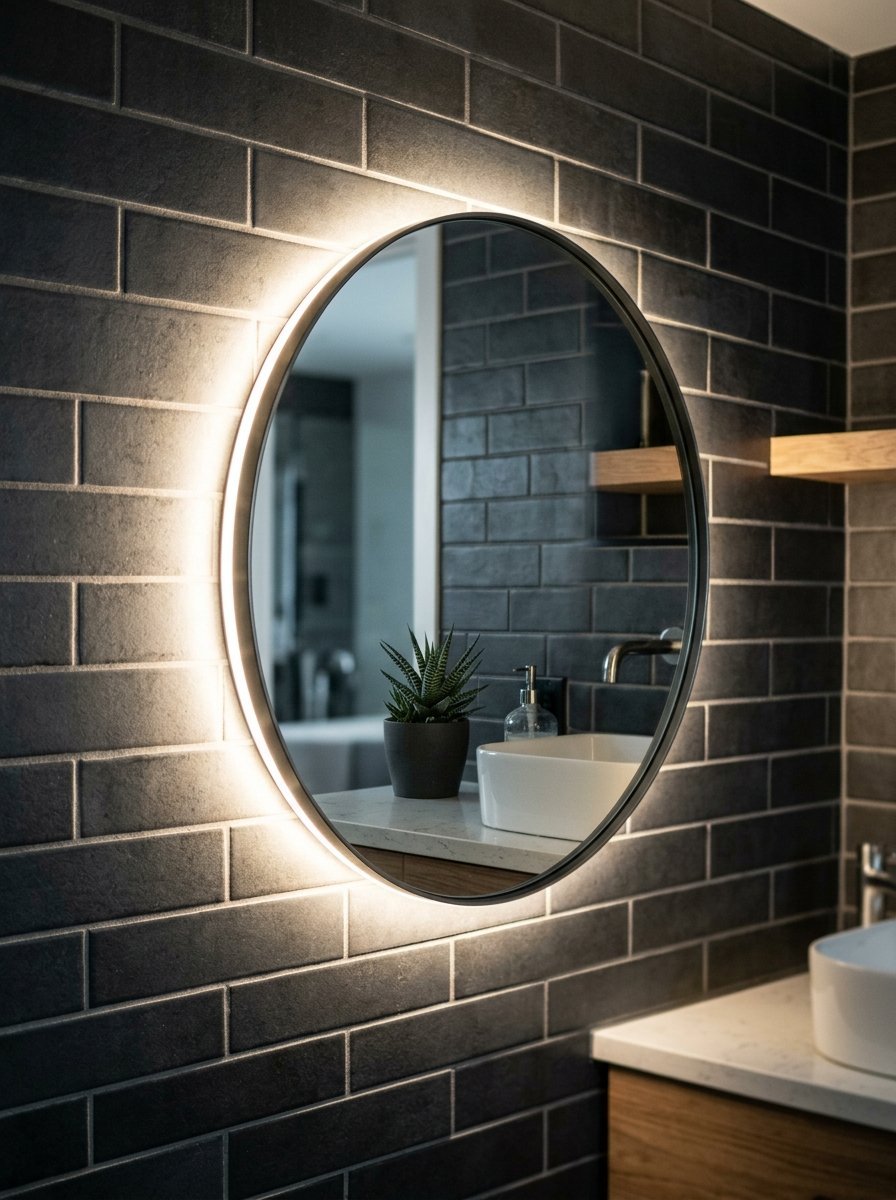
A backlit mirror gives a glowing and floating aesthetic on your wall. This looks incredibly sleek in a modern space. The light shines out from behind the glass. It bounces off the wall and casts a soft halo. You get plenty of brightness without blinding yourself. Be careful how you treat these surfaces. Last year I wiped my main vanity glass with a dry paper towel. The friction left fine scratches and ugly lint behind. I ruined a $600 piece instantly. Now I strictly buy high grade microfiber cloths and plain water. Brands like Kohler manufacture excellent backlit mirrors. Expect to pay between $500 and $1200 for a quality unit. You plug them directly into a standard wall outlet. You get instant hotel vibes in your own house.
4. Drop A Statement Pendant
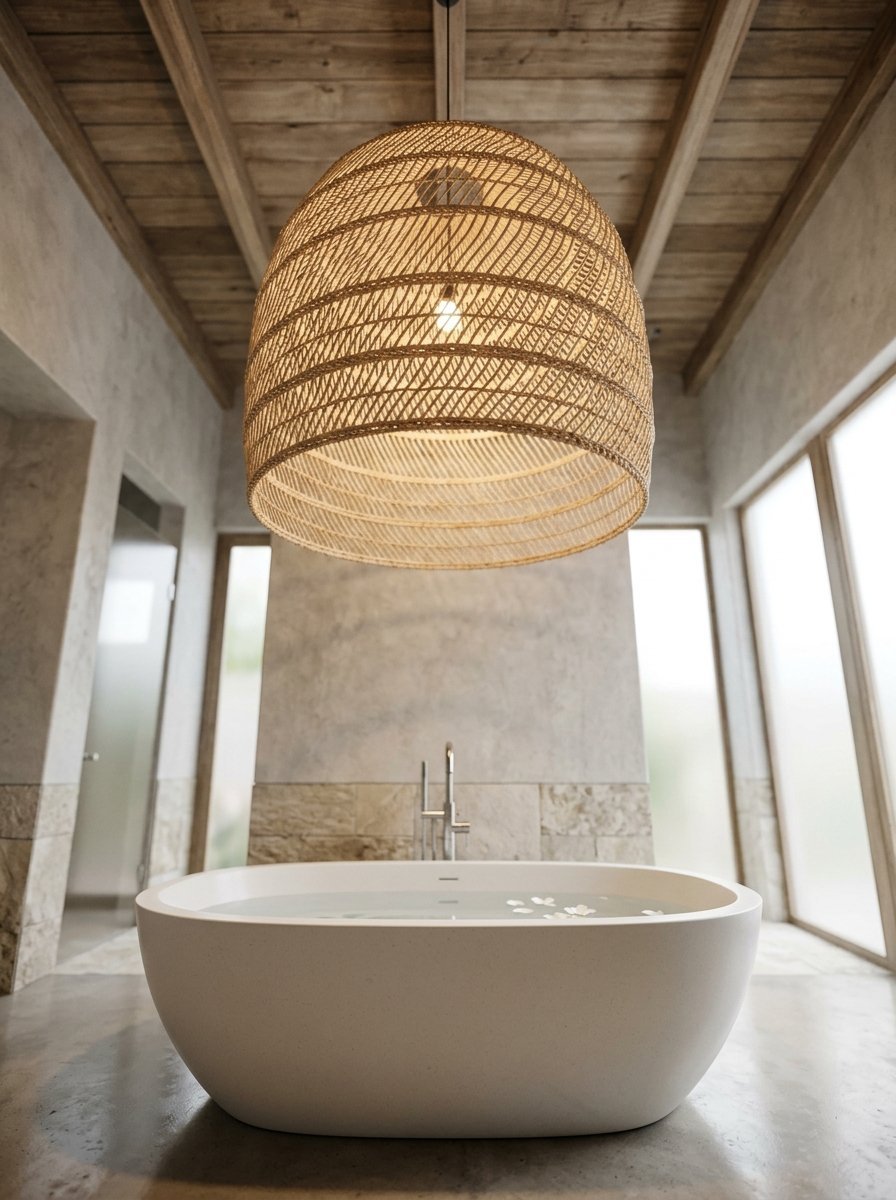
Pendants look amazing over a freestanding bathtub. They draw the eye up and make the ceiling feel taller. I love oversized woven baskets or blown glass spheres. You must check your local building codes first. Most cities mandate the fixture to sit at least eight feet above the highest part of the tub rim. This keeps you safe from electrical shocks. I buy oversized pendants from Arteriors. Their designs look very custom. A large pendant makes the entire room feel anchored. It serves as the main focal point when you walk through the door. This works wonderfully for large master suites with tall ceilings. You spend around $600 for a stunning center piece. You completely alter the entire mood of the room.
5. Recessed Shower Fixtures
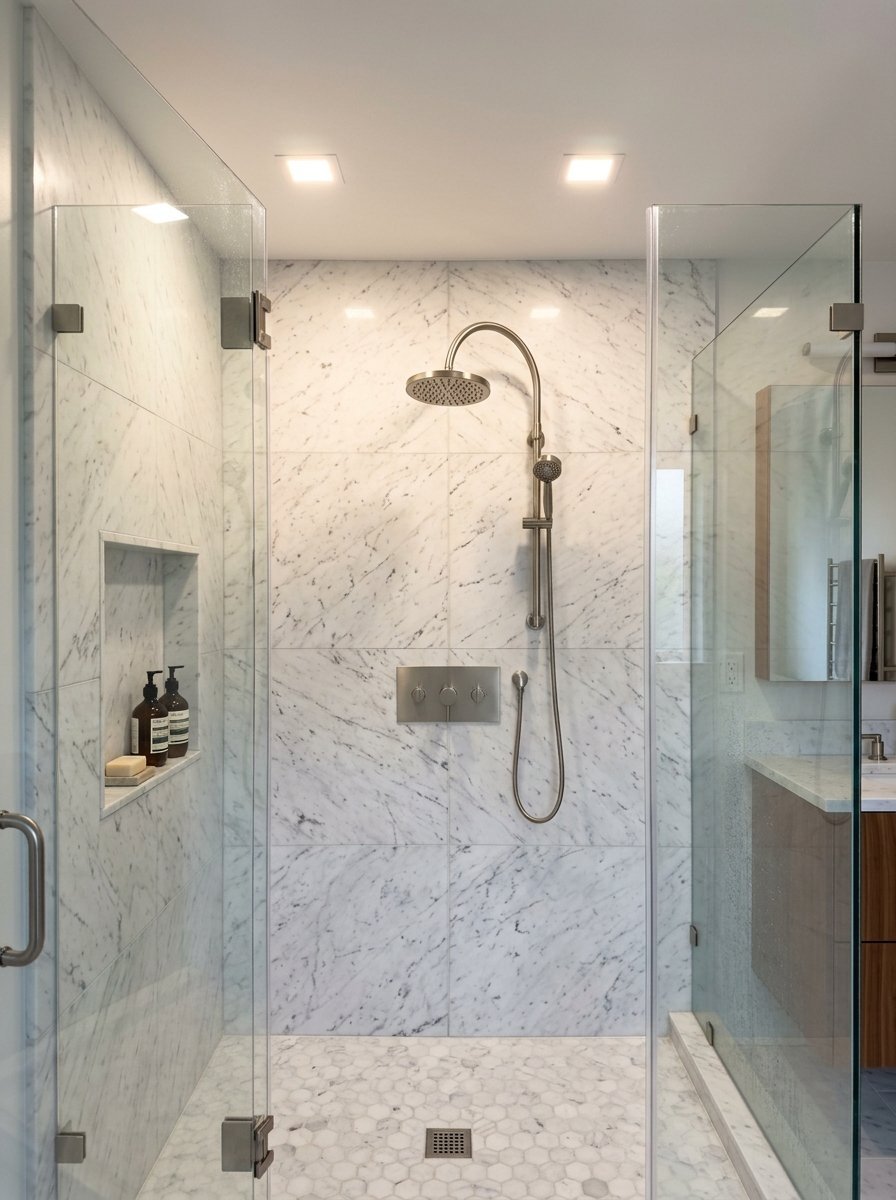
Showers get dark quickly behind glass doors or curtains. You need dedicated illumination inside the shower enclosure. I put two small recessed cans in the ceiling of the shower. I make sure they carry a wet rated safety label. This means they handle direct water spray without shorting out. I space them evenly to eliminate shadows in the corners. I want to keep my space looking like a true Vida De Luxo home. Dark showers ruin that high end luxury feel instantly. I buy trimless cans from Lotus LED Lights. They blend perfectly into the ceiling drywall. They cost about $60 a piece. You hire an electrician for two hours to wire them up. You never shower in a dark corner again.
6. Under Cabinet Night Glow
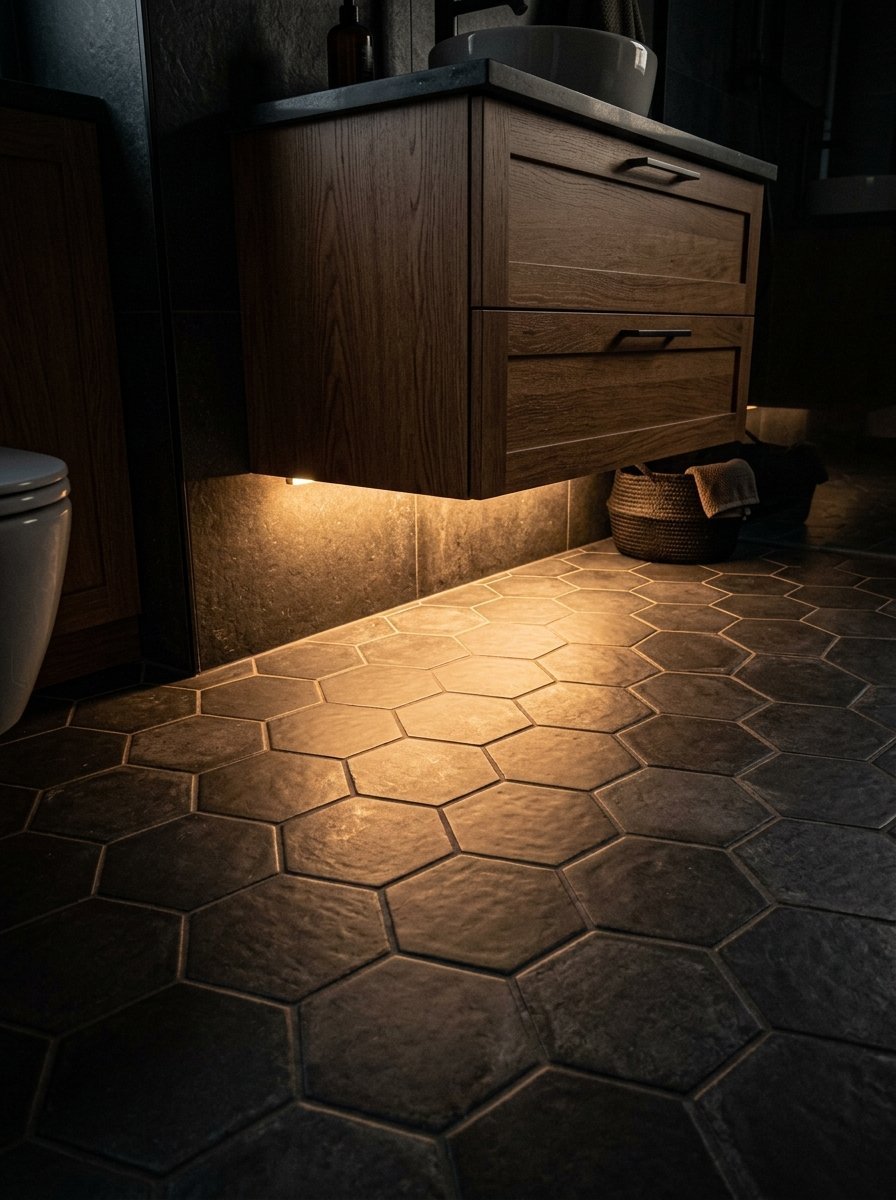
Nobody wants to turn on a bright overhead bulb at two in the morning. It ruins your sleep cycle. I mount thin LED tape lights directly underneath the floating vanity cabinet. This casts a soft pool of brightness on the floor. It guides you safely in the dark without waking you up completely. Philips Hue manufactures a waterproof light strip for this. You change the color with your phone. I set mine to a very dim warm orange at night. It looks beautiful over textured floor tiles. This setup costs less than $100 to do yourself. You peel the backing off and stick it under the wood. You get a custom detail that guests will compliment constantly.
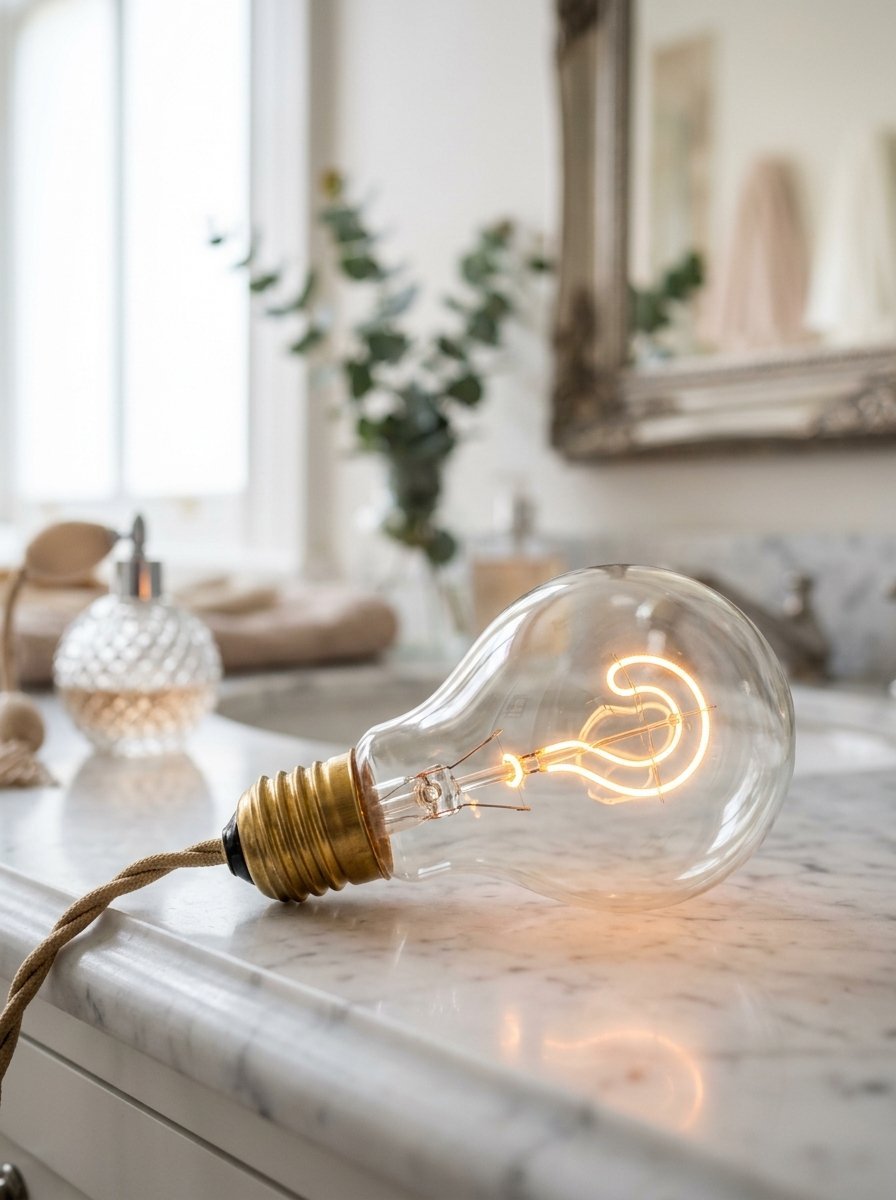
7. Warm Dimming Bulbs
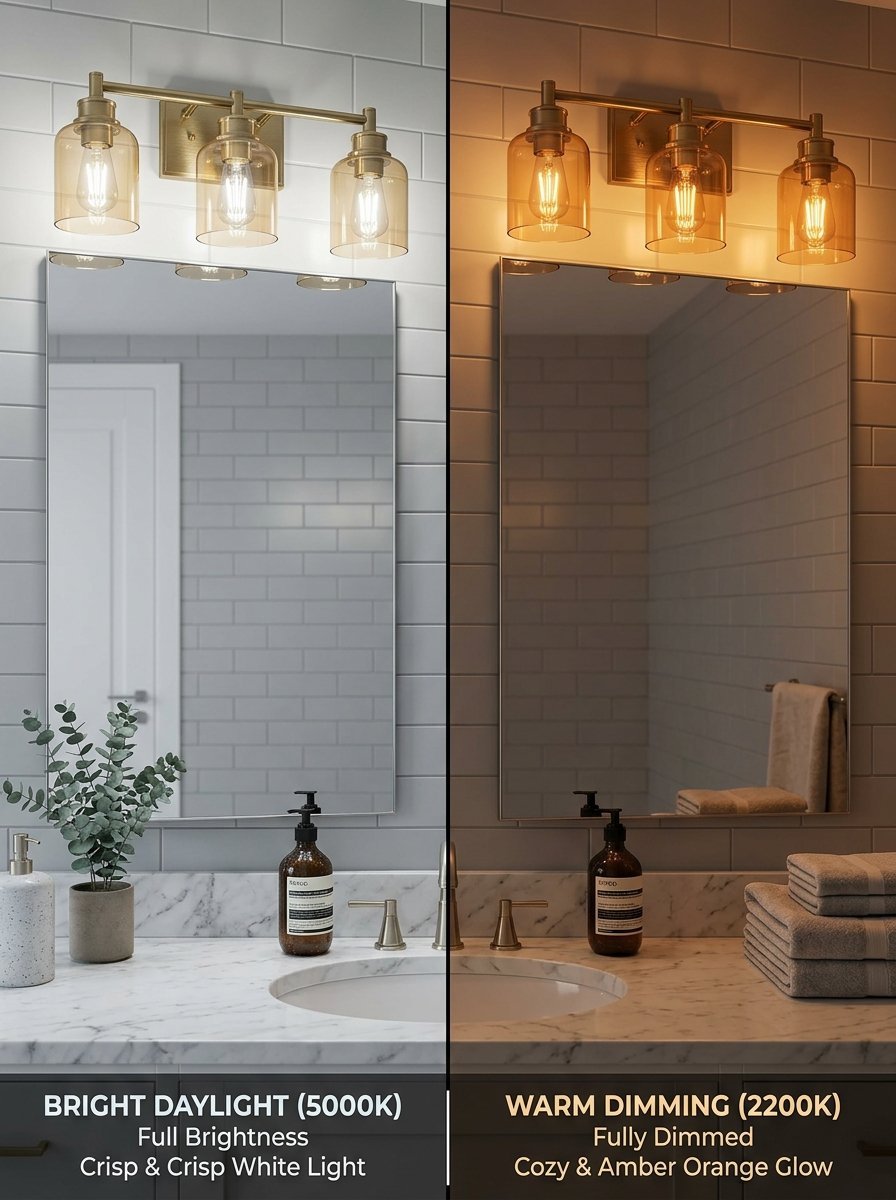
Standard LED bulbs turn a weird gray and blue color when you dim them. They make human skin look sick. You must buy fixtures with warm dimming tech. As you lower the brightness the light actually gets warmer and more orange. It mimics the glow of a candle or a sunset. I strictly use Nora Lighting warm dim fixtures. I pair them with a Lutron Caseta smart dimmer switch. You get bright white light for cleaning during the day. You get a relaxing warm glow for baths at night. This small detail separates cheap renovations from professional designs. You spend about $40 per bulb for this feature. You completely alter how the room feels after dark.
8. Unlacquered Brass Fixtures
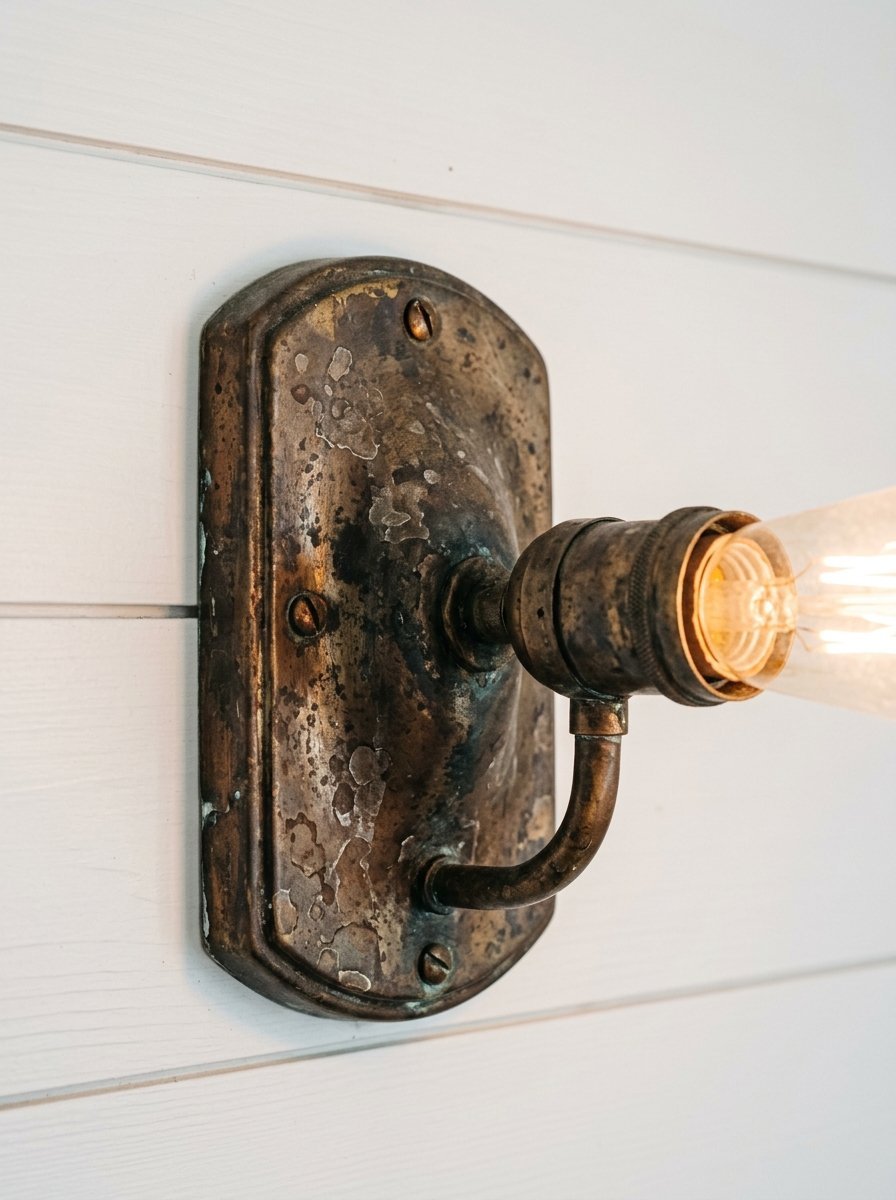
Polished chrome can feel very cold and clinical. I love unlacquered brass sconces to warm up a space. The metal ages and patinas over time. It gains dark spots and character. This gives the room a lived in and custom feel. You must clean these carefully. I once ruined a vintage gold painted wood frame with a vinegar spray. The acid peeled the gold paint right off the wood. Brass reacts similarly to harsh chemicals. Only use warm water and a soft cloth on unlacquered brass fixtures. Schoolhouse Electric sells beautiful brass sconces. They average $250 each. The warm metal tones reflect the light beautifully. You get a timeless look that never goes out of style.
9. Matte Black Industrial Sconces
Black fixtures give a room sharp contrast and graphic punch. They look incredible against white subway tile or light marble. I lean toward matte black finishes over glossy black. Matte black hides fingerprints and water spots much better. Moen offers a great line of matte black lighting that matches their plumbing fixtures. This creates a very cohesive look. The bold lines stand out cleanly. Expect to spend around $150 per fixture for good quality. Black fixtures will never go out of style. They ground the entire room visually. You get a very modern aesthetic without spending thousands of dollars. You simply swap out your old fixtures for new black ones.
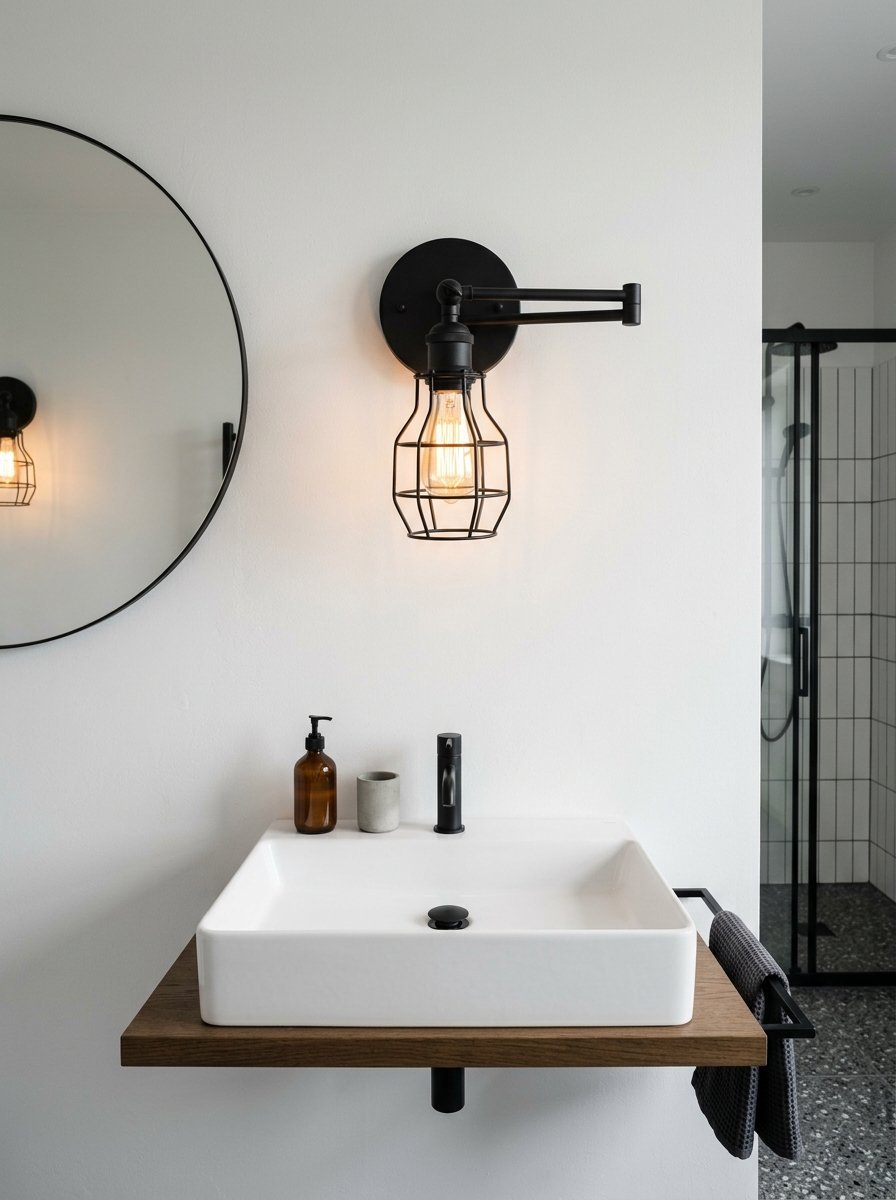
10. Articulating Arm Sconces
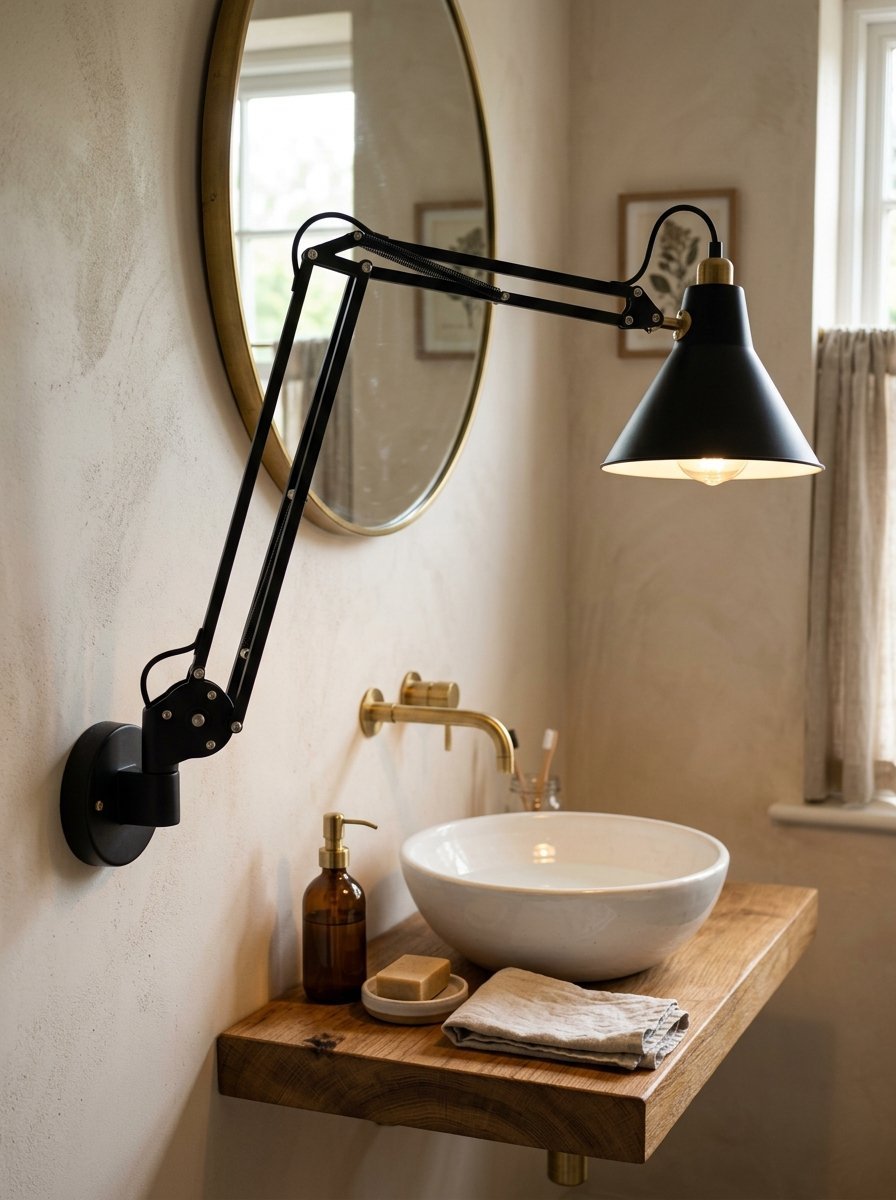
Sometimes you need light in a very specific spot. Articulating sconces have joints that let you move the bulb around. You pull the light close for shaving. You push it back against the wall for general room light. I install these in guest washrooms frequently. They give visitors control over their environment. CB2 sells modern articulating sconces for under $200 dollars. I mount them slightly higher than standard sconces to allow room for the arm to swing. They look very mechanical and interesting. They serve a real functional purpose while looking like custom art pieces. You impress your guests with this highly functional hardware. You get industrial styling paired with pure convenience.
11. Picture Lights Over Glass
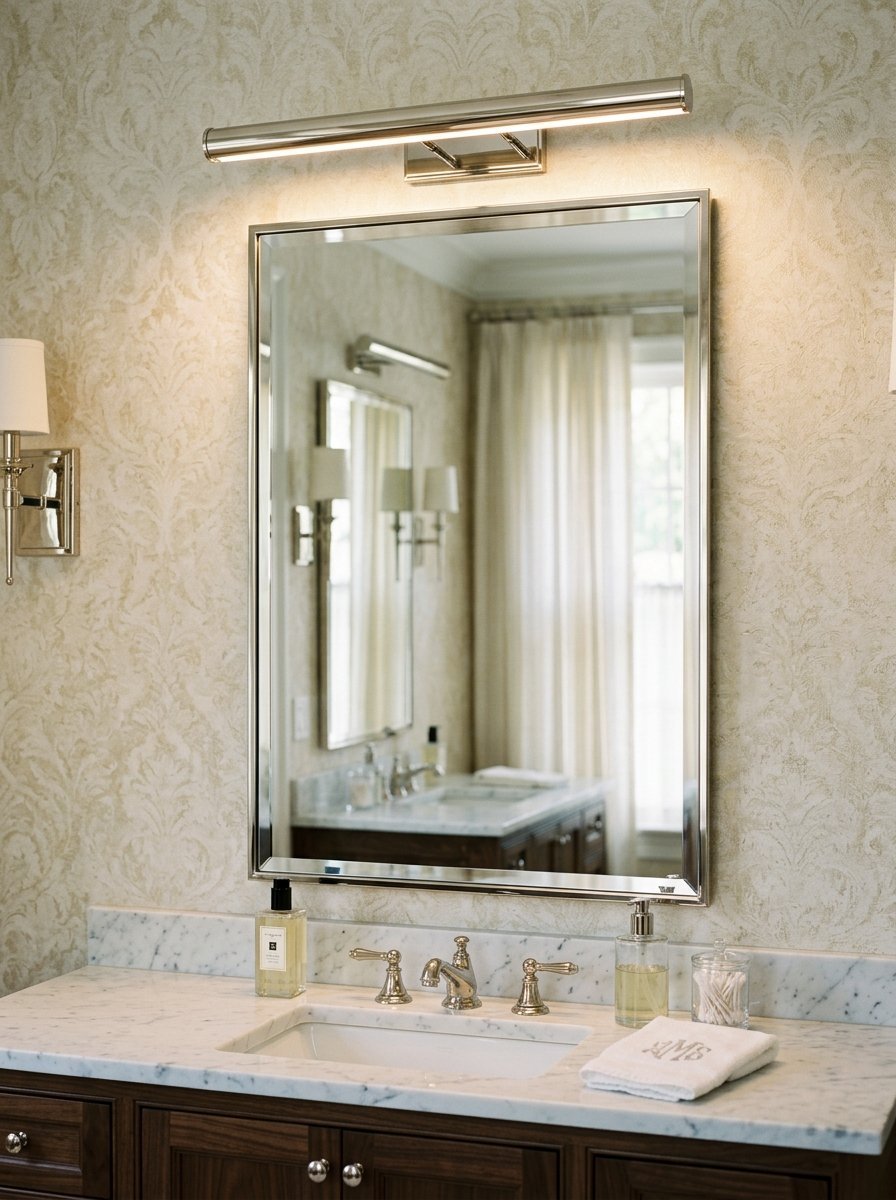
People usually put picture lights over paintings. I love putting them over bathroom mirrors instead. It provides a very classic and tailored look. The light washes directly down the face of the glass. This works perfectly for a narrow layout where wall space is tight. You only need space above the mirror and not on the sides. I prefer the Hudson Valley Lighting picture lights. They have a slim profile that does not block the ceiling. You can find them for about $300 dollars. This choice feels very unexpected in a washroom setting. It instantly elevates the room to a designer level. You get a rich and moody aesthetic that looks incredibly expensive.
12. Asymmetrical Fixture Layouts
Symmetry is safe. Asymmetry feels highly memorable. I sometimes hang one large pendant on the left side of the vanity. I leave the right side completely bare. This breaks the rules in a very intentional way. You must balance the visual weight with something else. I place a tall vase of branches on the empty side. This causes tension and interest in the room. It looks bold and confident. I buy a heavy concrete or ceramic pendant for this layout. The solid material grounds the off center placement. It makes the whole room feel like a boutique hotel. You break away from boring traditional layouts. You show real design confidence.
13. Decorative Flush Mounts
Recessed cans are highly functional but they lack personality. I swap out the center recessed can for a beautiful flush mount fixture. It sits tight against the ceiling but provides a decorative element. I love wide brass drums with frosted glass diffusers. They push soft light across the ceiling plane. Rejuvenation sells an amazing selection of mid century flush mounts. They cost between $300 and $500 dollars. This fixture acts as the jewelry of the room. You look up and see a beautiful design instead of a plain white hole. It changes the entire ceiling layout instantly. You get a very custom look with minimal electrical work.
14. Glass Globe Diffusers
Exposed lightbulbs hurt your eyes. You always want something to diffuse the light source. Milk glass globes do this perfectly. They scatter the light evenly in all directions. The room fills with a soft and glowing ambiance. I buy fixtures from Flos that feature perfect white glass spheres. They look like glowing moons on the wall. They never cast harsh shadows on your face. You find affordable versions at West Elm for around $100 dollars. The round shape softens all the hard right angles found in most washrooms. The contrast between square tiles and round globes looks fantastic. You get highly flattering illumination for a very low price.
15. Fluted Glass Shades
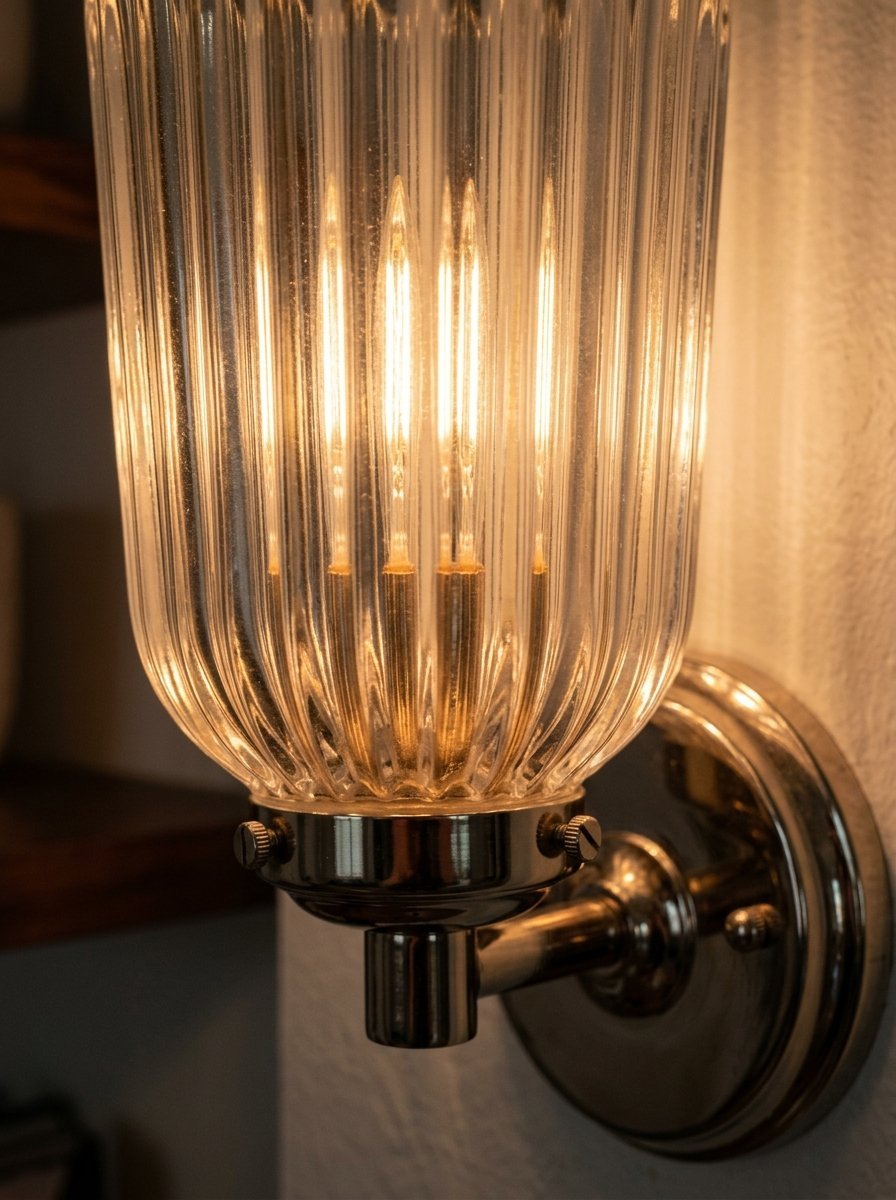
Clear glass looks cheap. Fluted glass looks highly intentional and custom. The vertical ridges in the glass bend the light beautifully. You get the brightness of clear glass without the glare of a bare bulb. This texture gives massive visual interest to the wall. I look for sconces with heavy cast glass shades. They feel substantial to the touch. This fits very well with a vintage or classic transitional style. It reminds me of 1920s architecture. You pair fluted glass with polished nickel hardware for a very clean and crisp look. It reflects the light back onto the wall behind it. You get a sparkling and glamorous aesthetic that fits perfectly in a master suite.
16. Double Arm Wall Sconces
If you have a long double vanity you need more light. A single sconce between the mirrors is never enough. I use double arm sconces instead. One backplate connects to the wall holding two separate bulbs on arms. This puts out twice the light from a single electrical box. It saves you money on electrician fees. You get the most brightness with minimal drywall damage. Visual Comfort makes gorgeous double sconces. They cost around $600 dollars but you only need one between two mirrors. This is a very smart way to handle wide and sprawling vanity setups. You get perfect symmetry and plenty of brightness for two people.
17. Natural Sunlight Placement
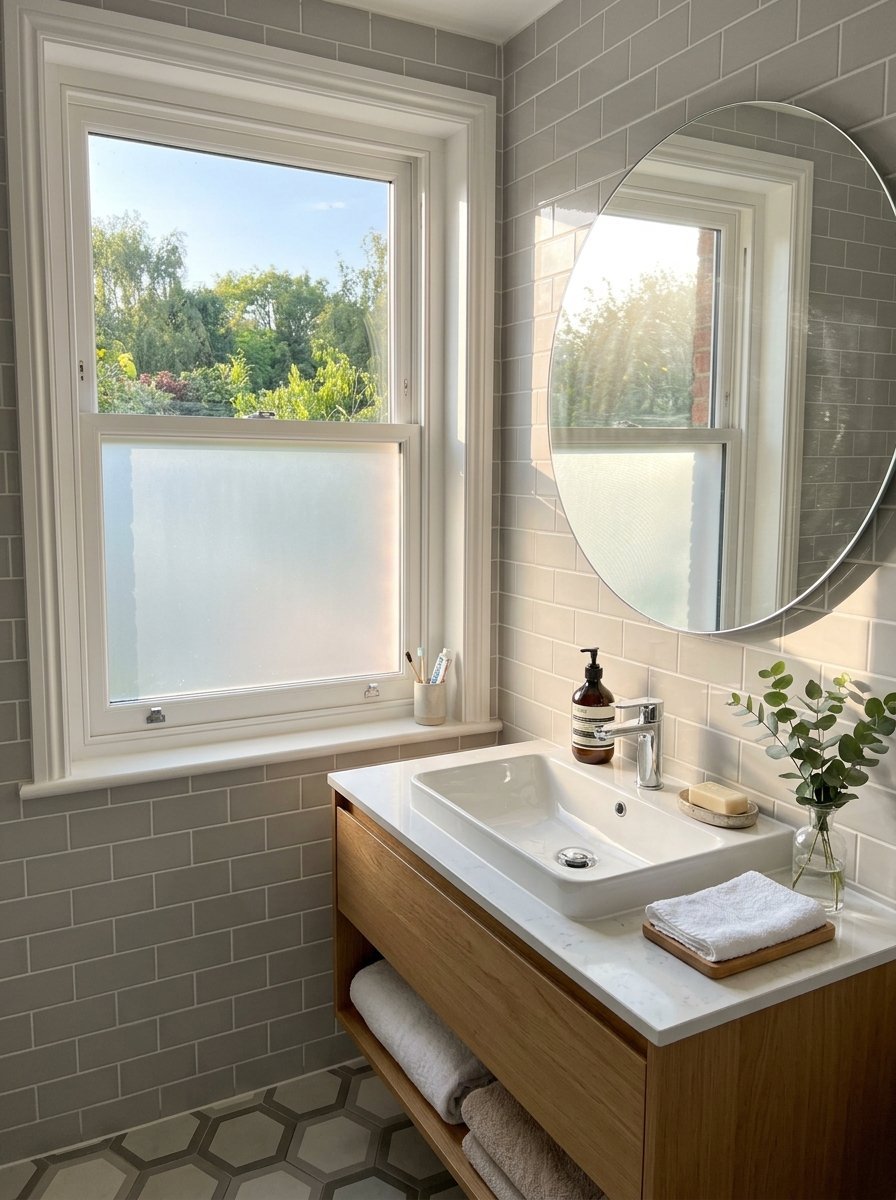
No artificial bulb beats actual sunlight. You must plan your layout around the windows. Do not block the natural light with tall cabinets. Moisture management near windows requires constant attention. I saw moisture destroy a beautiful decorative piece in my hallway in 2023. Bathrooms trap even more water. Use sealed windows and keep the frames clear. Place your vanity near the window if possible. The morning sun makes getting ready a joy. I use frosted window film on the bottom half of the glass. You keep your privacy while letting the light pour in through the top. This costs about $20 dollars at a hardware store.
18. Integrated Drawer Illumination
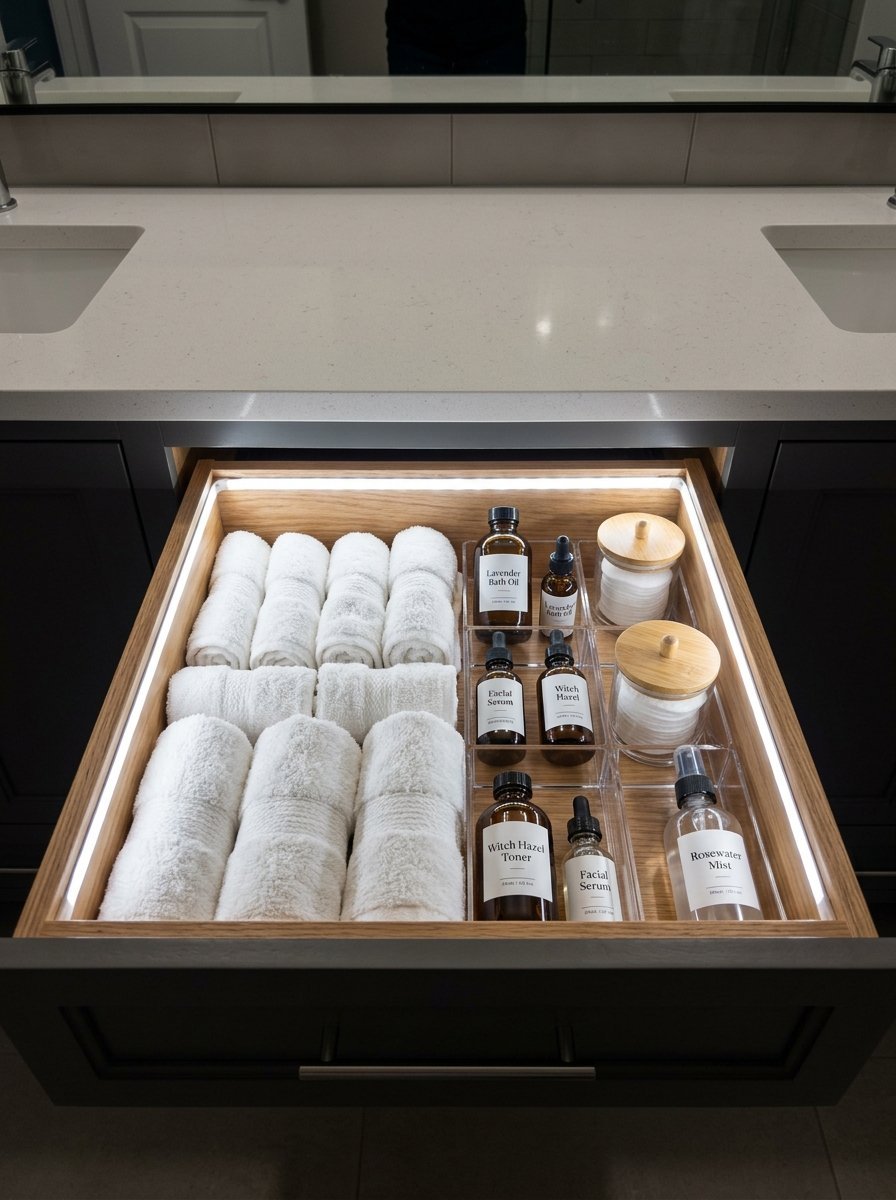
Digging through dark drawers is frustrating. I install small battery powered motion lights inside my vanity drawers. You pull the drawer open and the inside lights up instantly. You see every tube of toothpaste and every makeup brush clearly. I buy these on Amazon for $15 dollars a pack. They attach with a simple adhesive strip. No wiring required. This feels like a $10000 dollar custom cabinet upgrade. It takes exactly five minutes to install. I put them in deep bottom drawers and shallow top trays. The light makes organization incredibly easy. You never blindly dig around in the dark again.
19. Floor Level Wash Lighting
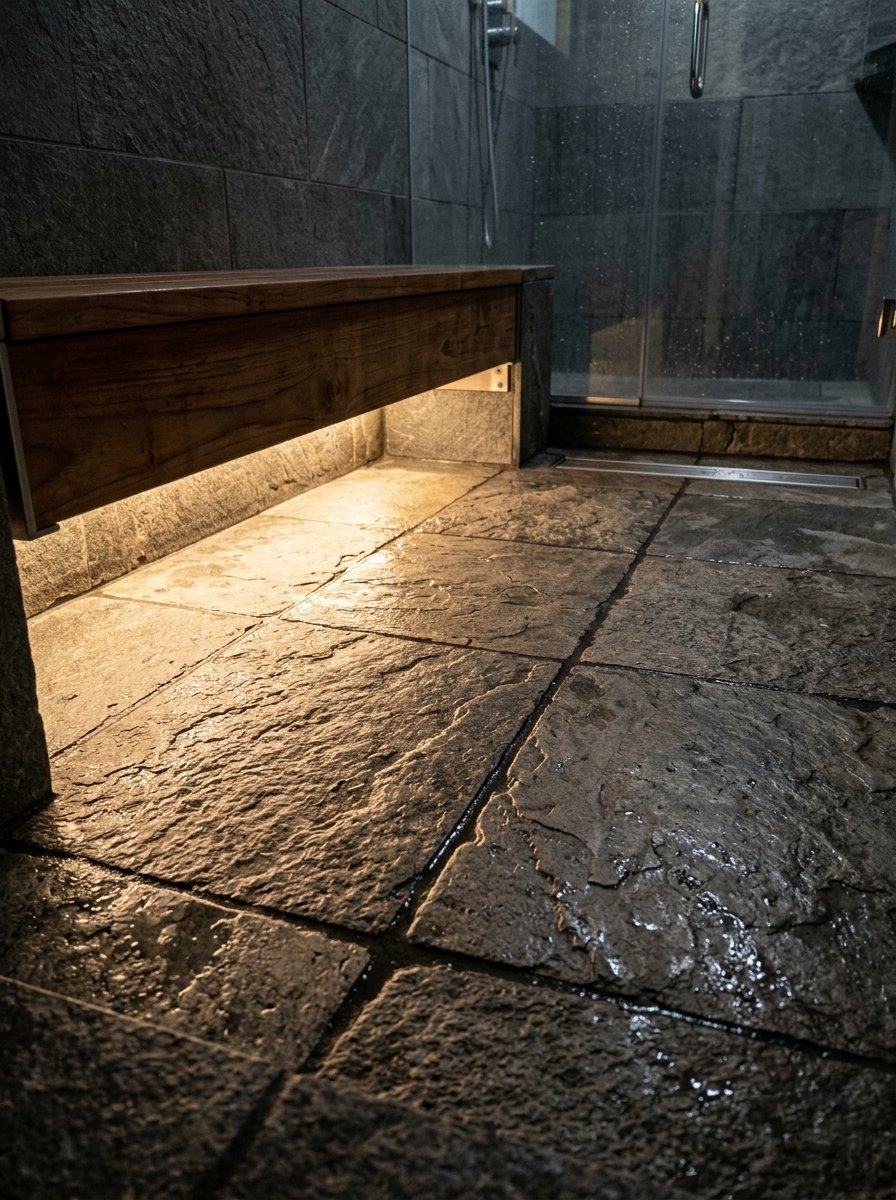
I love washing the floor tiles with light. I hide LED strips behind the baseboards or under a floating bench in the shower. The light grazes across the floor surface. It shows off the texture of natural stone or the grout lines in penny tile. It makes the floor feel like it is glowing from underneath. I strictly buy IP65 rated waterproof strips for this. You must keep the light source completely hidden from view. You should only see the glow and never the diodes. This works beautifully in modern and minimalist spaces with concrete or dark slate floors. You spend about $80 dollars for the strips and totally change the room.
20. Reclaimed Wood Fixtures
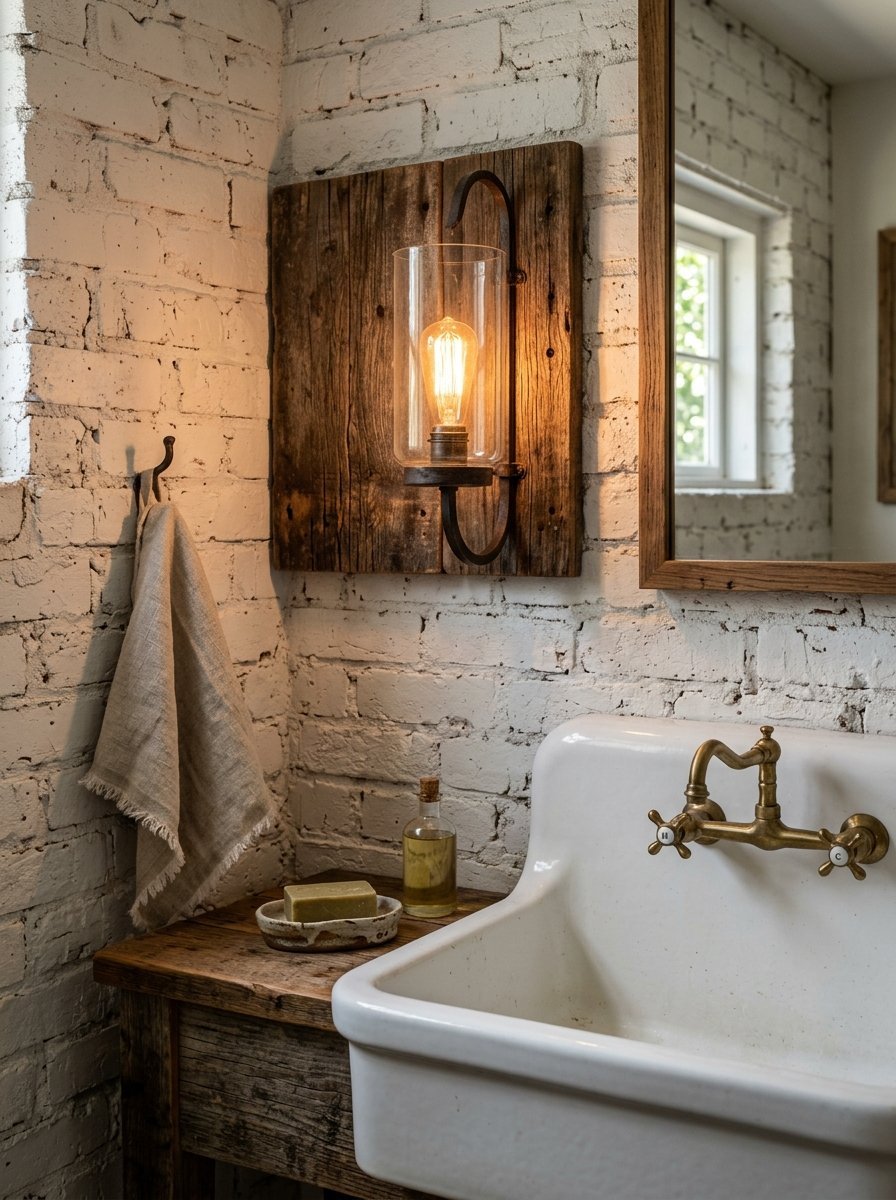
You might want a rustic touch in your lighting choices. A cottage core aesthetic relies heavily on raw materials. I try to incorporate natural wood where I can. Three months ago I threw a fresh piece of pine right into the trash. I tried to craft a farmhouse welcome sign for my entry. I failed completely. Woodworking requires exact precision. I stick to buying finished wood fixtures now. West Elm sells gorgeous reclaimed wood sconces. They give you that perfect farmhouse feel without the frustration of making it yourself. They cost around $150 dollars each. The wood texture balances out all the cold tile in the room.
21. Strict Wet Zone Ratings
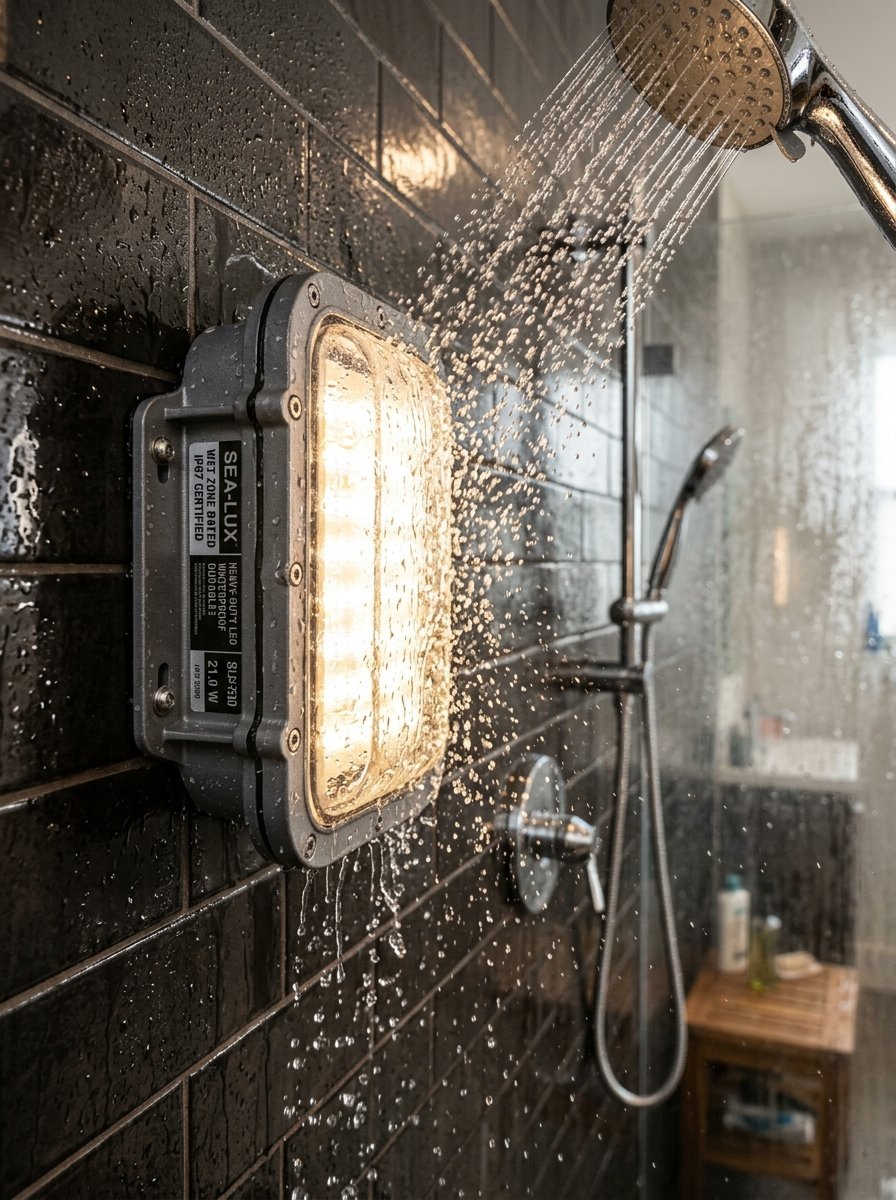
Safety always comes first with electricity and water. You cannot put a normal light fixture inside a shower or above a tub. You must check the IP rating of the fixture. IP65 or higher means it handles direct water jets. Damp rated fixtures handle steam but not direct spray. I always check the manufacturer spec sheet before buying anything. A beautiful light is useless if it causes an electrical fire. I strictly enforce this rule on all my projects. You pay a slight premium for wet rated fixtures. The peace of mind is worth every single penny. You protect your house and your family with this simple check.
22. Mixing Two Metal Finishes
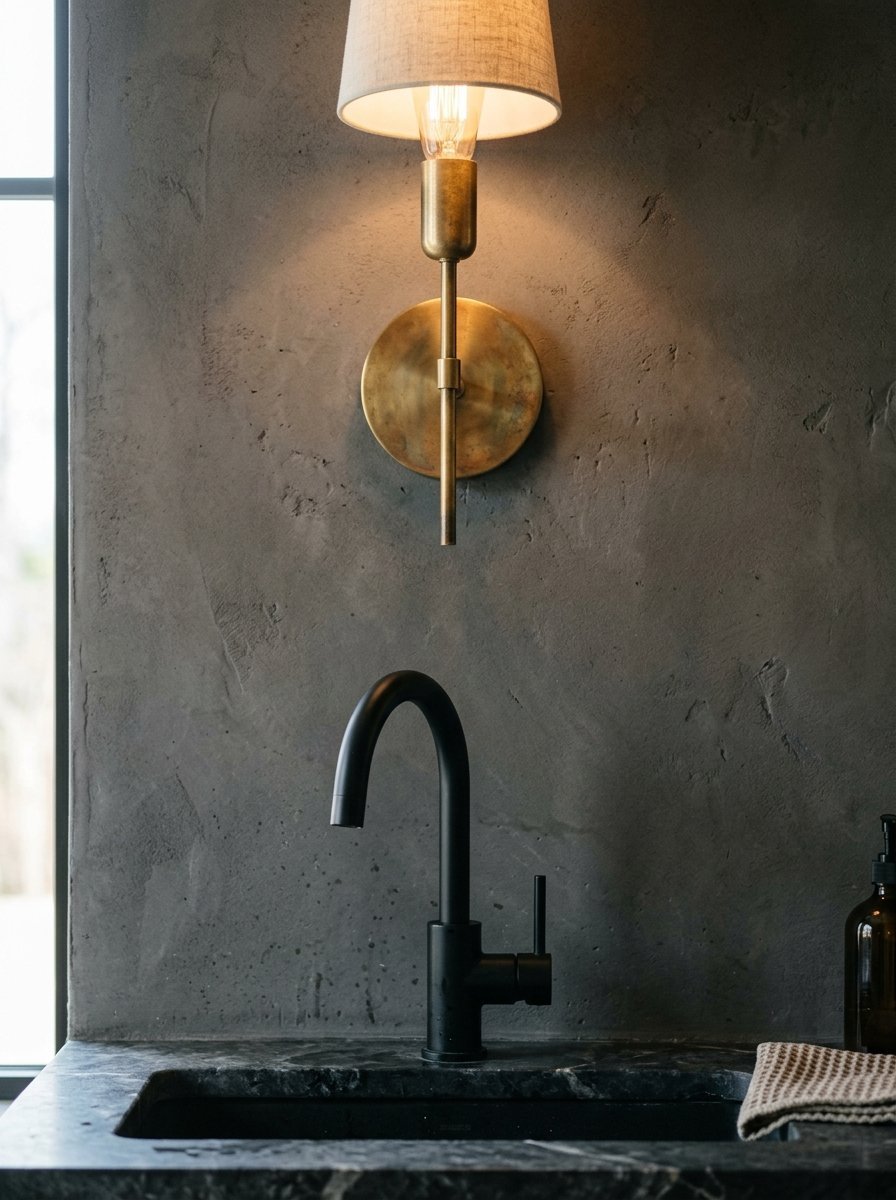
You do not have to match all your metals perfectly. That looks very dated and boring. I mix finishes to give the room depth. I might use a brass chandelier on the ceiling. I will use matte black sconces on the wall. I tie it together with a black vanity and brass cabinet pulls. The trick is sticking to exactly two metal finishes. Three gets chaotic. Two creates harmony. I aim for a seventy thirty split. Make one metal the dominant choice. Use the second metal strictly for accents. This keeps the design feeling intentional and highly curated. You get a designer aesthetic that looks incredibly custom.
23. Match Kelvin Temperatures
You must match the color temperature of every single bulb in the room. If your recessed cans are 4000K bright white and your sconces are 2700K warm yellow the room looks terrible. The light clashes and gives you a headache. I strictly buy 3000K bulbs for the entire washroom. This provides a clean and crisp white light that still feels slightly warm. It looks identical to halogen bulbs. Check the box before you buy. Manufacturers print the Kelvin number right on the front. Matching this number across all fixtures ties the entire room together beautifully. You get a cohesive glow that feels entirely professional.
Frequently Asked Questions
What color temperature works best at a vanity
Keep it right at 3000K. This mimics natural daylight very well. It gives your skin a healthy glow. Avoid anything higher than 4000K because it feels like a hospital. You want warmth without turning the room yellow. I always check the box for the exact Kelvin number before buying.
Can I hang a chandelier over a bathtub
You must check local building codes first. Usually the lowest part of the fixture must sit exactly eight feet above the tub rim. This prevents you from touching it while wet. Safety always comes first with electricity and water. Hire a licensed electrician for this specific job.
How many lumens do I need for makeup
Aim for 700 to 800 lumens per sconce at the vanity. This gives you plenty of brightness for detailed tasks. Put them on a dimmer so you can lower the output later. You need crisp light to match foundation colors accurately.
Should my sconces point up or down
Aim your sconces up to bounce light off the ceiling for soft ambient fill. Aim them down for direct task lighting. I prefer diffusers that push light equally in all directions. Milk glass globes work perfectly for this exact purpose.
How far apart should vanity sconces sit
Space them about 36 to 40 inches apart on the wall. Mount them so the center of the light hits 60 to 65 inches off the floor. This brackets your face perfectly. You eliminate all harsh shadows under your eyes with this spacing.
Final Thoughts On Washroom Illumination
Getting this right takes patience and careful planning. You must think about how you actually use the space daily. Do not just buy fixtures because they look pretty online. Think about shadows and color temperature and wet ratings. I lived with terrible lighting and I lived with great lighting. The difference to your daily mood is staggering. Start by flanking your mirror. Install dimmers on everything. Keep your color temperatures perfectly matched. You will craft a space that feels custom and expensive and completely yours. What lighting mistake drives you crazy in your own house right now? Let me know in the comments.

Amelia Hart is the Senior Design Editor at Vellora Interiors, where she curates small-space and apartment content. With a background in color theory and years spent designing under-500-square-foot rentals, she’s the editor who’ll tell you exactly which paint sheen, curtain length, and lamp height to choose, no guessing. A former design lead at a boutique studio, her work has been featured in several home and lifestyle publications. Her guiding belief: “Good design isn’t about more, it’s about choosing better.”