Last Tuesday I walked into my newly painted space. The overhead glare washed out every painted surface. I spent $400 on bedding. The cheap plastic bedside lights ruined the entire room. I replaced them with solid brass thrift store finds for $15 each. The space instantly felt expensive. High-end styling does not require a massive budget. A cozy bedroom relies on careful lighting choices. In my experience finding the right piece completely shifts the layout. I spent three months sourcing affordable options. I tested dozens of models in my own space. This guide shares exact items that elevate your space without emptying your wallet.
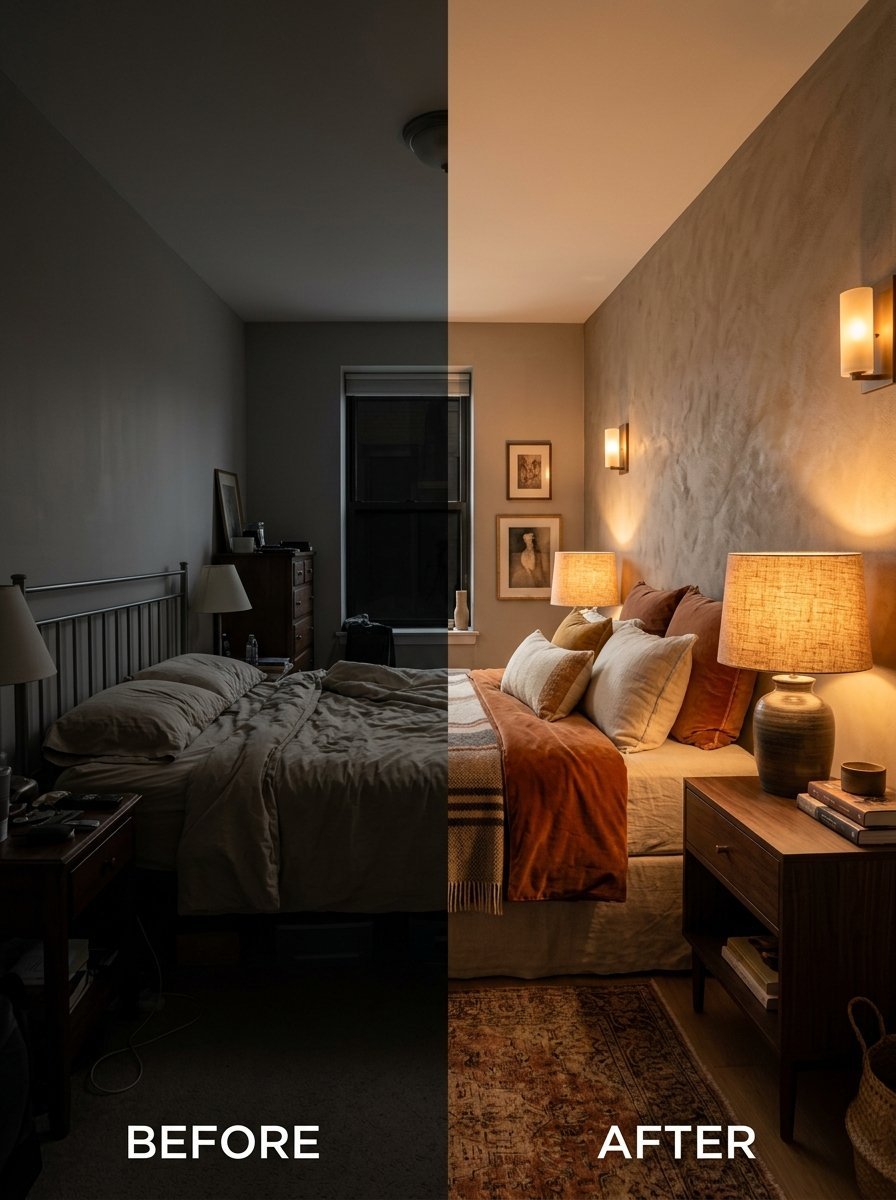
You will find specific budget-friendly options ranging from $15 to $75. I tested fixtures from Target, HomeGoods, and local antique shops. These choices span multiple aesthetics. We cover Bohemian rattan designs. We include Farmhouse distressed wood finishes. We feature Art Deco geometric shapes. I provide exact styling advice for tight spaces. Renters will see damage-free wall sconce hacks. I share maintenance routines to keep glass bases sparkling. You will get my exact paint matching trick for custom lampshades. Every single item below costs less than traditional high-end retail options. Upgrading your bedroom lighting is the fastest way to make the space feel curated and expensive.
1. Art Deco Brass Apothecary Lamps
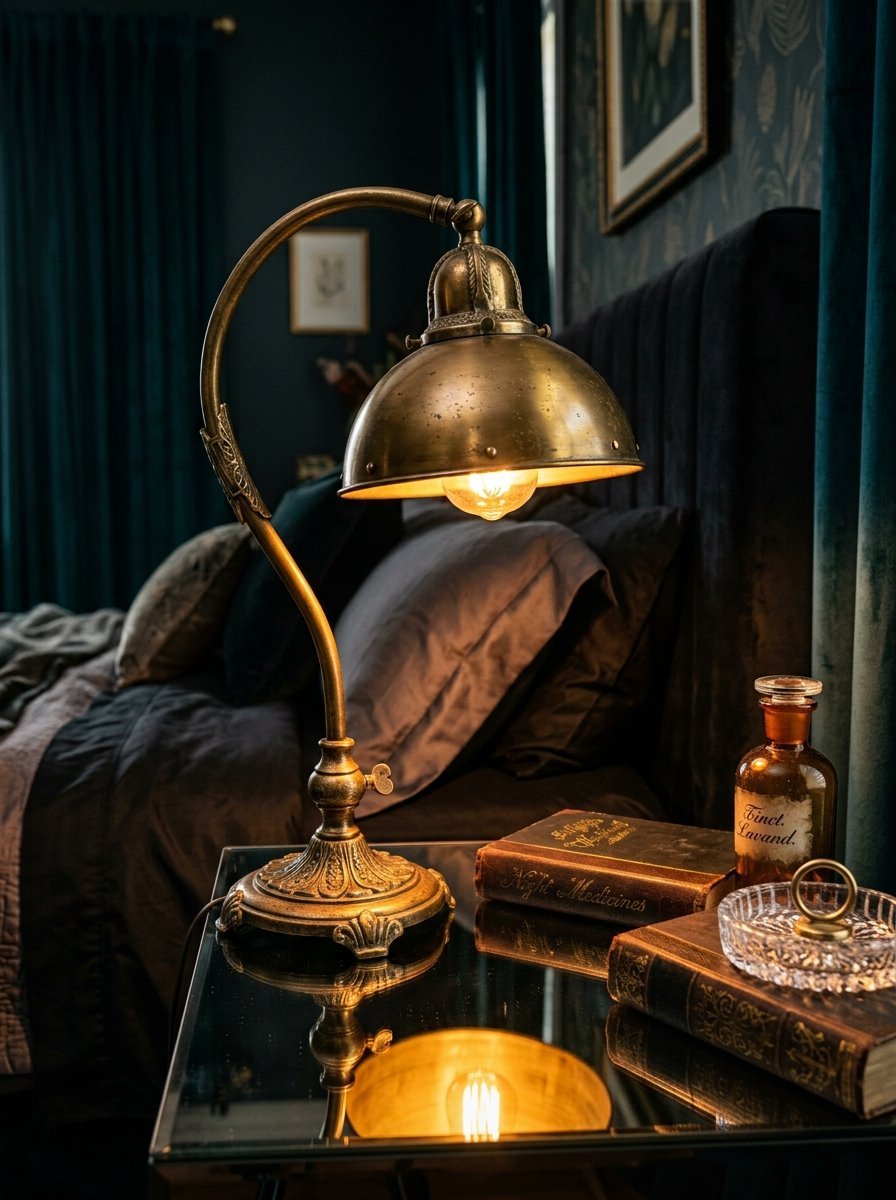
In my experience vintage brass instantly elevates a space. I found an arched brass apothecary light at a flea market for $20. Similar models at luxury retailers retail for $350. The heavy metal base prevents tipping. A directed metal shade focuses the beam for reading. This specific shape perfectly suits luxurious bedrooms. I styled one on a mirrored nightstand. The reflection doubles the warm glow. You can find excellent budget replicas at Target right now. The Threshold line offers a $45 version with a very similar profile.
My specific maintenance rules:
- Wipe metal weekly with a dry microfiber cloth.
- Use a damp Norwex towel for heavier smudges.
- Dry immediately to prevent water spots on the brass finish.
2. Bohemian Rattan Globe Lights
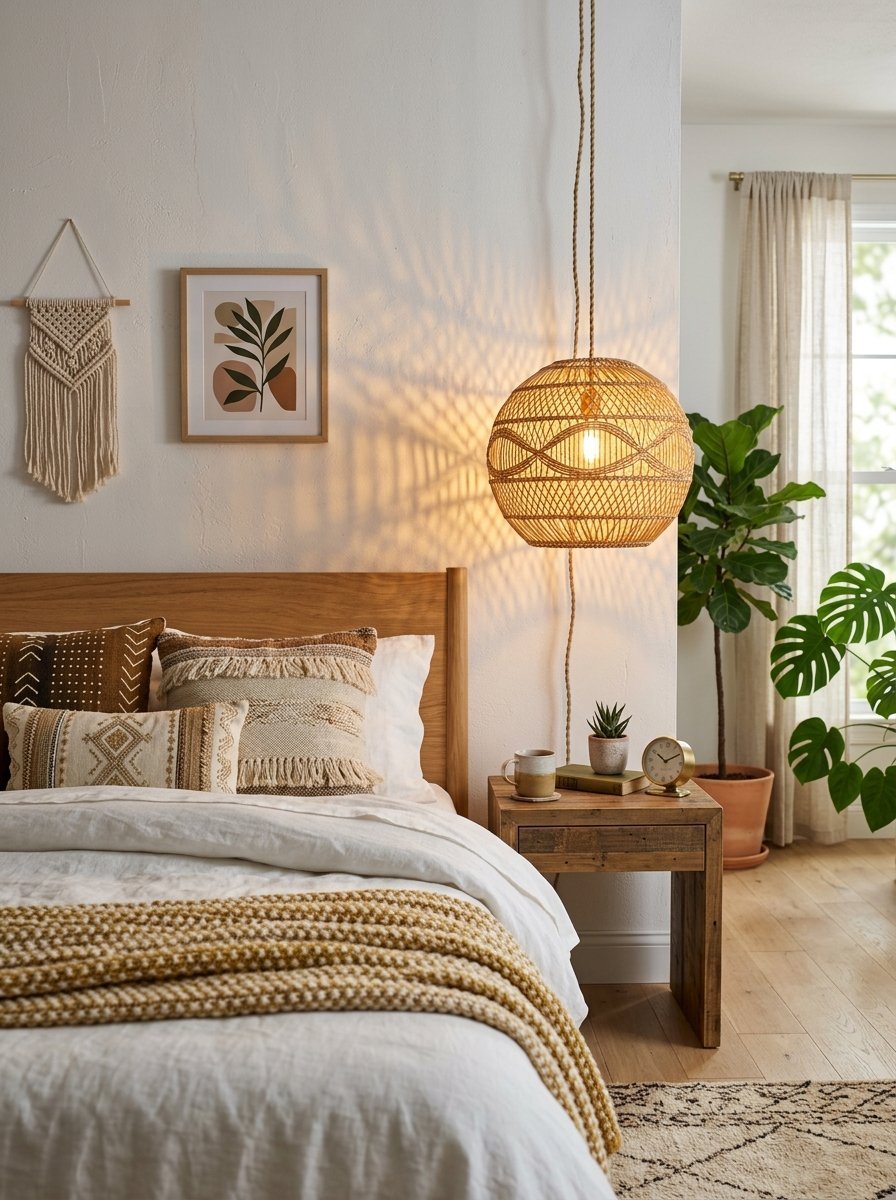
A cozy bedroom needs textural elements. Rattan globes cast beautiful patterned shadows across the ceiling. I bought a simple plug-in cord kit from Amazon for $12. I paired it with a woven basket from HomeGoods. I drilled a hole in the basket bottom. This $30 DIY project mimics a $200 designer pendant. The natural wood tones warm up cold white walls. I hung this setup in a client’s guest room last month. The woven texture perfectly complements a layered bed back design.
My installation steps:
- Screw a heavy-duty ceiling hook into a wooden stud.
- Drape the fabric cord loosely over the hook.
- Plug the end directly into a wall outlet behind the bed.
3. Farmhouse Distressed Wood Turned Lamps
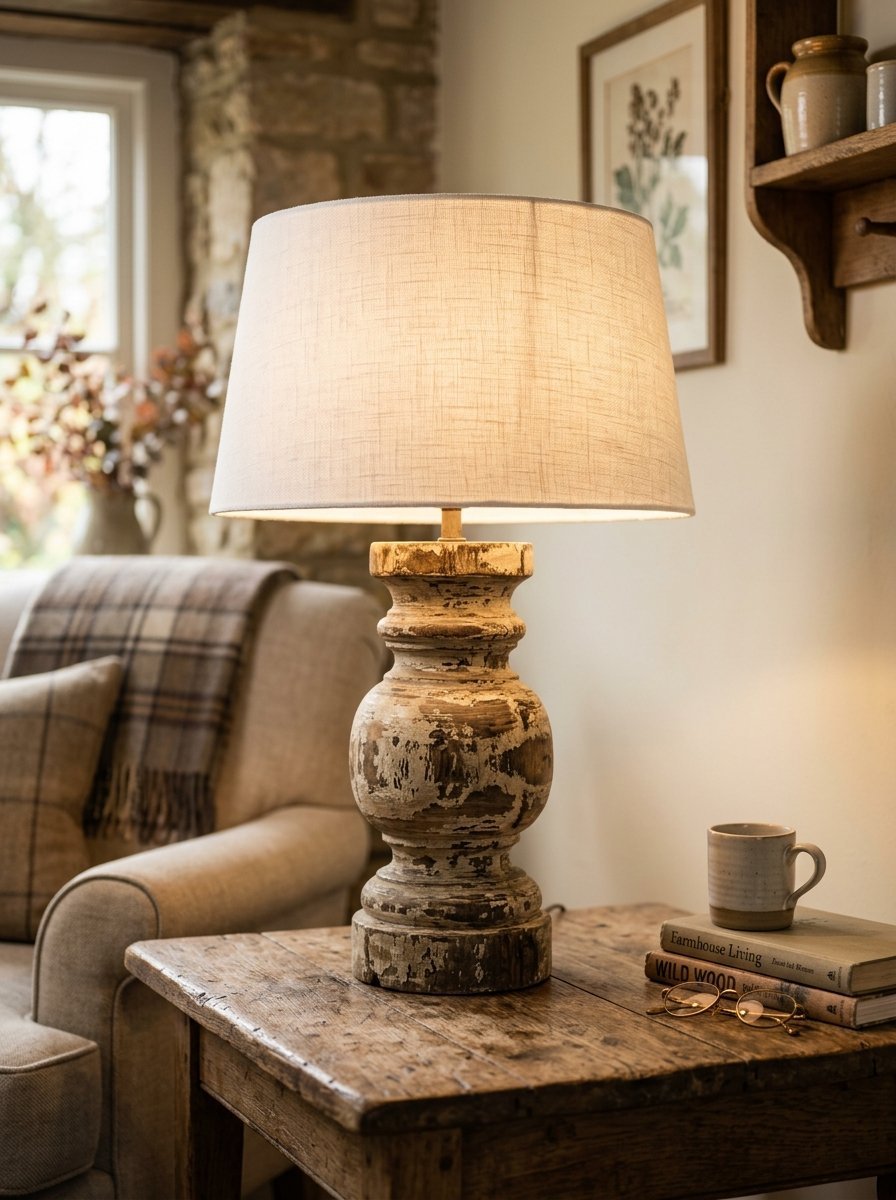
Chunky wooden bases supply grounding energy to your bedside. I prefer turned wood designs with subtle white washing. I tested the Better Homes and Gardens wooden table model from Walmart. It costs exactly $38. The weight feels incredibly solid. The natural grain peeks through the distressed finish. I matched this with a crisp white drum shade. The contrast looks incredibly high-end. In my experience cheap wood looks fake. You must look for actual solid wood bases.
My thrifting strategy for wood bases:
- Search local thrift stores for heavy ugly pieces.
- Sand the existing glossy finish completely off.
- Apply a clear matte wax to protect the raw wood.
4. Ribbed Glass Mushroom Lamps
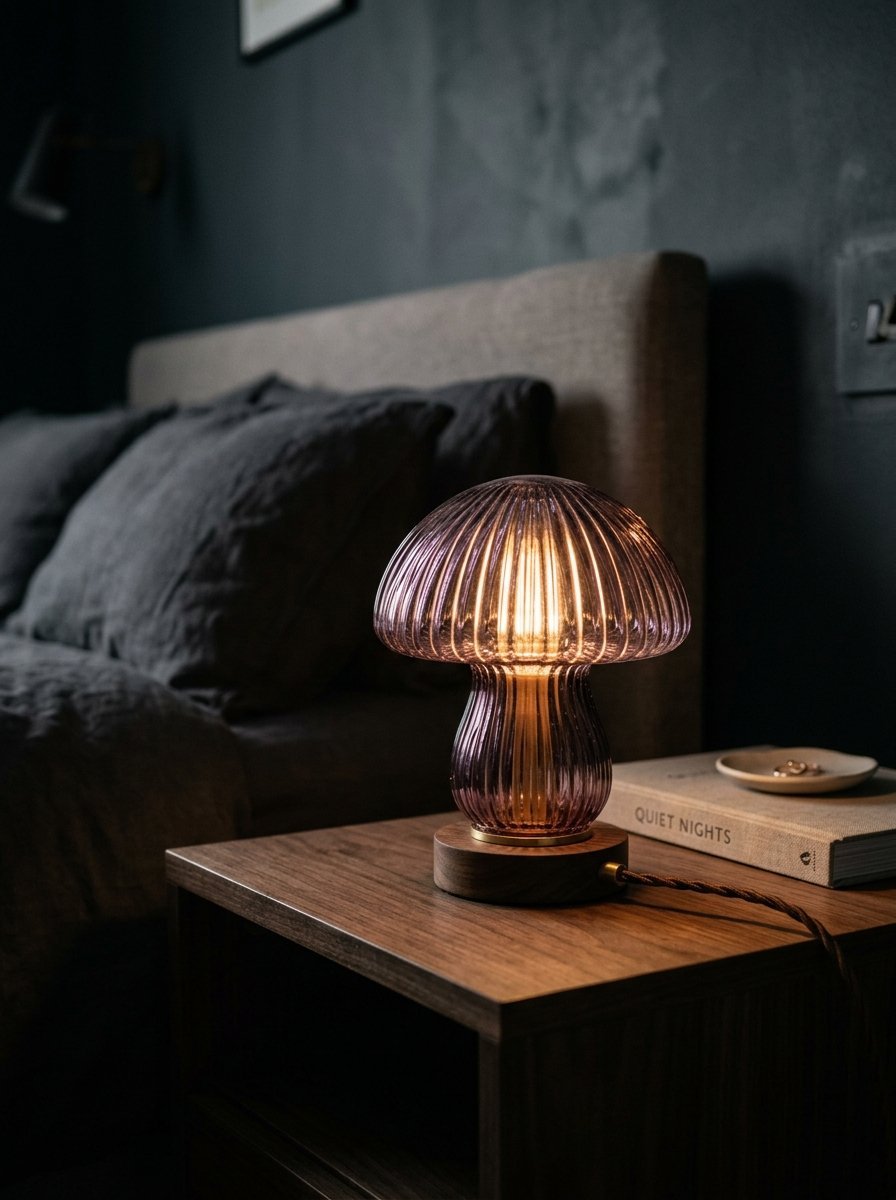
Glass fixtures keep a small space feeling open. Mushroom shapes are trending heavily right now. The curved glass dome diffuses light softly. I bought a beautiful ribbed version from IKEA for just $25. The model is called Tokabo. It fits perfectly on tiny nightstands. The purple tinted glass throws a very moody glow. Maintaining glass takes effort. You must prevent heavy dust accumulation.
My cleaning routine:
- Spray Method glass cleaner directly onto a soft cloth.
- Wipe the curved glass gently in a circular motion.
- Never spray liquid directly near the electrical housing.
5. Matte Black Swing Arm Sconces
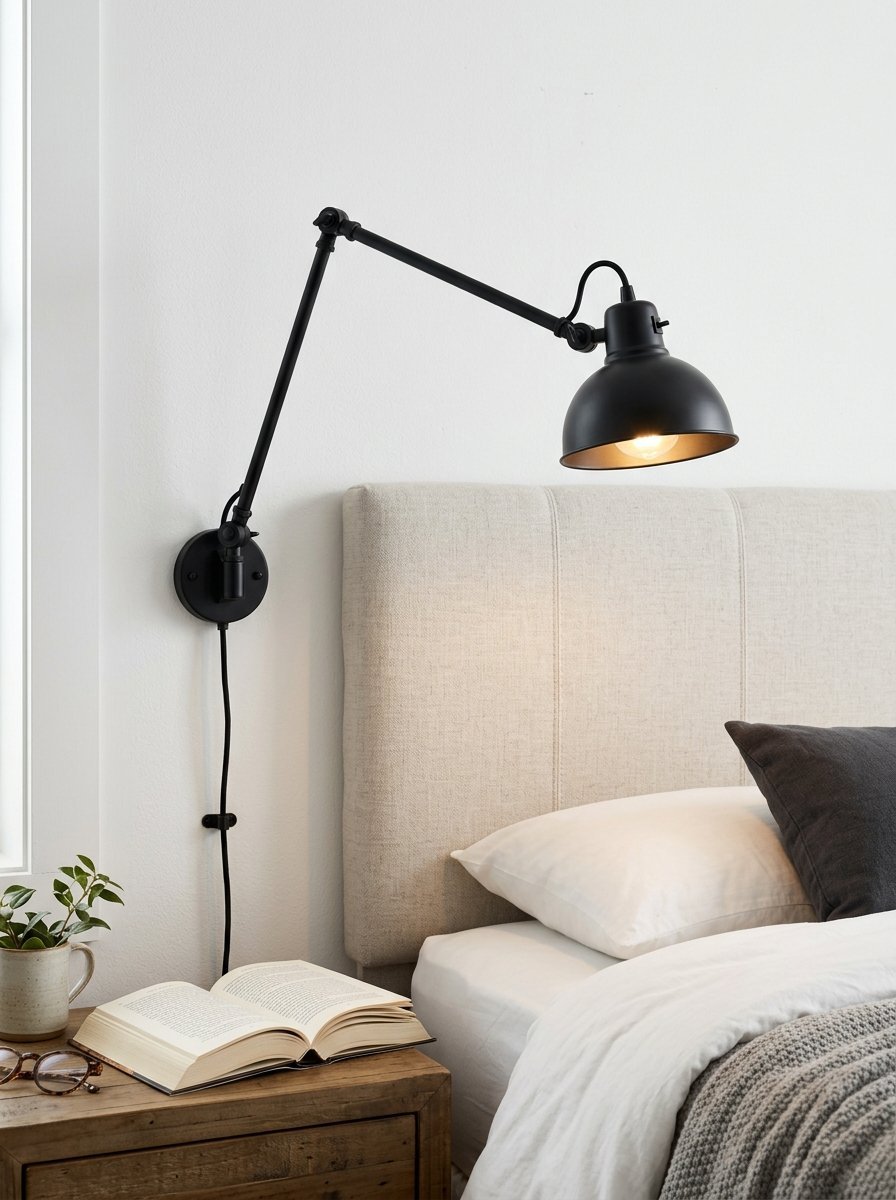
Wall sconces free up precious surface area on your nightstand. Hardwiring costs hundreds of dollars in electrician fees. I bypass this by buying plug-in models. I recently installed matte black swing arms from Wayfair. They cost $65 for a pair. The matte black finish hides fingerprints. The adjustable arm lets you pull the light over your book. I tucked the messy cords behind the bed frame. The dark metal contrasts nicely against light-colored headboards.
Renters can copy this exactly:
- Buy lightweight sconces under two pounds.
- Attach them using heavy-duty industrial mounting tape.
- Press firmly against the drywall for thirty seconds.
6. Oversized Linen Drum Shades
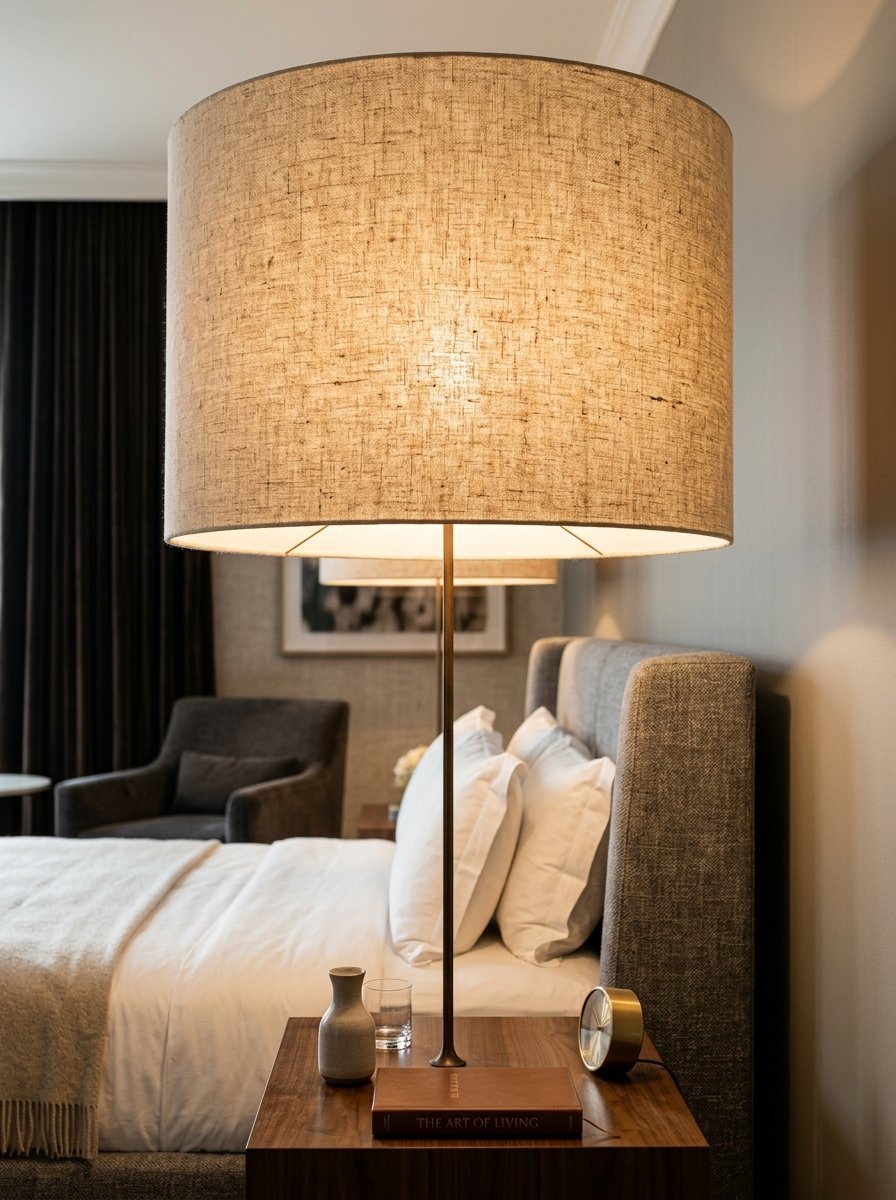
Scale dictates luxury in interior styling. Tiny fixtures look cheap. An oversized shade makes a massive visual statement. I update basic bases by swapping out the top portion. I purchased a massive 18-inch linen shade from At Home for $30. I attached it to a skinny $10 thrifted base. The proportion feels deliberate and expensive. Linen provides a beautiful organic texture. The fabric weave filters light perfectly. Big shapes command attention.
My fabric care rules:
- Roll a sticky lint roller over the fabric monthly.
- Vacuum the inside wire frame with a brush attachment.
- Keep linen away from open windows to prevent fading.
7. Sculptural Plaster Geometric Bases
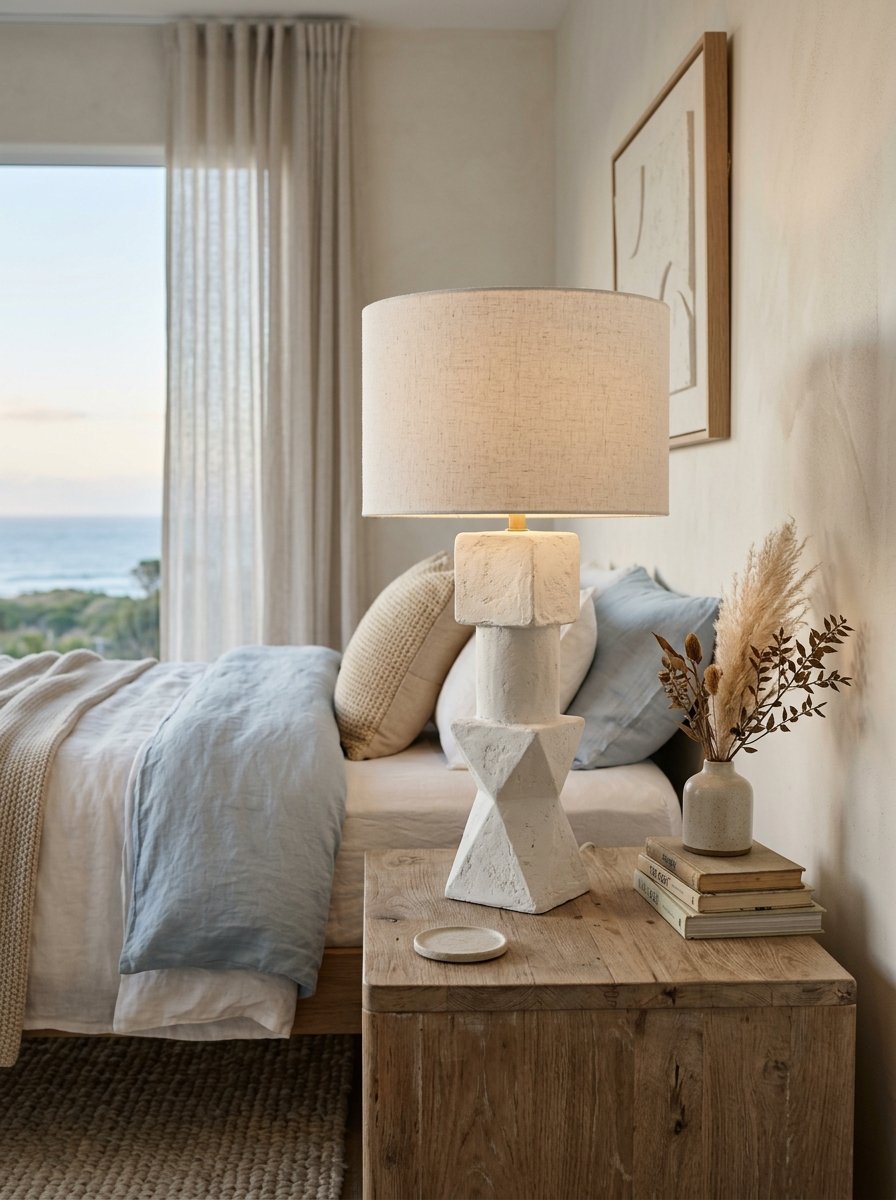
Textured white plaster is everywhere in high-end catalogs. These chalky finishes look ancient and artistic. I made my own version last weekend. I bought an ugly ceramic base for $5. I mixed joint compound with a little water. I slathered the mixture over the shiny ceramic. I used a sponge to texture the wet compound. The dried finish looks exactly like a $400 designer piece. The matte surface absorbs light beautifully. This styling works perfectly for minimalist or coastal layouts.
My DIY plaster steps:
- Sand the shiny ceramic base lightly.
- Apply the joint compound in thick uneven layers.
- Seal the dried plaster with a clear matte spray paint.
8. Plug-in Frosted Globe Pendants
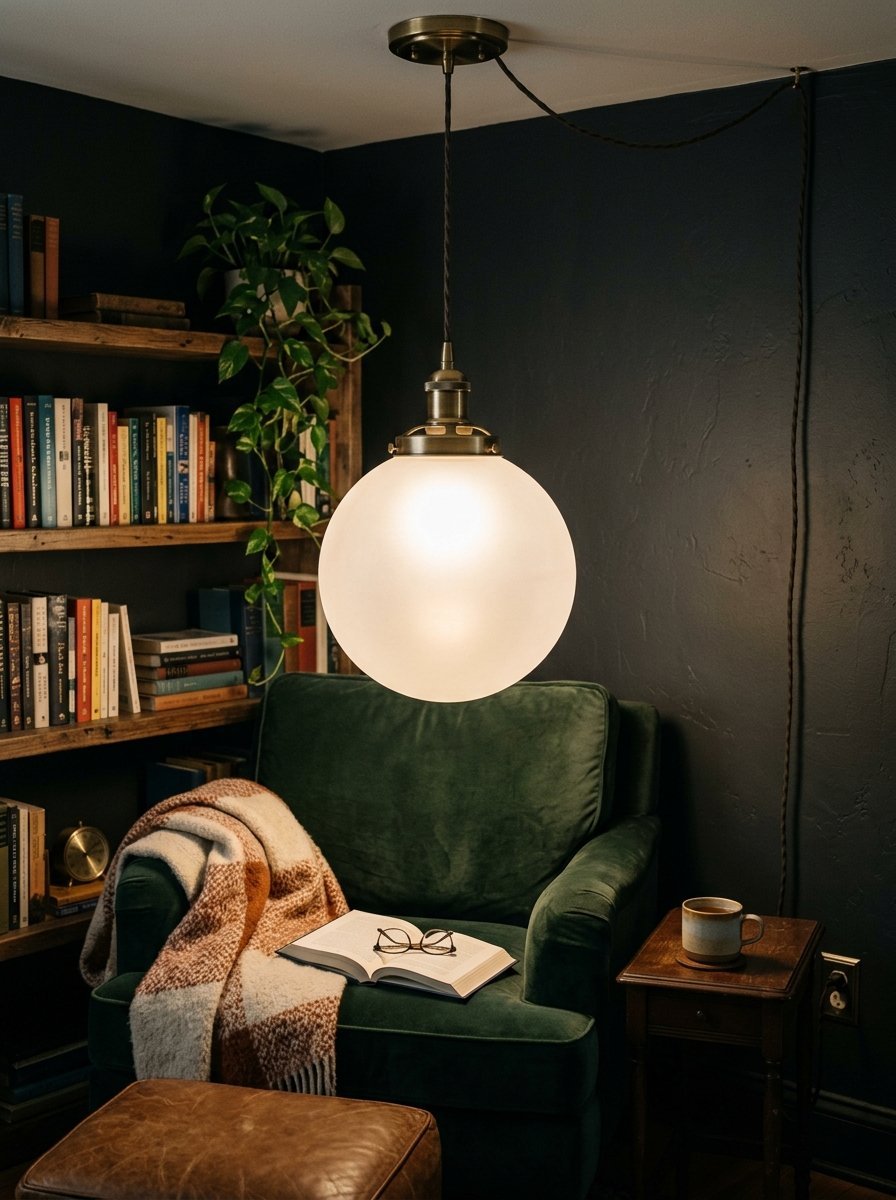
Hanging fixtures draw the eye upward. A frosted glass globe provides 360-degree illumination. I bought a plug-in pendant cord with a brass socket. I paired it with an 8-inch frosted globe. The total cost was $45. I hung it directly over a corner reading chair. The frosted glass eliminates harsh glare. This hanging style makes a dedicated cozy zone within a larger master suite.
My glass maintenance routine:
- Spray a thick foam cleaner onto the glass.
- Let the foam sit for sixty seconds.
- Wipe away with a dry paper towel for a streak-free shine.
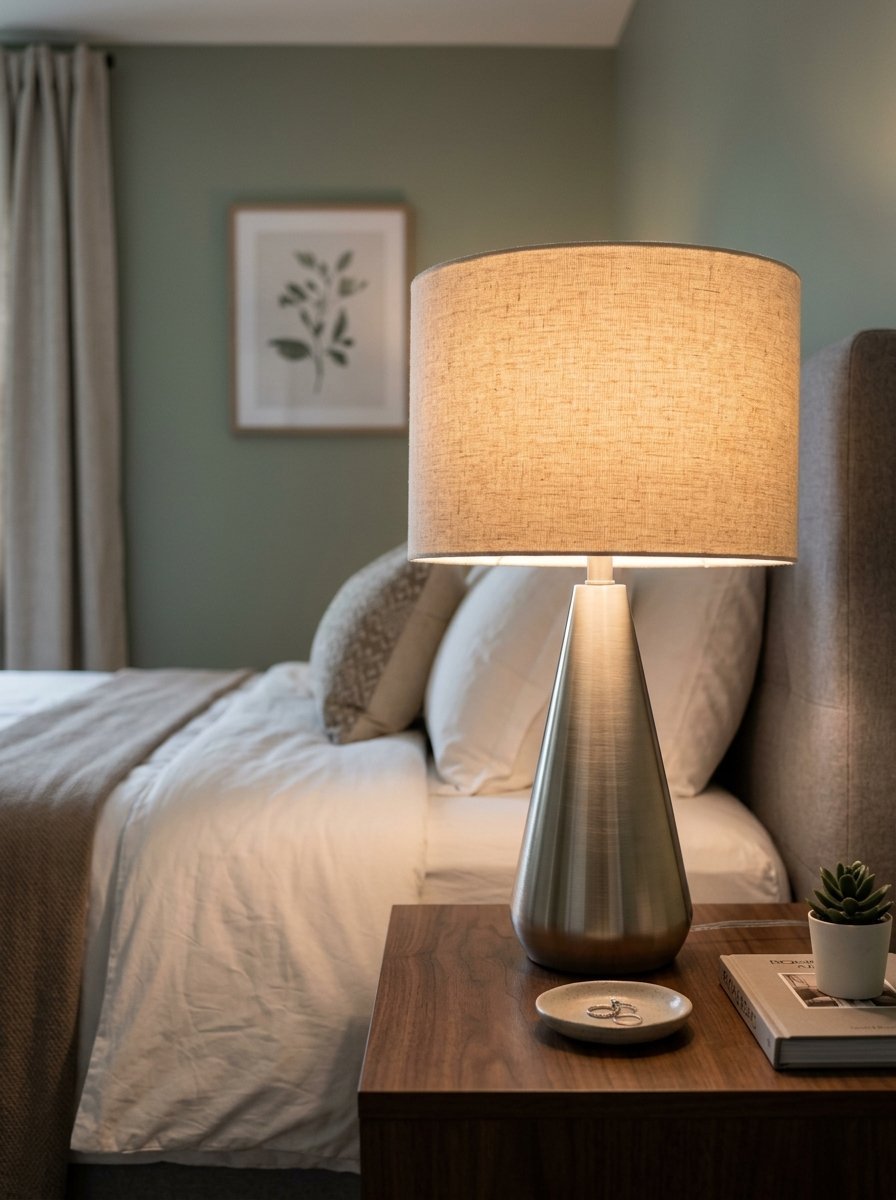
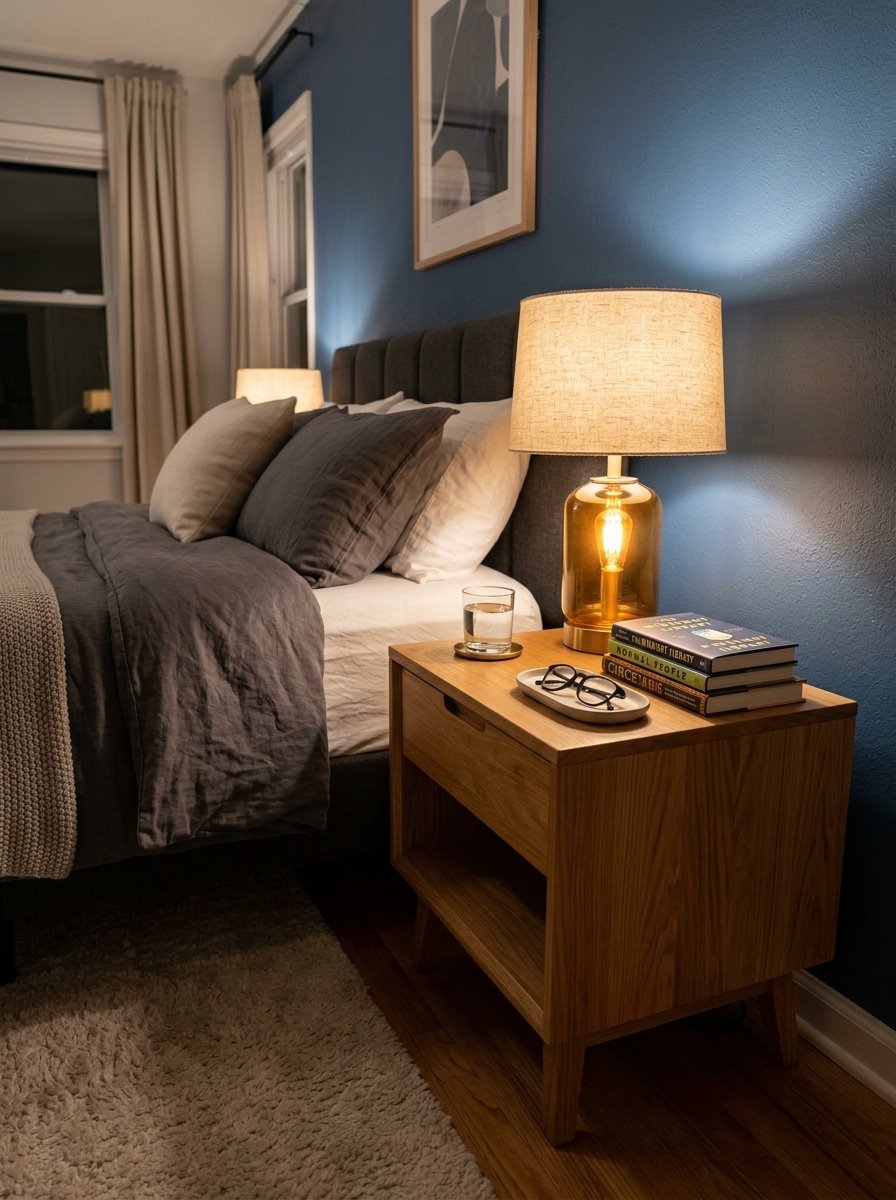
9. Fluted Ceramic Nightstand Lights
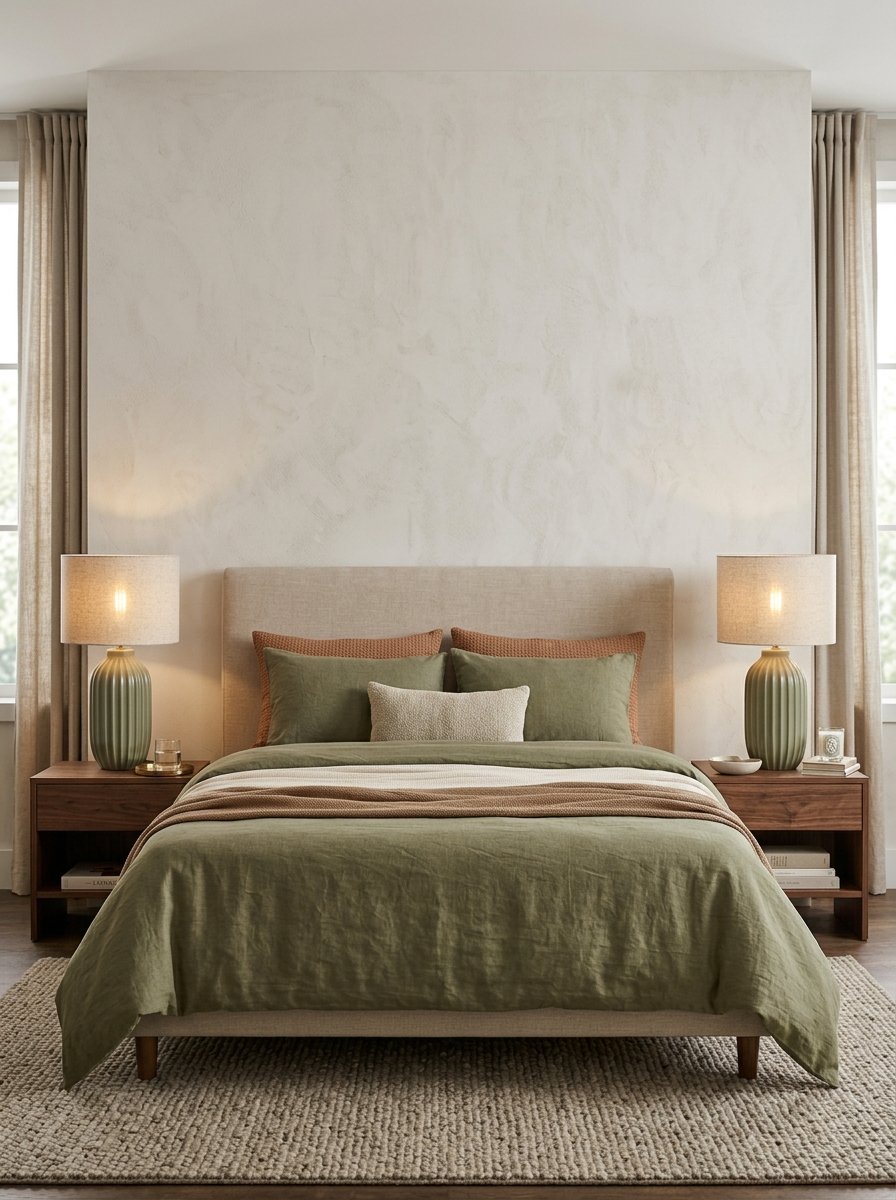
Vertical lines draw the eye up. Fluted details make inexpensive ceramics look heavy and bespoke. Target currently sells a beautiful fluted table model for $55. The grooves catch shadows throughout the day. This provides visual interest even when the bulb is off. I prefer these in soft earth tones like sage green or terracotta. Symmetrical placement on identical nightstands forms instant luxury.
My bulb selection rules:
- Always buy warm 2700K LED bulbs for bedroom spaces.
- Avoid crisp white daylight bulbs entirely.
- Choose dimmable smart bulbs for ultimate brightness control.
10. Terracotta Jug Lamps
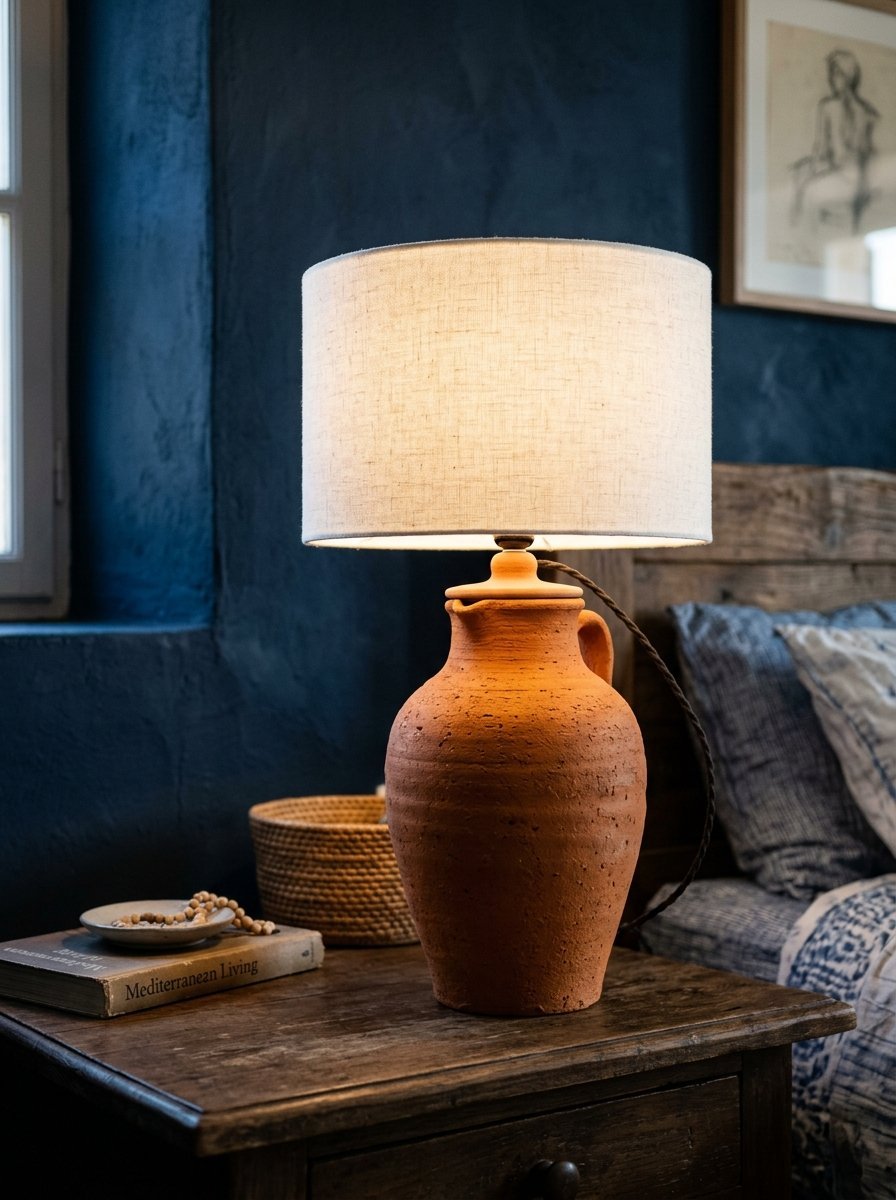
Earthy materials deliver warmth indoors. A large terracotta jug base feels grounded and historical. I found a vintage water jug at a garage sale. I bought a DIY wiring kit from Home Depot for $15. I carefully drilled a hole near the bottom using a masonry bit. The conversion took twenty minutes. The handmade nature of the clay looks incredibly expensive. This style perfectly fits a relaxed Mediterranean aesthetic.
My styling advice for raw clay:
- Leave the terracotta completely unpainted.
- Pair it with a stark white cotton shade.
- Place it against a deep blue or dark green wall.
11. Antique Brass Wall Torcheres
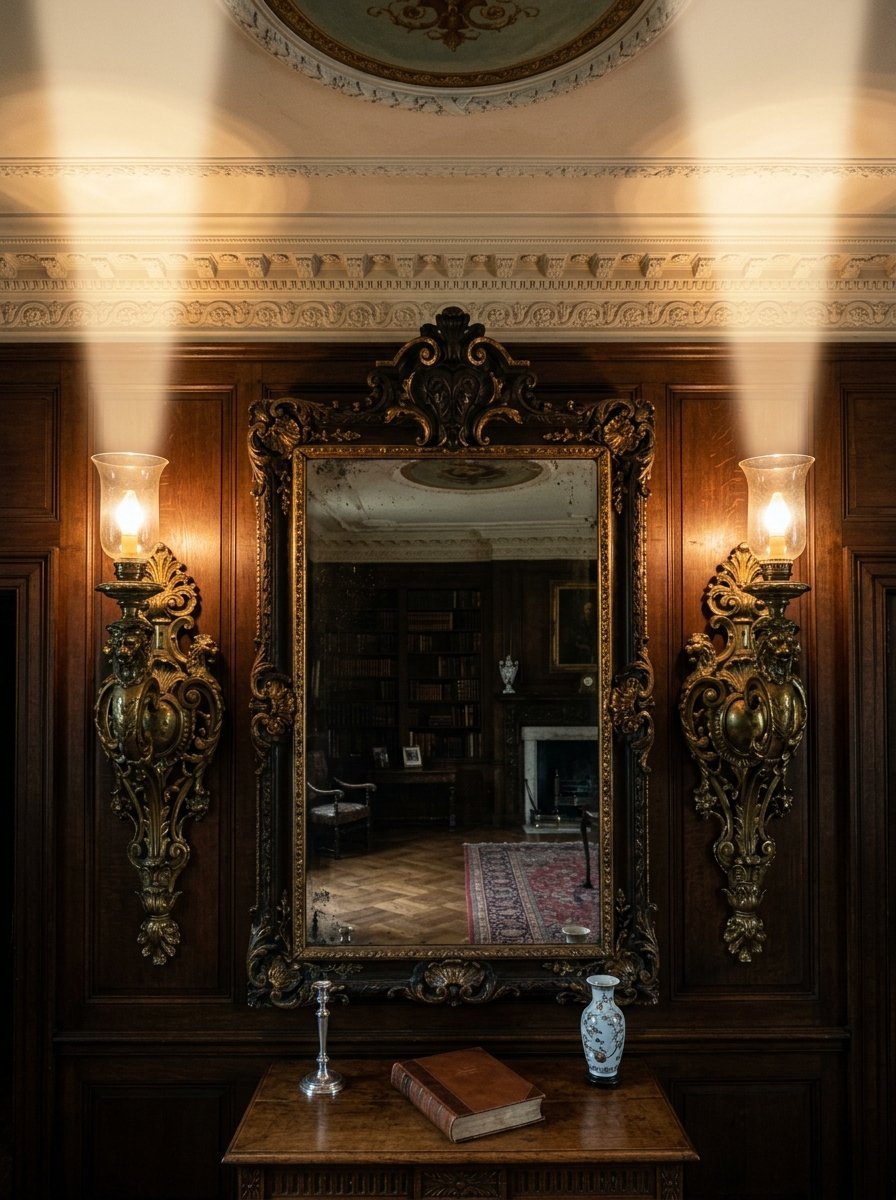
Up-lighting completely changes a room’s atmosphere. Torcheres direct beams straight at the ceiling. The ceiling then bounces a soft ambient glow downward. I found a pair of vintage brass torcheres for $50 online. I mounted them flanking a large vintage mirror. This placement is deliberate. The light reflects off the mirror back design. This up-lighting trick makes low ceilings feel much taller.
My mirror protection rules:
- Keep hot bulbs at least six inches away from glass.
- Wipe mirror edges carefully with a dry cloth.
- Never let moisture seep behind the silver backing.
12. Pleated Fabric Empire Shades

Traditional details are experiencing a massive revival. Pleated shades feel slightly formal but incredibly charming. I refuse to pay $150 for custom pleats. I bought plain empire shades from Walmart for $12 each. I hot-glued folded fabric strips directly onto the shade. I used a dark floral cotton print. The finished product looks like English country house decor. I paired these with simple brass stick bases.
My fabric wrapping tips:
- Cut the fabric strips exactly two inches wide.
- Fold the raw edges inward and iron them flat.
- Apply hot glue sparingly to avoid soaking through the fabric.
13. Woven Seagrass Cylinder Lamps
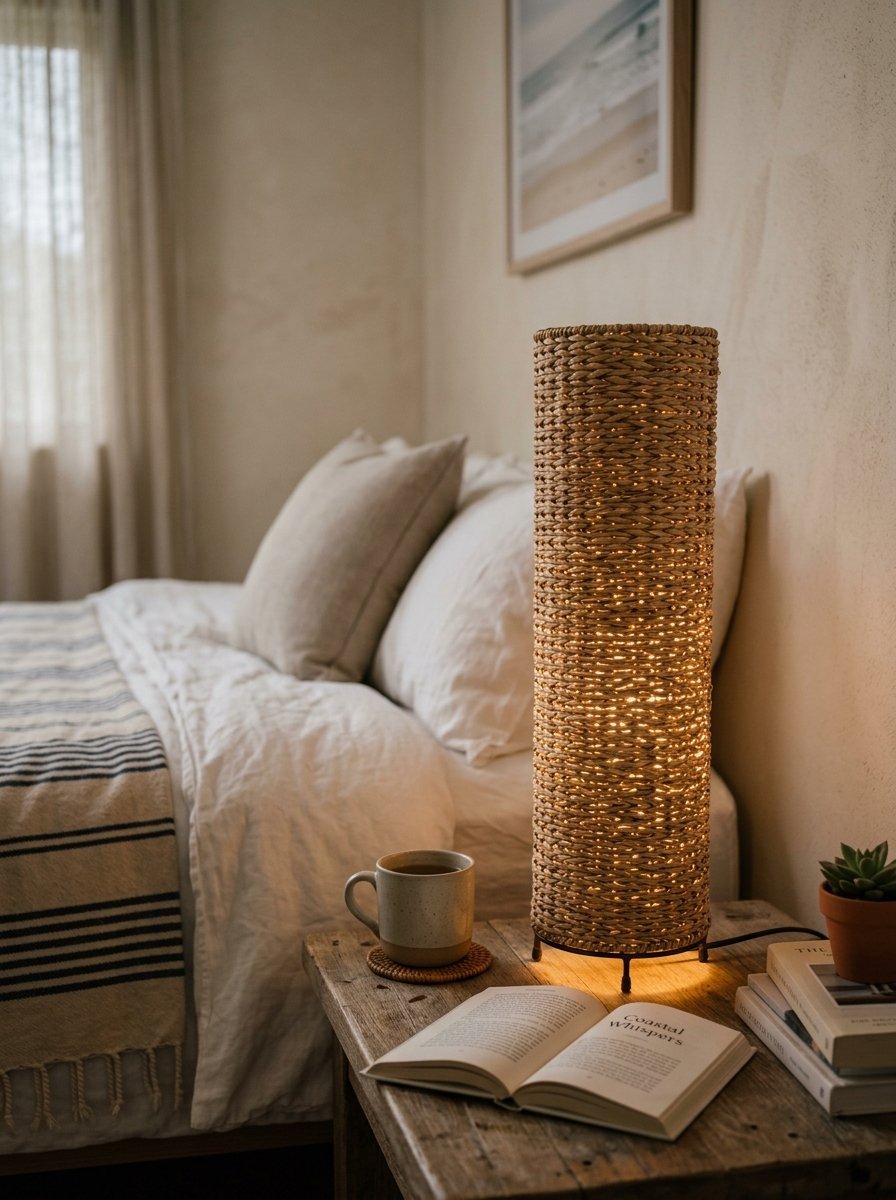
Coastal spaces need natural fiber textures. Seagrass offers a tighter weave than rattan. The thick grass ropes wrap tightly around a metal frame. I bought a tall seagrass cylinder from World Market. It cost $65. The slim profile takes up very little nightstand space. The light escapes through tiny gaps in the woven grass. This forms a beautifully dappled lighting pattern. This texture makes any sleeping space feel like a vacation resort.
My cleaning tricks for woven fibers:
- Never use a damp cloth on natural grass.
- Use a vacuum hose brush attachment.
- Vacuum in the direction of the grass weave.
14. Faux Marble Block Bases
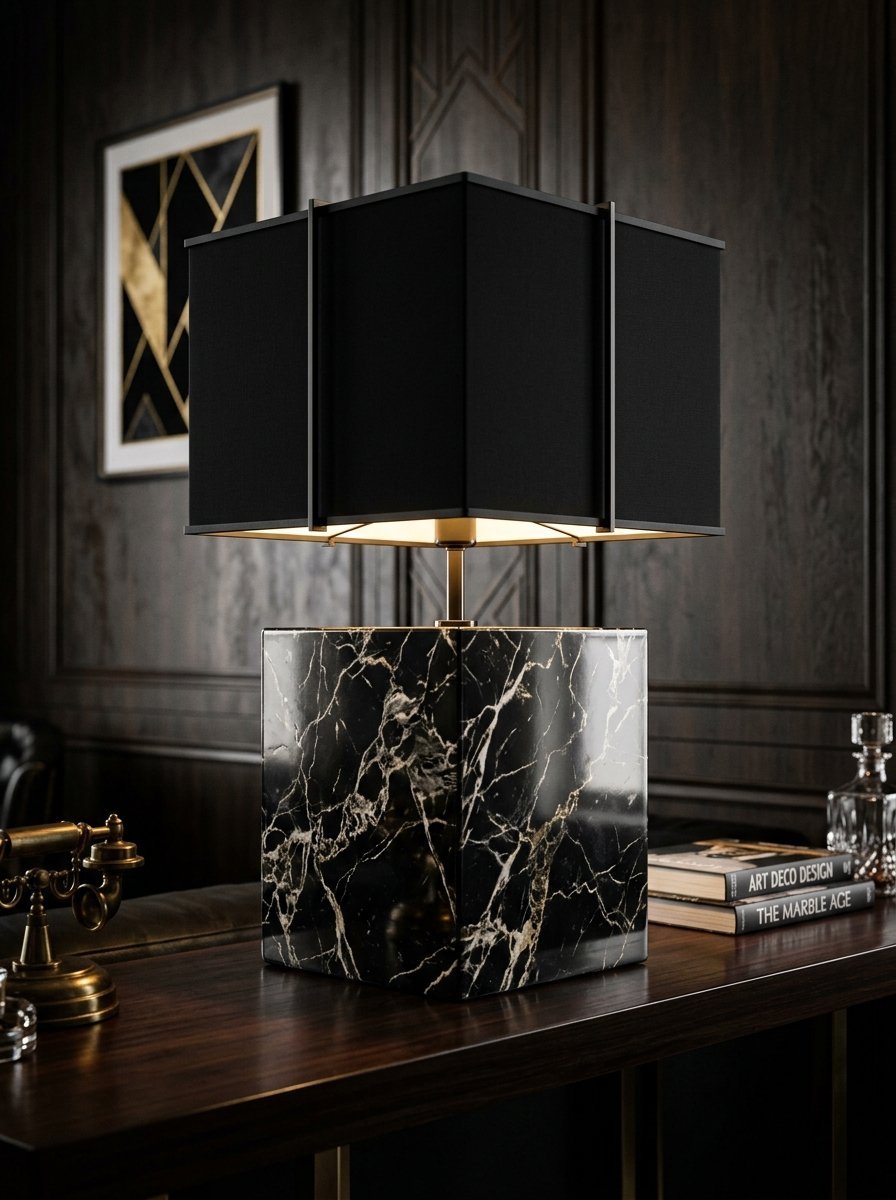
Solid stone costs a fortune. Heavy marble bases retail for hundreds of dollars. I mimic this look using contact paper. I bought heavy square wooden blocks from a craft store. I wrapped them tightly in realistic marble adhesive vinyl. The vinyl cost $9. I attached a simple socket to the top. The visual weight tricks the eye. Visitors assume the bases weigh thirty pounds. I paired these geometric blocks with severe black square shades.
My vinyl wrapping steps:
- Wipe the wooden block completely free of dust.
- Peel the vinyl backing off slowly while pressing down.
- Use a plastic squeegee to push out any air bubbles.
15. Brushed Nickel Touch Lamps
Convenience feels luxurious. Fumbling for a tiny switch in the dark is frustrating. Touch-activated bases solve this daily annoyance. I bought a pair of brushed nickel touch models from Amazon. They cost $40 for the set. You simply tap the metal base to cycle through brightness levels. The sleek silver finish feels incredibly modern. I use these specifically in guest rooms. Guests never have to search for the switch.
My metal maintenance advice:
- Wipe the metal bases daily.
- Use a dry microfiber cloth to remove fingerprints.
- Avoid harsh chemical sprays on the touch sensor.
16. Hammered Copper Teardrop Pendants

Warm metals glow beautifully at night. Hammered copper reflects light in a scattered fractured pattern. I hung a single teardrop copper pendant above a reading nook. The fixture cost $75 at a home improvement store. The dimpled surface hides scratches and imperfections. Over time the raw copper develops a dark patina. I prefer this aged look over perfectly shiny metal. The teardrop shape directs a tight pool of light downward.
My hanging pendant tips:
- Measure exactly thirty inches above the mattress height.
- Secure the ceiling hook firmly into a joist.
- Let the cord hang straight down with zero tension.
17. Bamboo Trellis Nursery Lamps

A nursery room design requires gentle illumination. Harsh overhead bulbs startle sleepy infants. I designed a bamboo trellis light for my niece’s room. I glued thin bamboo sticks into a grid pattern around a cheap paper lantern. The materials cost less than $20. The bamboo structure looks like a high-end designer piece. The thick paper heavily diffuses the bulb. This casts a very soft glow for midnight feedings.
My nursery lighting rules:
- Keep all power cords permanently secured to the wall.
- Use extremely low wattage LED bulbs.
- Place the fixture far away from the crib edge.
18. Velvet Wrapped Cylinder Shades

Rich fabrics instantly convey wealth. Velvet absorbs surrounding light and looks incredibly deep. I wrapped an old plastic shade in leftover emerald green velvet. I used fabric spray adhesive for a smooth finish. The total project cost was $8. The thick velvet blocks all light from the sides. The bulb only shines straight up and straight down. This forms dramatic cones of light on the wall. I paired this dark green shade with a shiny gold base.
My velvet care instructions:
- Keep a sticky lint roller in your nightstand drawer.
- Roll the shade lightly once a week.
- Pluck pet hair off immediately before it embeds deeply.
19. Floating Backlit Headboard Strips
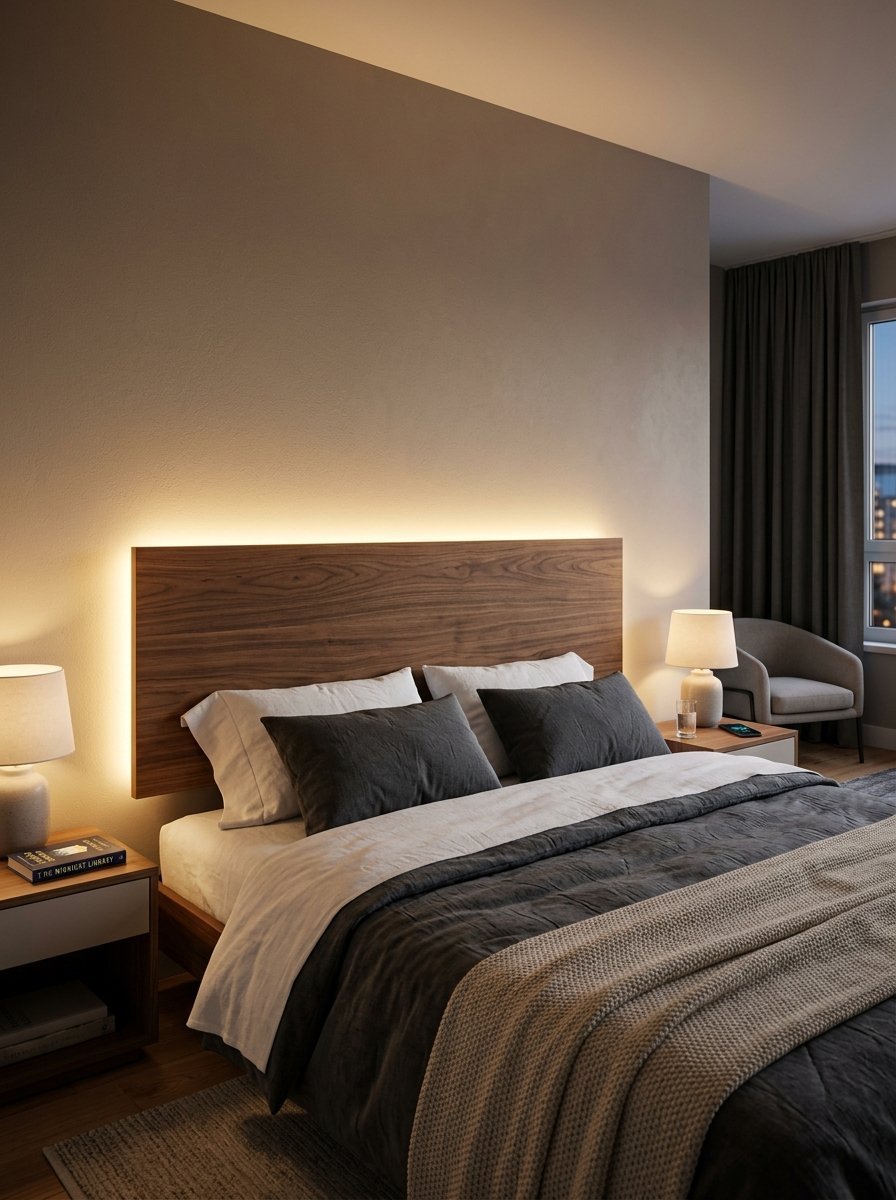
Hidden light sources mimic expensive hotel styling. I attached cheap LED tape directly to the back of my wooden headboard. A 16-foot roll costs $15 online. The light bounces off the wall behind the bed. You never see the actual bulbs. This bed back design makes a glowing halo. I chose a warm white strip with a dimmer remote. The indirect glow is perfectly cozy for watching television.
My renter-friendly installation:
- Apply standard blue painter’s tape to the furniture first.
- Stick the LED strip directly onto the painter’s tape.
- Peel everything off cleanly when moving out.
20. Industrial Pipe Desk Lamps
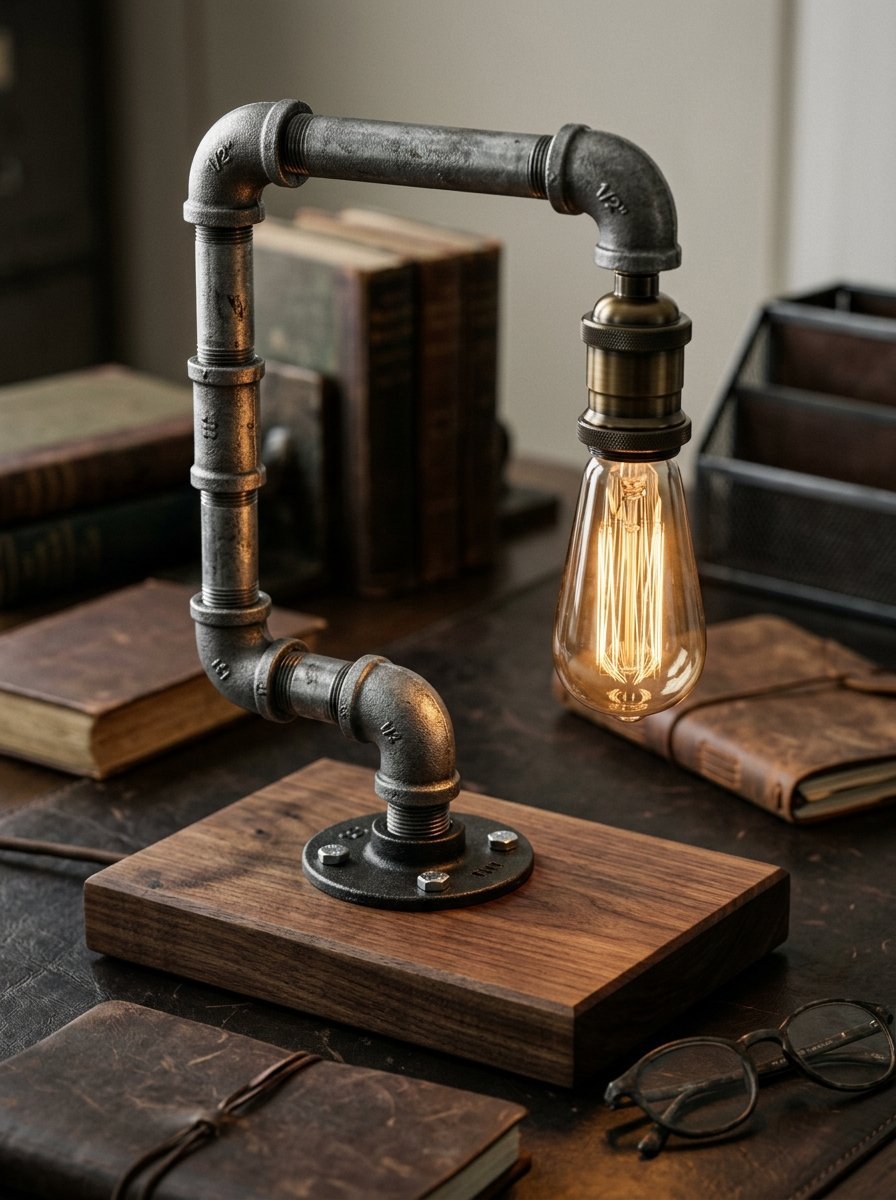
Raw materials supply edge to a soft space. Plumber’s pipe feels heavy and masculine. I constructed a custom desk light using galvanized iron pipes from the hardware store. I threaded the wires right through the hollow tubes. I mounted the pipe structure onto a chunky piece of scrap walnut wood. The entire build cost $35. Similar industrial pieces sell for $250 at boutique shops. I left the Edison bulb completely exposed.
My pipe assembly tips:
- Wash the iron pipes with dish soap to remove factory grease.
- Dry them completely to prevent rust formation.
- Tighten the threaded joints firmly with a heavy wrench.
21. Wicker Basket Floor Lamps
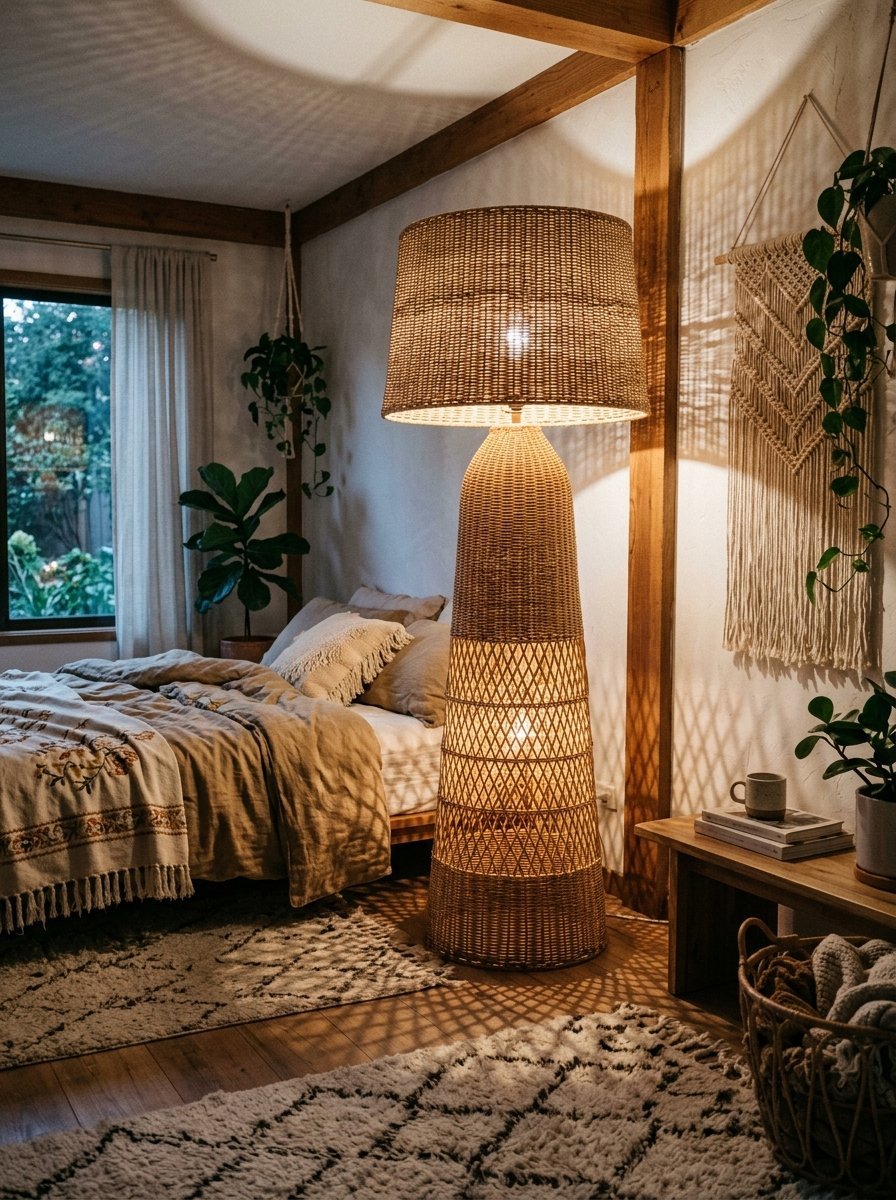
Floor fixtures fill empty corners perfectly. Large wicker structures deliver immense visual volume. I stacked three cheap thrift store wicker wastebaskets on top of each other. I secured them with black zip ties. I dropped a simple pendant cord down the center. This massive 4-foot floor structure cost me $25. The woven pattern projects incredible shadows across the entire room. This works beautifully in a relaxed Bohemian space.
My deep cleaning method:
- Carry the entire wicker structure outside to the driveway.
- Attach an air compressor nozzle to your hose.
- Blow dust out of the tight wicker weaving rapidly.
22. Minimalist Arc Bar Lights
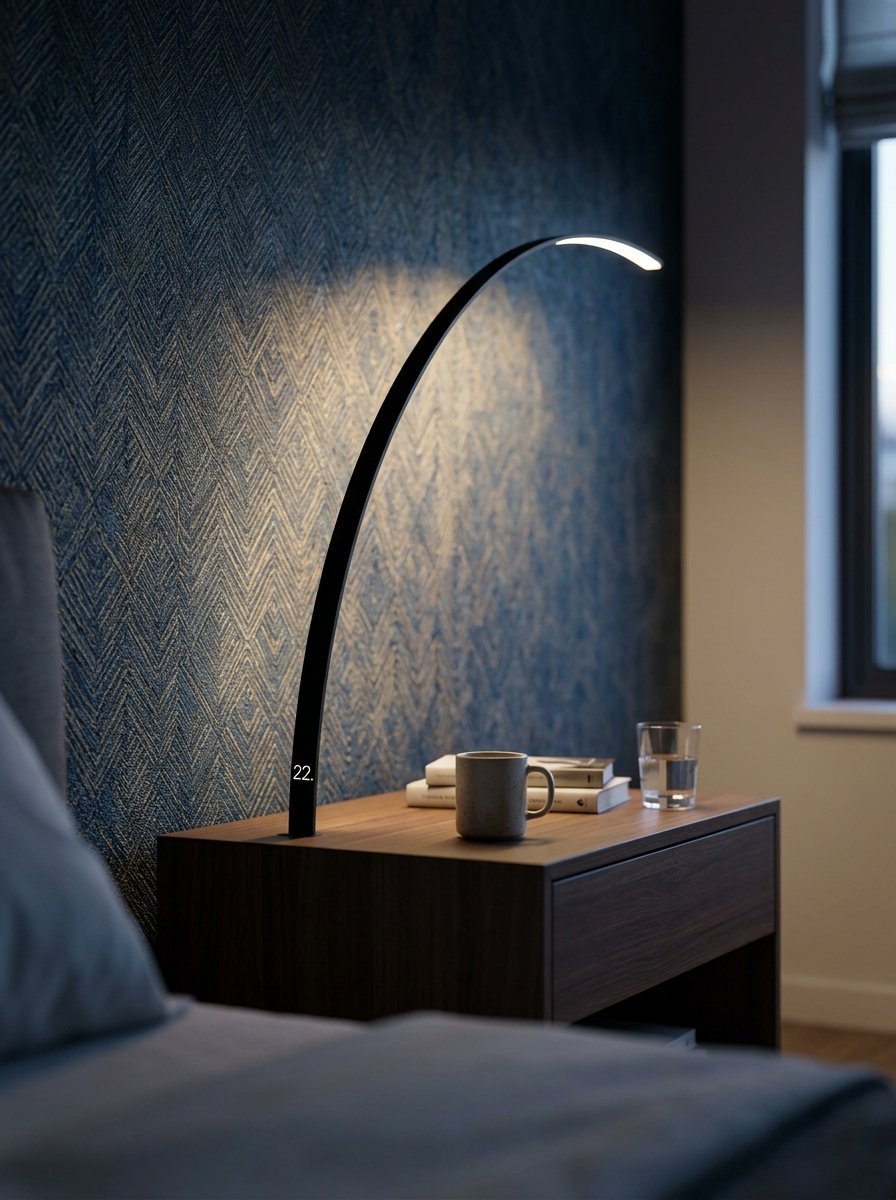
Ultra-thin profiles look very futuristic. A simple black metal bar hovering over a nightstand is striking. I purchased a minimalist LED arc from a modern decor website on sale for $60. The fixture is barely half an inch thick. The LED strip is fully integrated into the curve. You cannot replace the bulb. It takes up absolutely zero visual space. I placed it against heavily patterned wallpaper. A bulky shade would have hidden the wall design.
My placement strategy:
- Center the arc exactly over the middle of the nightstand.
- Keep other tabletop accessories very low profile.
- Let the thin metal line act as modern art.
23. Painted Mason Jar Farmhouse Lights
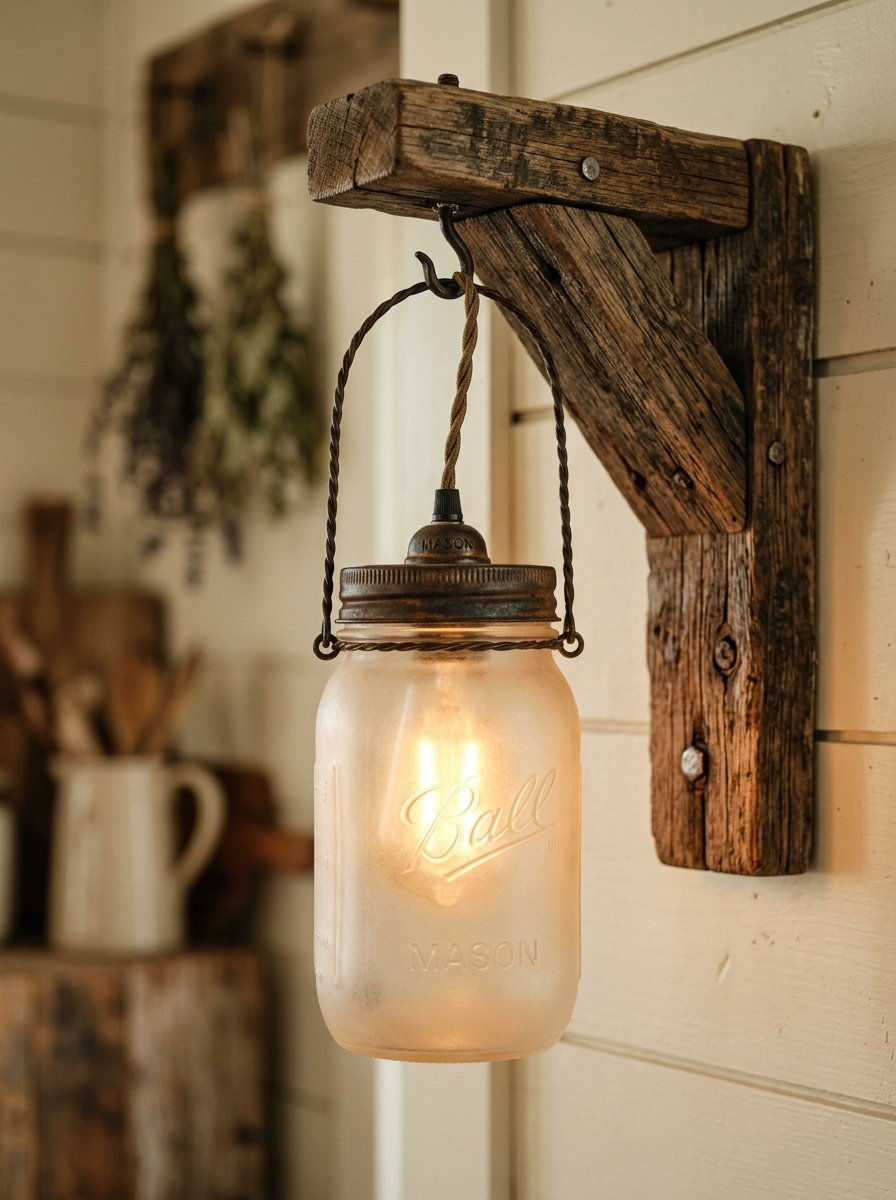
Classic farmhouse style relies on repurposed items. Mason jars make excellent protective glass covers for small bulbs. I painted the inside of a large mason jar with frosted glass spray paint. I punched a hole in the metal lid. I threaded a basic socket through the top. This $10 craft perfectly diffuses the harsh bulb filament. The frosted glass looks soft and vintage. I hung two of these from rustic wooden shelf brackets.
My frosting paint tips:
- Wash the glass jar with rubbing alcohol first.
- Spray three very light coats of frosting spray.
- Let each coat dry for twenty minutes.
24. Milk Glass Vintage Replicas
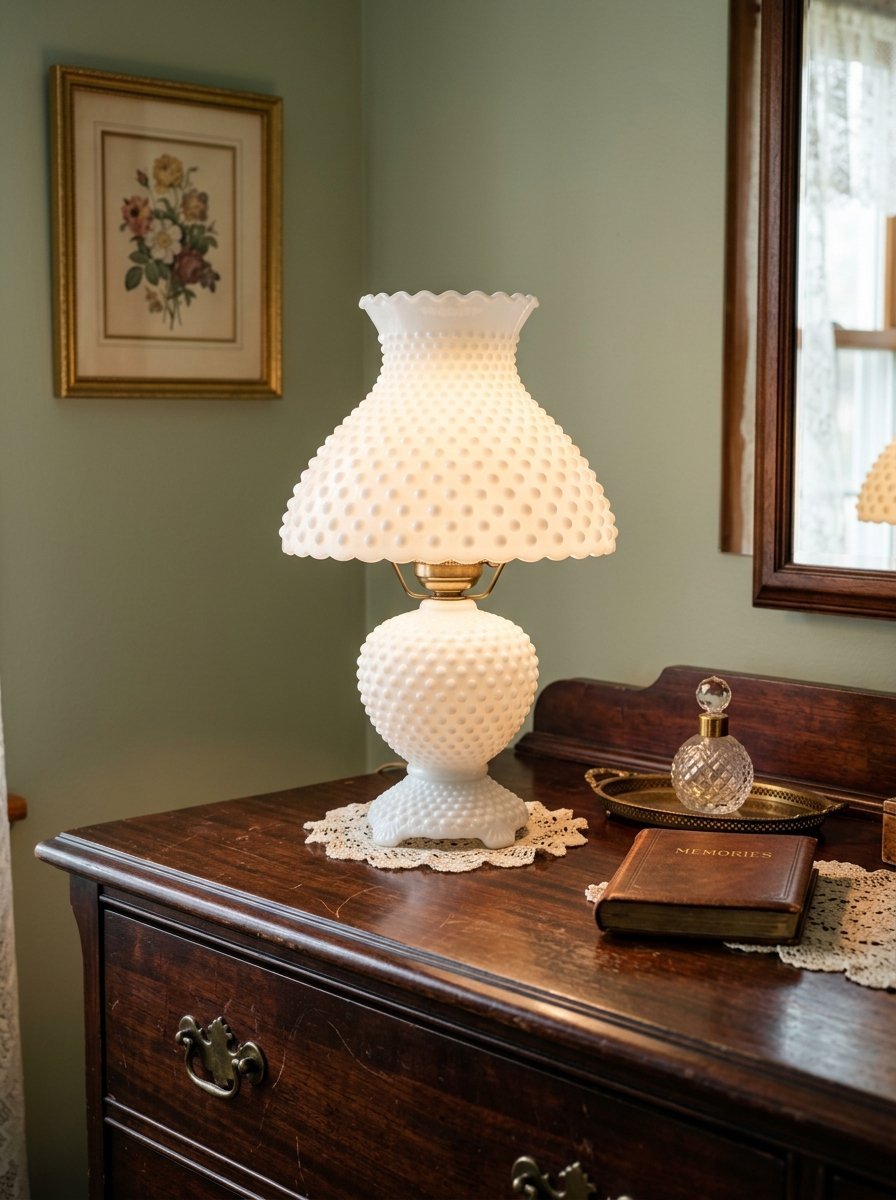
Opaque white glass feels incredibly nostalgic. True vintage milk glass can be quite expensive. I found exact replicas at a discount home store for $30 each. The hobnail texture catches the light beautifully. The thick white glass completely hides the bulb shape inside. This prevents any harsh bright spots. I styled these on dark mahogany dressers. The stark white glass pops against the dark wood.
My specific cleaning routine:
- Unplug the base and carry it to the kitchen sink.
- Wash the glass body with warm soapy water.
- Scrub the raised glass bumps gently with a soft sponge.
Frequently Asked Questions
How do you hide messy cords on bedside tables?
I tape power strips directly to the back of my nightstands. I use heavy-duty command strips. I plug the lamp cord into the hidden strip. Then I run a single main cord down the back leg of the furniture. I zip-tie the cord to the furniture leg. This keeps the floor completely clear.
What is the best bulb temperature for a sleeping space?
You must buy 2700K LED bulbs. These cast a warm amber glow. White bulbs above 3000K look like hospital lighting. I check the exact Kelvin number on the packaging before buying. Warm light signals your brain to prepare for sleep. Cold light keeps you awake.
Can renters safely mount wall sconces?
Yes. You buy lightweight plug-in sconces. You completely skip the hardwiring. You apply heavy-duty industrial mounting tape to the back plate. You press the fixture firmly against the drywall. I have hung dozens of lights this way. They stay secure for years. You pull the tape straight down to remove it without wall damage.
How tall should a bedside lamp be?
The bottom edge of the lampshade should align exactly with your chin when sitting up in bed. This prevents the bare bulb from shining directly into your eyes while reading. I physically sit in the bed to measure the exact height before purchasing. Scale matters immensely for comfort.
How do you clean delicate fabric lampshades?
I use a fresh sticky lint roller. I roll it gently over the fabric once a month. I never use water or liquid sprays on fabric shades. Liquid drives dust deeper into the fibers and leaves ugly brown water rings. I use a dry vacuum brush attachment for heavy dust.
Conclusion
Your sleeping space deserves deliberate lighting choices. Upgrading your fixtures immediately shifts the entire room’s energy. I spent months making these exact changes in my own home. I stopped settling for harsh overhead glare. I sourced thrifted brass pieces, wrapped wooden blocks in vinyl, and converted old jugs into glowing statement pieces. You possess the exact details needed to recreate these high-end looks for less than $50. Start by evaluating your current bedside setup tonight. Look for a heavy base at your local thrift store tomorrow morning. Replace that tiny cheap plastic shade with a massive linen drum. Share your favorite DIY lighting transformations in the comments below.

Amelia Hart is the Senior Design Editor at Vellora Interiors, where she curates small-space and apartment content. With a background in color theory and years spent designing under-500-square-foot rentals, she’s the editor who’ll tell you exactly which paint sheen, curtain length, and lamp height to choose, no guessing. A former design lead at a boutique studio, her work has been featured in several home and lifestyle publications. Her guiding belief: “Good design isn’t about more, it’s about choosing better.”