I stood in my own room last October staring at a massive blank space above my headboard. Blank spaces feel incredibly cold. You want your sleeping space to reflect your exact personality. Hanging photos on the wall fixes this instantly. You do not need professional interior design help. You just need a free Saturday and some basic 3M Command strips. I spent years making layout mistakes and putting unnecessary holes in my drywall. I ruined the paint in my first apartment doing this wrong. Now I know exactly what works for a gallery wall bedroom setup. Here is everything I wish I knew before I started styling my own home.

You will walk away from this guide with exactly twenty five fresh layout options to try today. I promise to show you exact spacing rules that prevent messy walls. You get direct styling advice pulled directly from my past failures and successes. I cover everything from thrifted vintage pieces to clean modern grids. We look at exact frame counts and specific hanging heights for every single layout. I also name the exact cleaning products I use to keep my glass shining. You will have a completely finished and styled room by Sunday night.
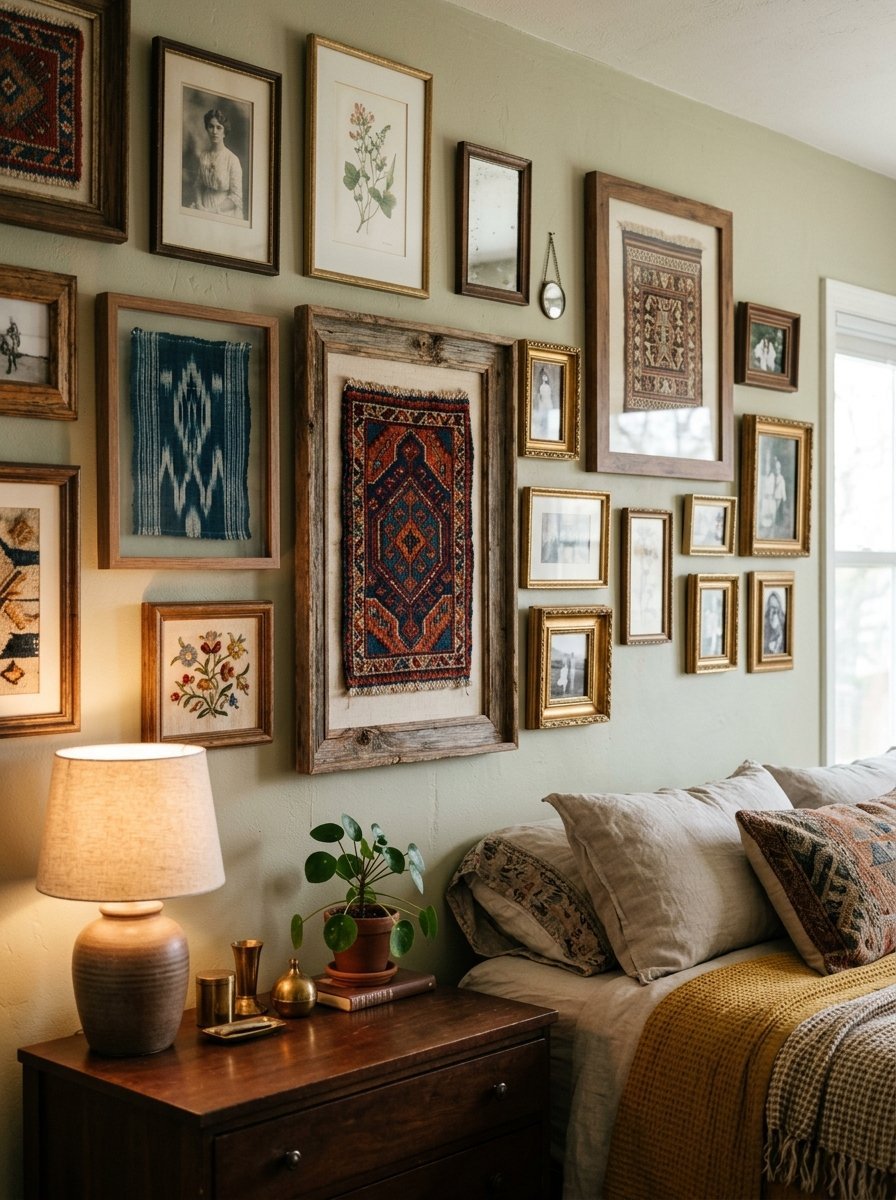
1. The Asymmetrical Boho Mix
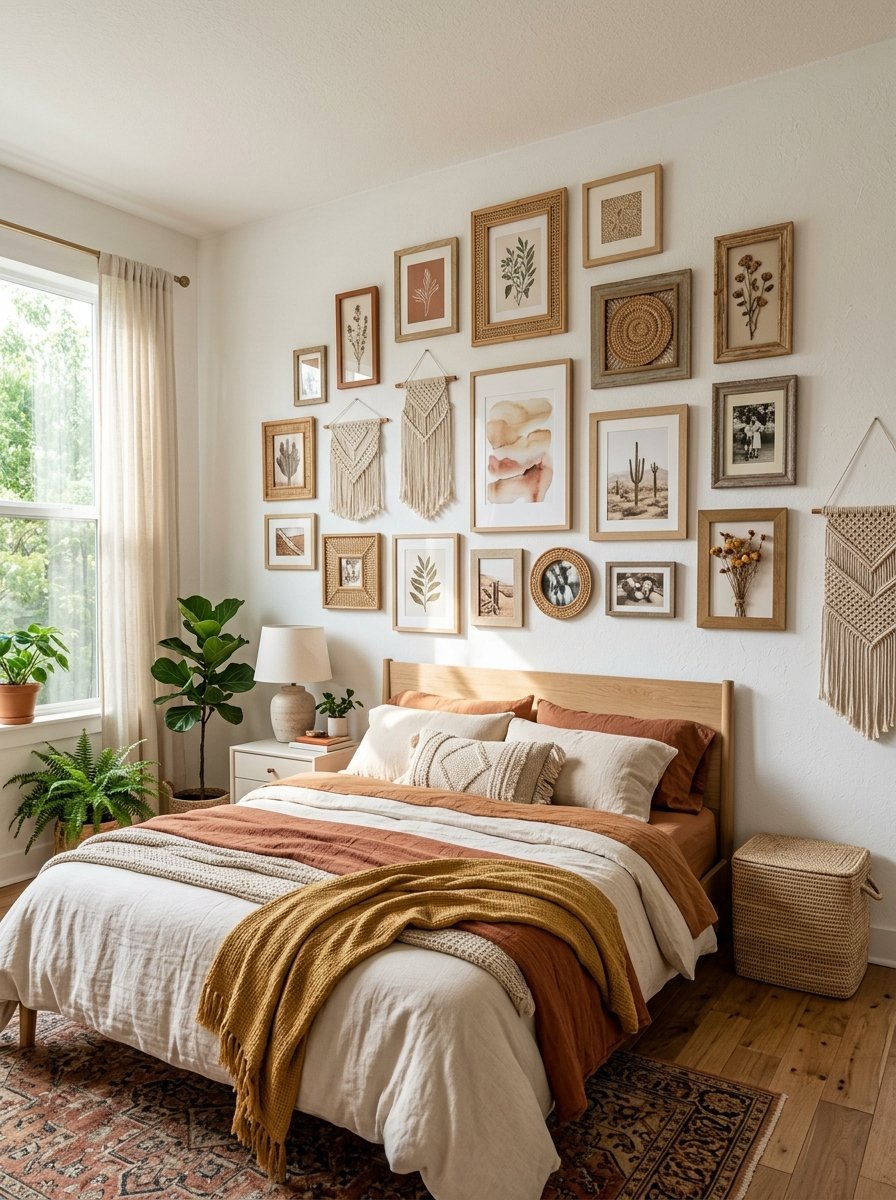
Boho styling needs balance without looking perfectly aligned. I love mixing different frame sizes together to give character. Start with your largest frame slightly off center on the wall. Place medium frames around it in a scattered pattern. This relaxed gallery wall layout feels lived in and comfortable. I prefer using rattan frames next to light oak finishes.
Follow these spacing rules for a natural boho feel.
- Keep two inches of space between your small and medium frames.
- Leave three or four inches around your largest anchor piece.
- Let the outer edges of the entire grouping remain uneven.
- Mix horizontal and vertical orientations freely without strict rules.
I tried this exact setup in my guest room last spring. The finished wall feels incredibly cozy and warm. You can even pin small dried flowers directly to the wall between frames. Use a microfiber Norwex cloth to keep all the glass dust free weekly.
2. Farmhouse Botanical Canvas Setup
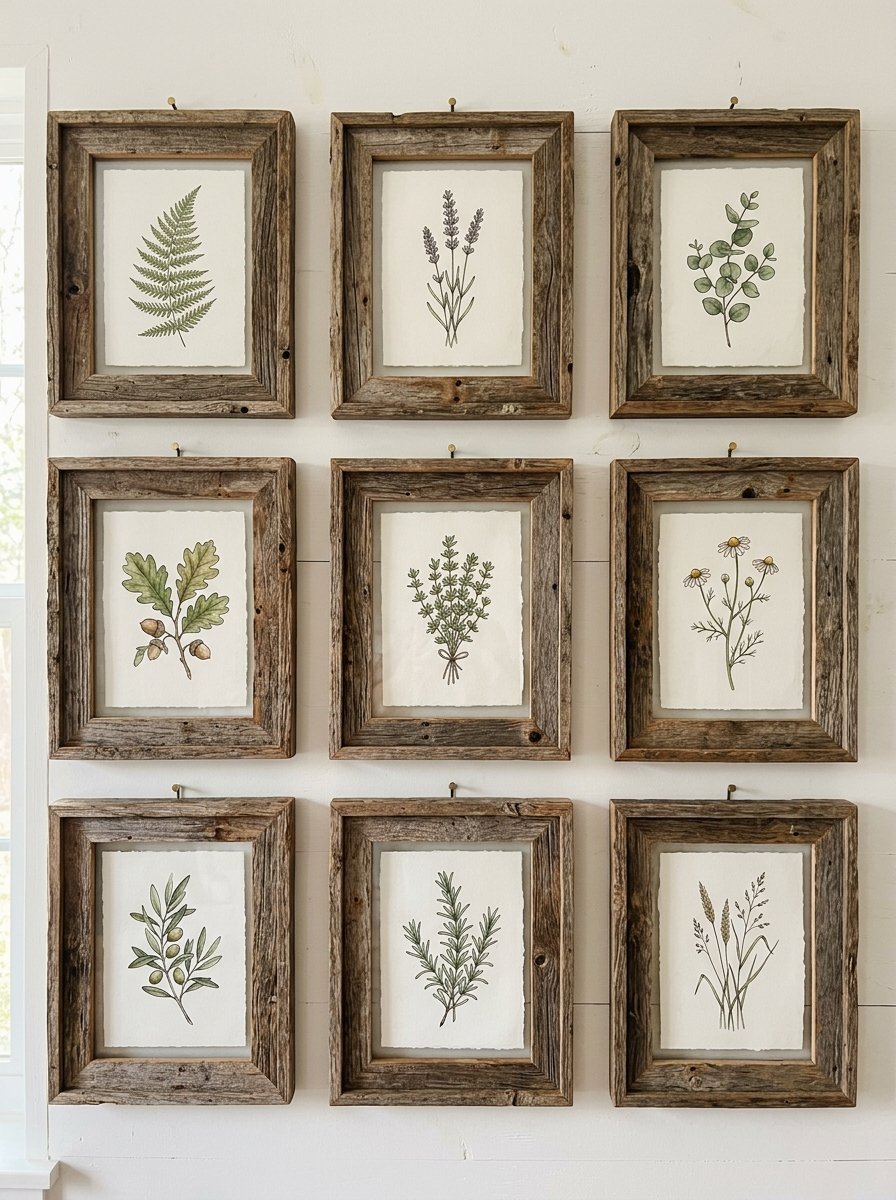
Farmhouse style relies on nature and simple quiet living. Find vintage botanical prints featuring local greenery or soft florals. I prefer printing these on textured canvas paper at home. It gives the artwork an authentic rustic feel. Hang them in a clean grid of six or eight matching frames. Weathered wood frames work best here to give texture.
Try these steps for a perfect farmhouse grid.
- Buy six identical wooden frames from Target or Michaels.
- Measure exactly fifty seven inches from the floor to find your center.
- Use a small laser level to mark your top row of nails.
- Space the frames exactly two inches apart on all sides.
This creates a calm chic decor space for sleeping. I helped my neighbor set this up last month. We used cheap thrifted frames and painted them with white chalk paint. The matte finish looks beautiful against a dark painted wall.
3. Art Deco Geometric Symmetry
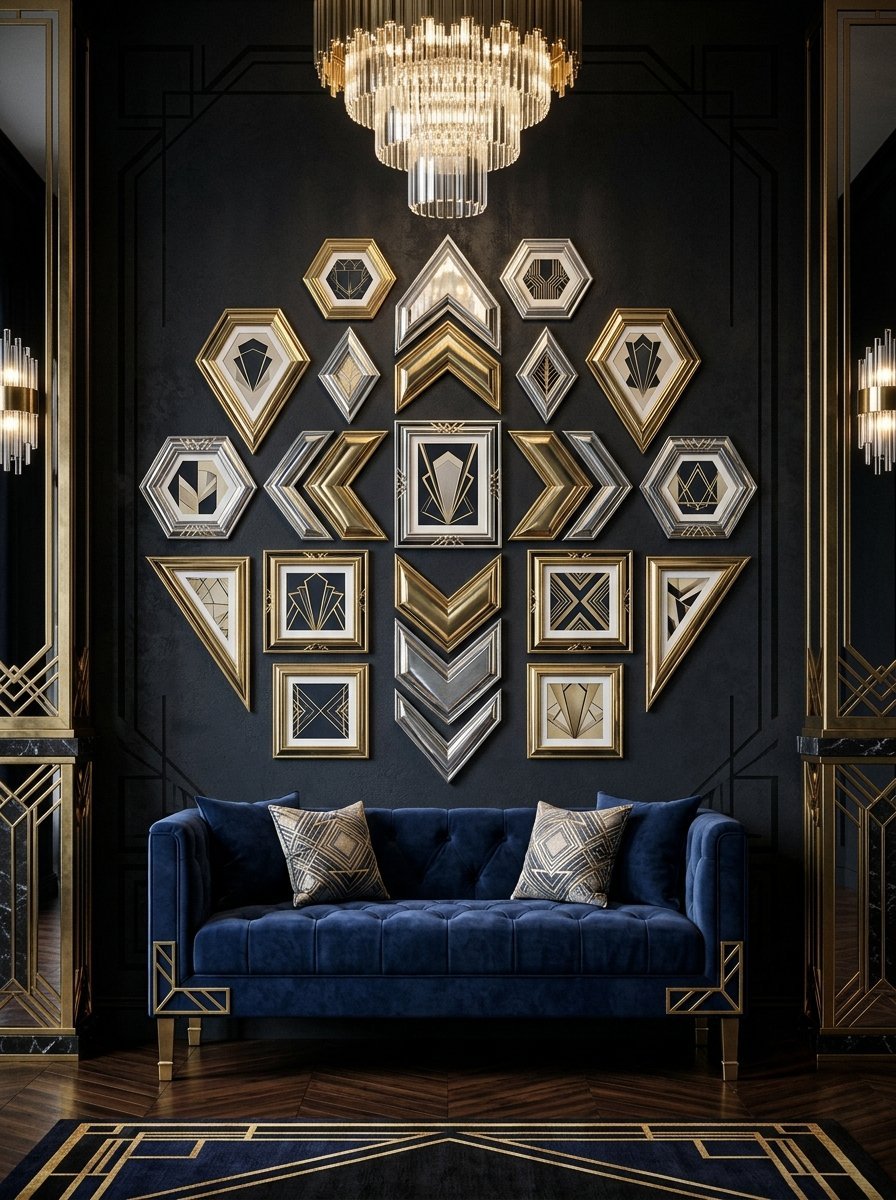
Art Deco styling relies on sharp lines and glamorous gold finishes. You want to use brass or polished silver frames here. Arrange them in a perfectly symmetrical diamond or stepped stair pattern. This gives a high end hotel feel directly to your home. I styled a room like this last winter for a friend.
Keep these rules in mind for geometric layouts.
- Measure your total wall width and find the absolute center point.
- Hang your focal point mirror or art piece perfectly in the middle.
- Match the exact frame sizes on the left and right sides.
- Use metallic frames to catch the natural sunlight in the room.
The symmetry pleases the eye immediately upon walking in. You need to measure your wall space exactly for this to work. Even a quarter inch mistake shows up clearly in a geometric layout. Hang the entire arrangement centered above a sleek velvet bench.
4. The Floor To Ceiling Statement
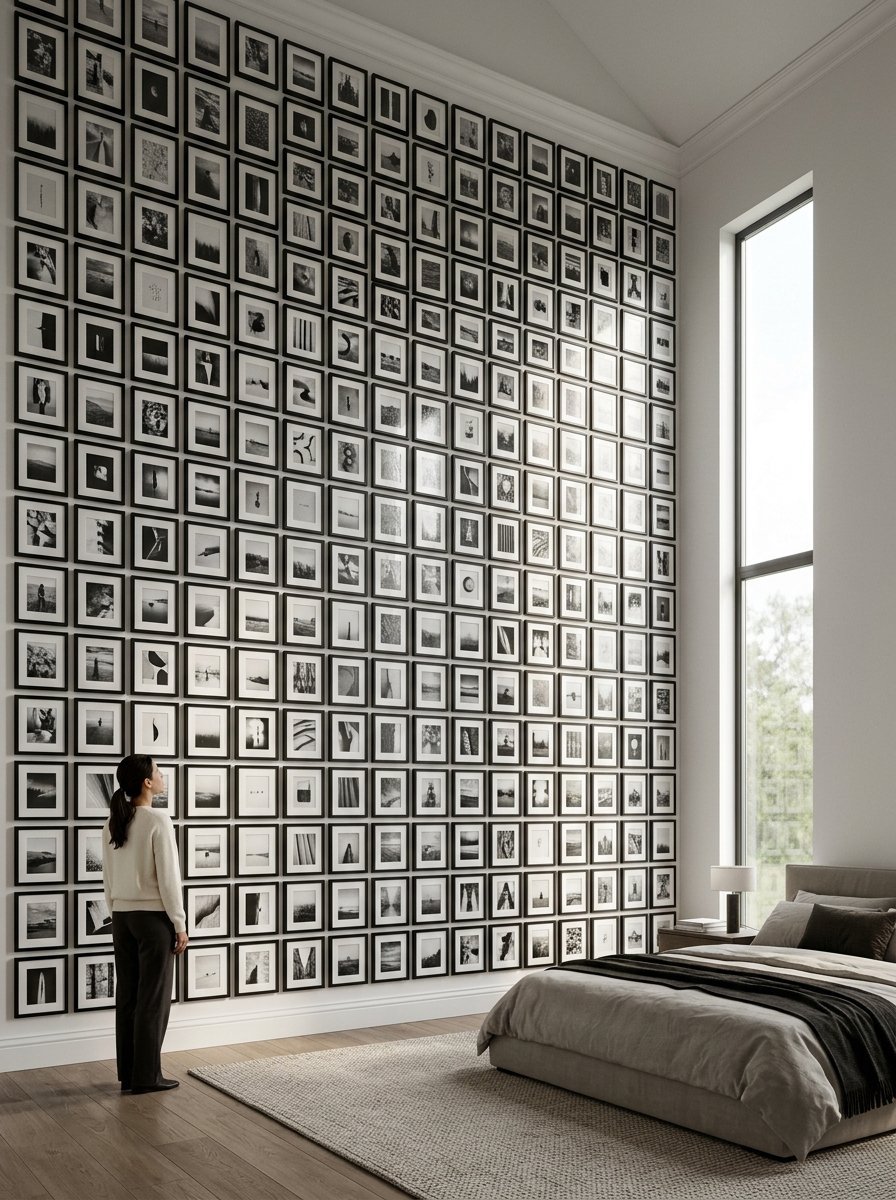
Do not let vertical wall space go to waste in small rooms. A floor to ceiling arrangement makes your ceiling feel twice as tall. Start placing your largest frames right at your natural eye level. Work your way up and down with smaller art pieces. This massive setup draws the eye all the way up the wall.
Use these tips to prevent damage near the floor.
- Leave the bottom twelve inches completely empty to clear the baseboards.
- Avoid putting expensive art near the floor where shoes might kick it.
- Use 3M Command strips for the bottom frames to prevent shifting.
- Stick soft felt pads on the bottom corners of every frame.
I ruined a favorite print with a vacuum cleaner back in 2019. Now I secure everything tightly against the drywall. Pick frames in a single color to keep the massive display clean.
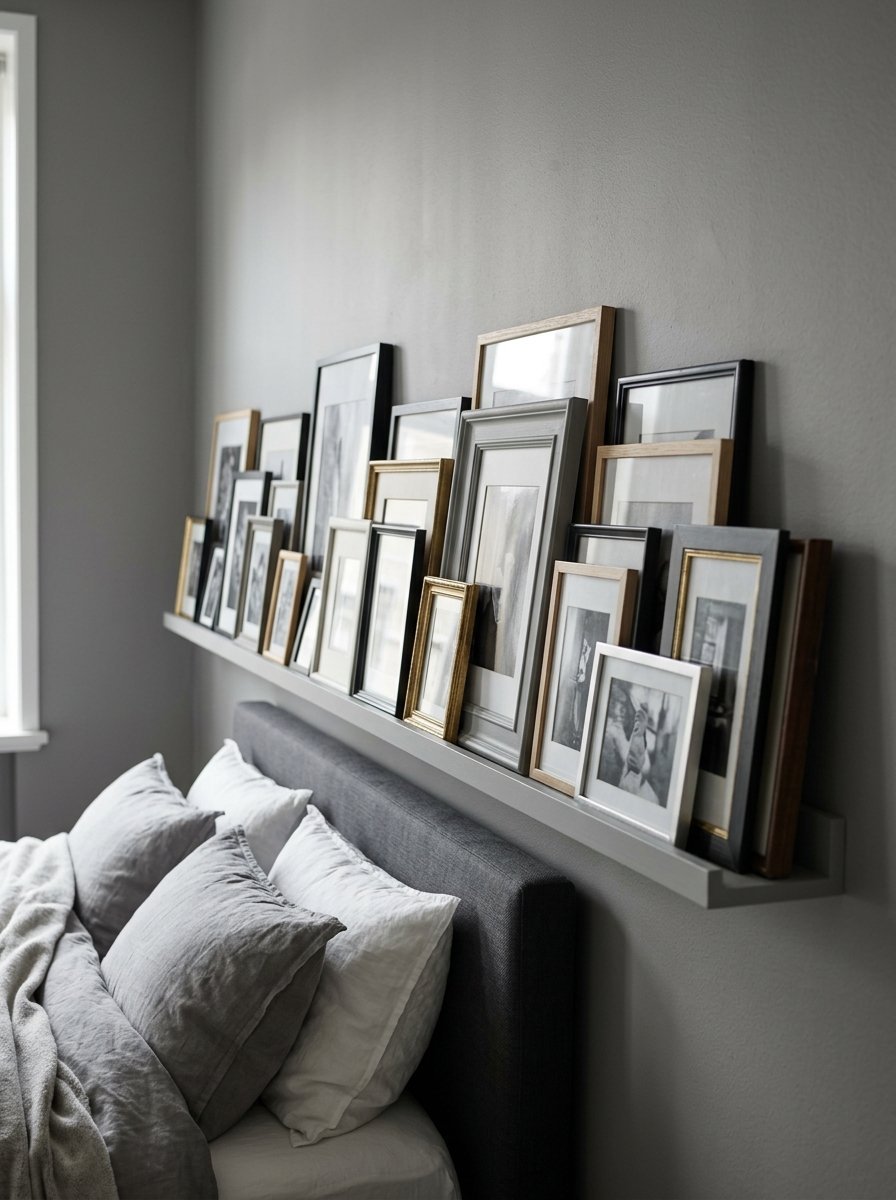
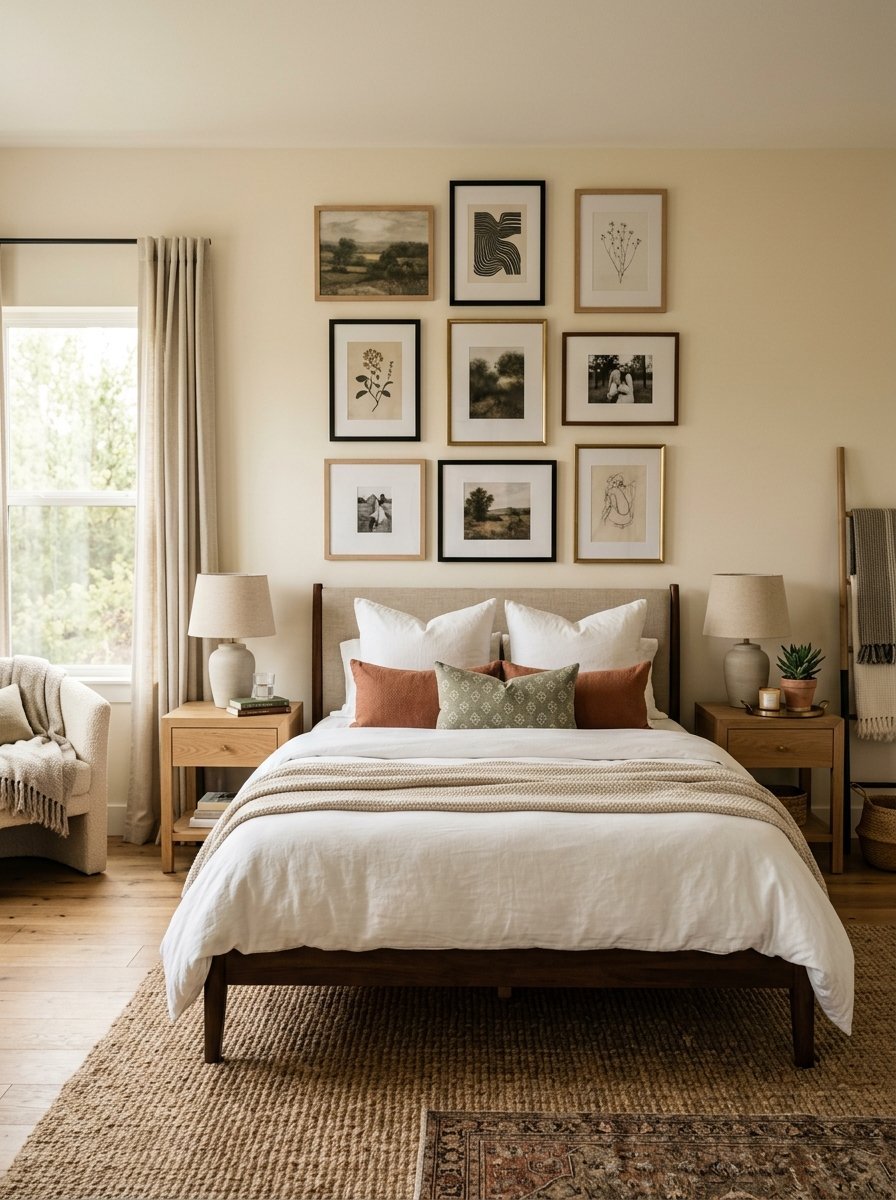
5. Above The Headboard Grid

The space directly above your bed is prime real estate. You want a calm and orderly feel where you sleep. A clean grid of identical square frames provides exactly that feeling. I prefer using nine square frames arranged in a tight three by three square. This is a very popular gallery wall bedroom choice right now.
Follow these guidelines for above the bed placement.
- Keep the bottom edge exactly six inches above your headboard.
- This spacing prevents you from bumping your head when sitting up in bed.
- Choose soft watercolor landscapes or muted abstract pieces for the art.
- Make sure every frame has an extra wide white paper mat.
I used this specific layout in my own master bedroom. It feels incredibly peaceful and grounded at the end of the day. White frames with large white mats look incredibly polished.
6. Mixed Media With DIY Wood Signs
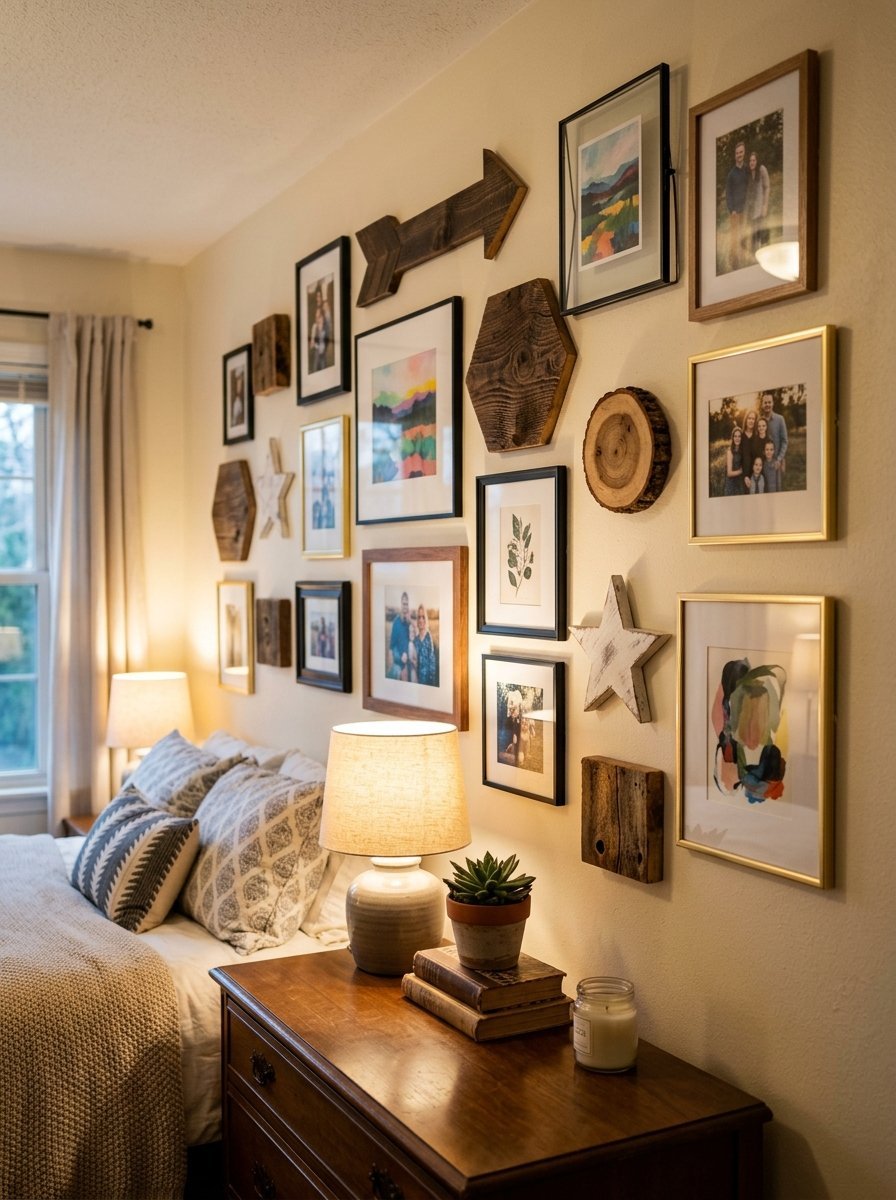
Mixing wood textures with glass frames gives deep warmth. I absolutely love making my own DIY wood decorations for my home. You can paint a simple welcome sign on scrap pine wood. Place this wooden piece right in the middle of your framed photos. The flat wood contrasts beautifully with the shiny glass frames.
Here is exactly how I make the wood signs look professional.
- Sand the wood edges down until they feel perfectly smooth.
- Put one coat of dark walnut stain and let it dry overnight.
- Paint your letters using a fine tip white acrylic paint pen.
- Seal the whole piece with a matte clear coat spray finish.
This breaks up the predictable look of standard frames. It gives your space a custom handmade feeling. I get compliments on my bedroom wood sign every single time guests visit.
7. Vintage Mirror Integration
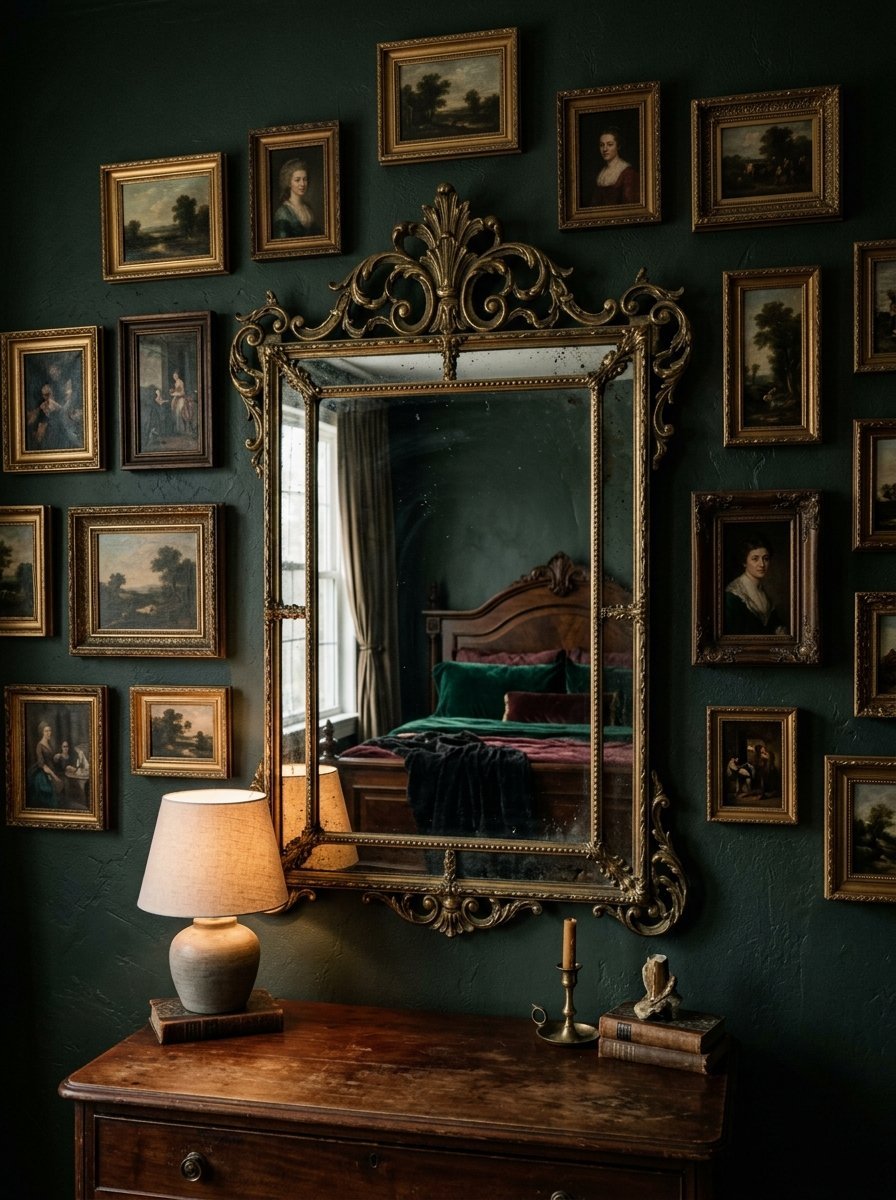
Mirrors reflect natural light and make small rooms feel twice as big. I collect ornate brass mirrors from local weekend estate sales. Mixing them with framed art makes a stunning vintage wall decor idea. Start by hanging the mirror right in the center of your space. Arrange your art pieces naturally around the reflective glass.
Protect your vintage mirrors with these specific cleaning steps.
- Never use ammonia cleaners on old antique mirror glass.
- Spray Method brand glass cleaner onto your cloth first.
- Wipe the glass gently to prevent the liquid from dripping down.
- Dry the edges quickly so moisture stays away from the mirror backing.
Ammonia cleaners will ruin old mirror backings over time. I figured that out the hard way in 2021 with a prized piece. You want to place lighter art prints near the mirror. Make sure you use heavy duty wall anchors for the mirror.
8. Monochrome Photography Display
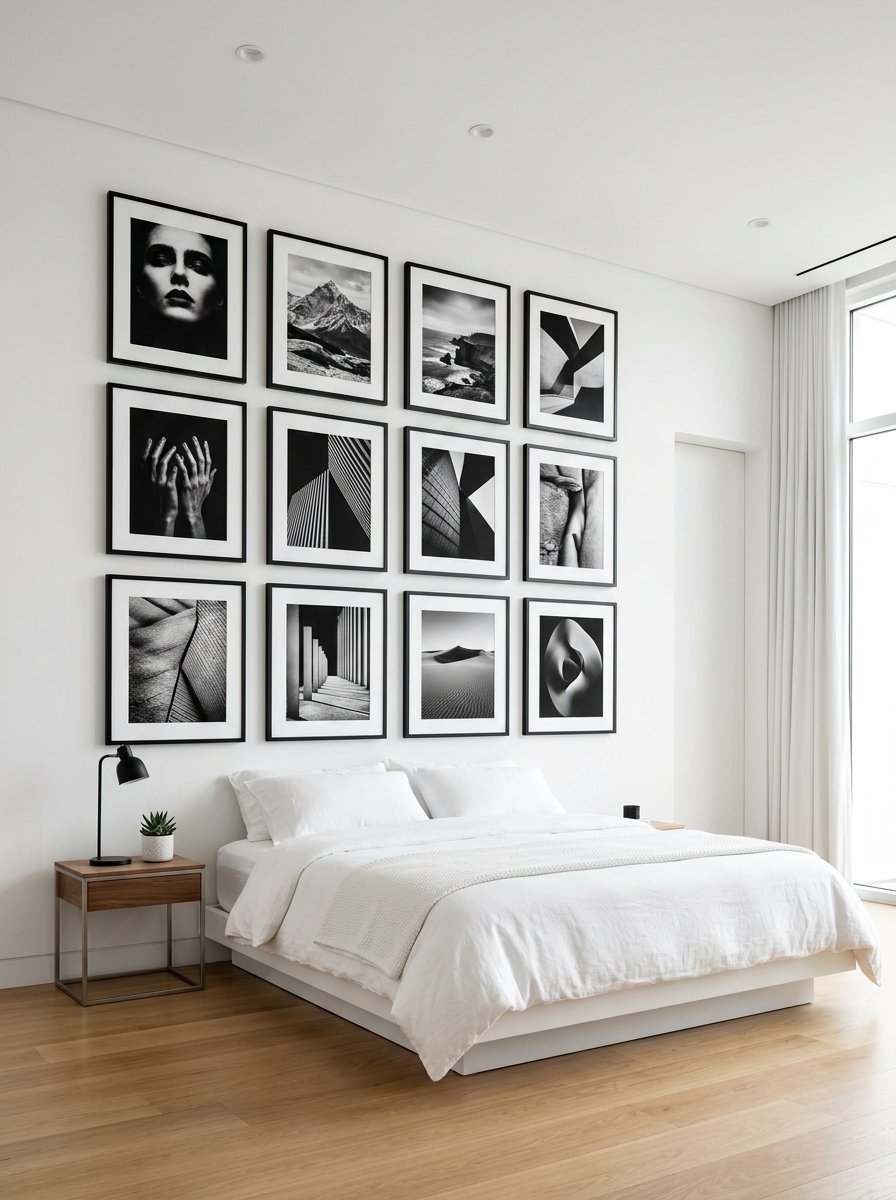
Black and white photos give instant drama and emotion to any room. You can mix old family photos with modern travel shots. Converting everything to black and white ties the whole collection together perfectly. I run all my photos through a simple phone editing app first. This keeps the contrast and lighting perfectly uniform across every picture.
Try these framing ideas for a striking monochrome look.
- Use sleek black metal frames for a very modern hotel feel.
- Pick pure white frames to make the black ink really pop.
- Order prints with a matte finish to avoid harsh glare from lamps.
- Ask your print shop to use heavy archival photo paper.
This is one of the best frames on wall ideas for beginners. You literally cannot mess up the color matching. It always looks totally cohesive and wildly expensive.
9. The Corner Wrap Around Display
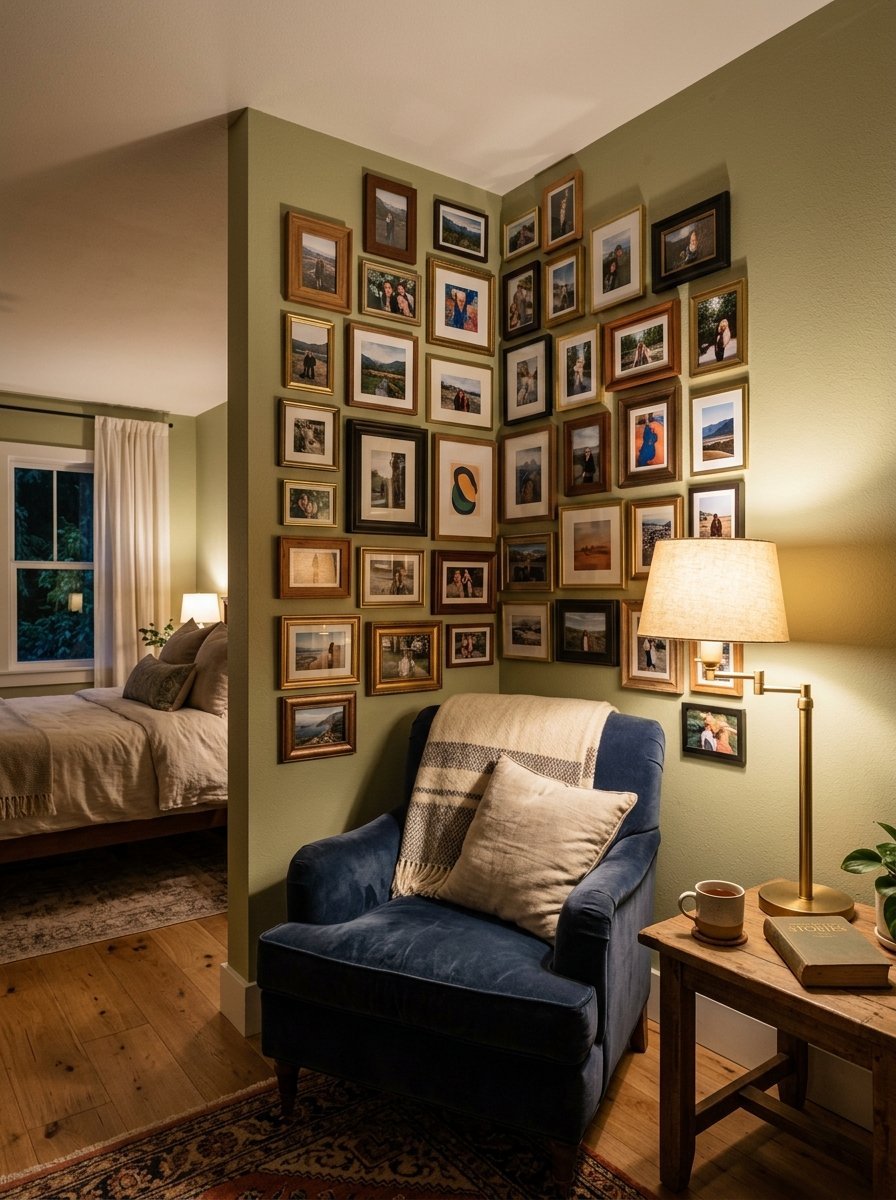
Most people completely ignore the inner corners of their rooms. Wrapping a collection of frames around a corner gives a cozy reading nook. You start by hanging your frames on the left wall. Then you continue the exact same pattern onto the right wall. The art physically bends around the architecture of the room.
Keep these wrapping rules in mind for the best look.
- Keep the spacing identical on both sides of the corner crease.
- Use a flexible measuring tape to check distances around the bend.
- Hang smaller pieces closest to the actual corner seam.
- Place your larger anchor frames further out on the flat walls.
I did this in my tiny home office last year. It completely changed a dead space into a visual feature. You will need someone to help you judge the leveling here.
10. Pressed Florals And Glass
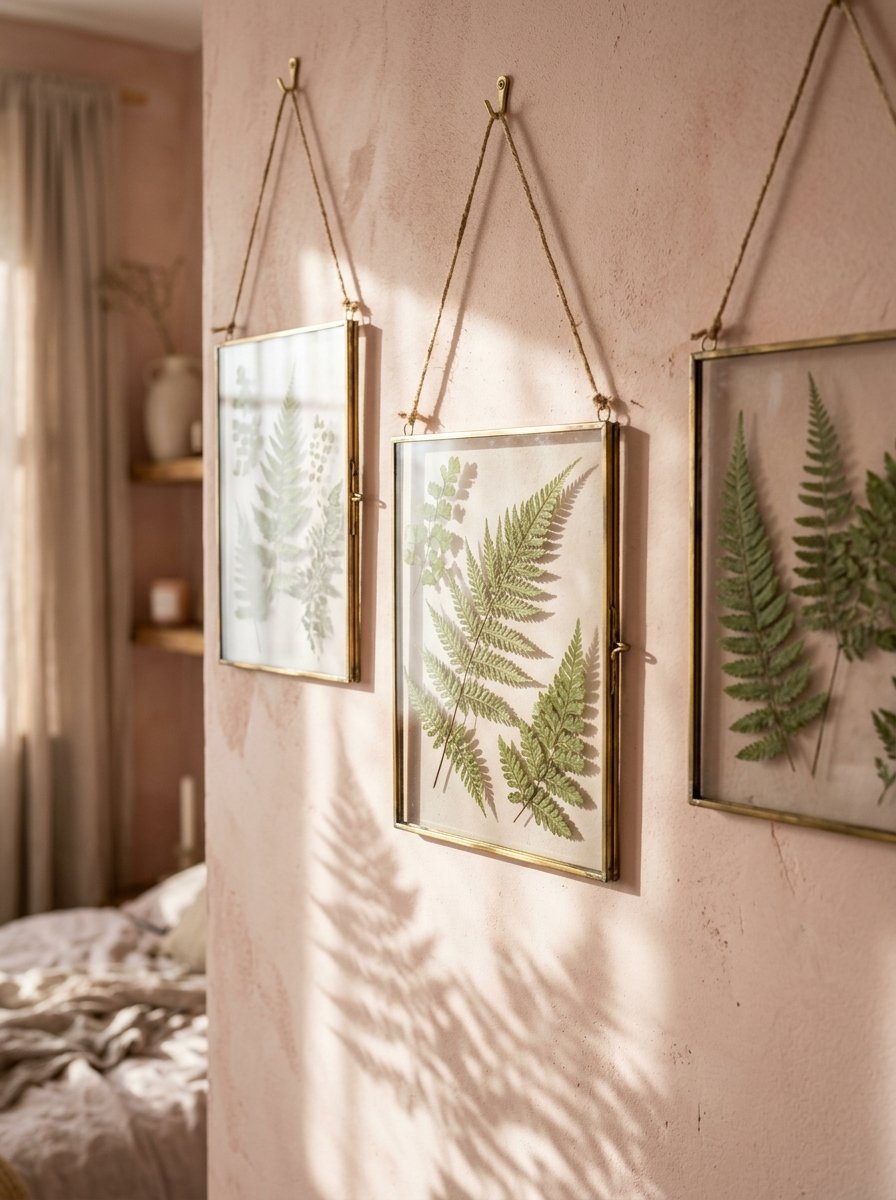
Bringing nature inside calms the mind before sleep. You can press your own backyard flowers inside heavy books for a month. Place these dried stems inside clear floating glass frames. The wall color shows straight through the glass behind the flower. This looks incredibly delicate and feminine in a sleeping space.
Follow these steps for perfect pressed flower frames.
- Pick flowers in the late afternoon when they are completely dry.
- Lay them flat between heavy parchment paper inside a heavy textbook.
- Wait four full weeks before taking them out of the book.
- Use tiny dots of clear craft glue to hold them inside the frame.
I have a collection of ferns framed like this. The green leaves pop beautifully against my blush pink painted walls. Keep these frames away from direct sunlight so the leaves stay green.
11. Floating Shelves With Layered Frames
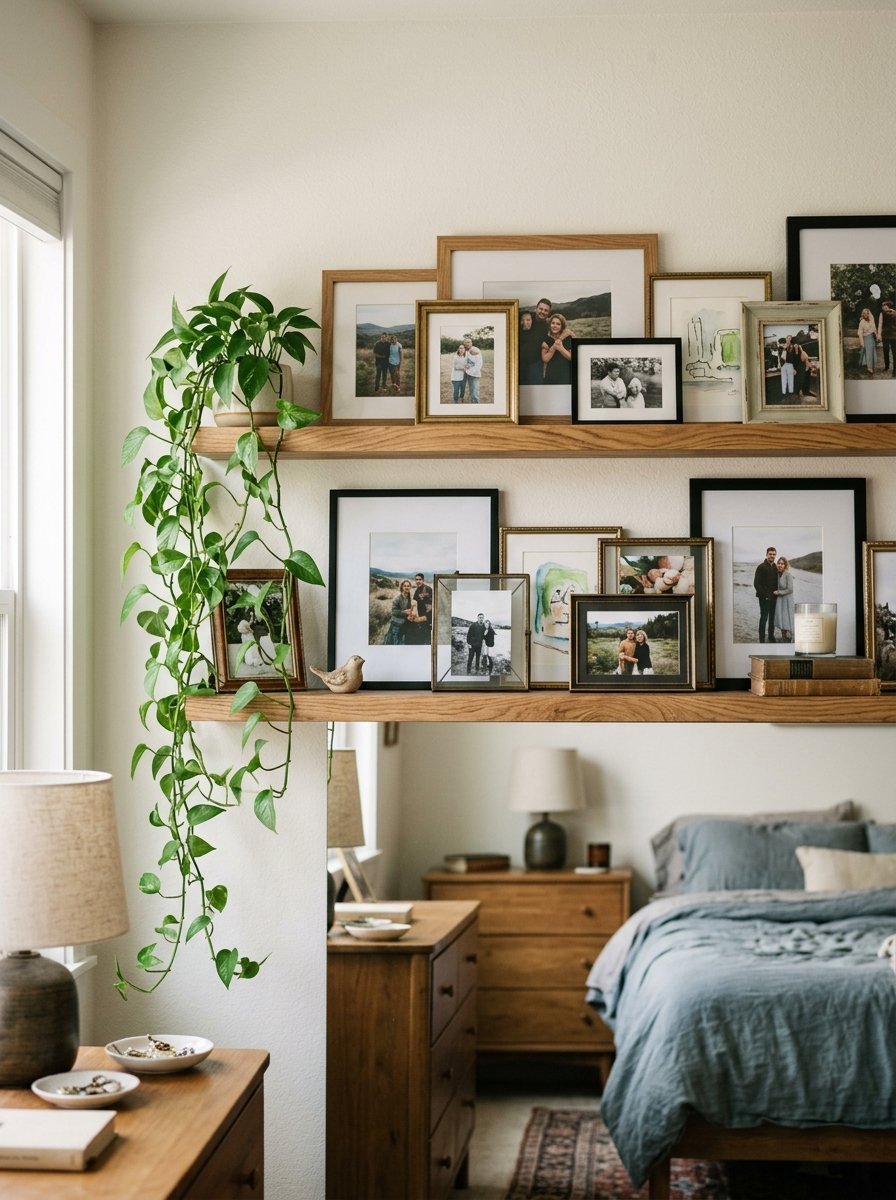
Putting holes in the wall for every single frame gets exhausting. Installing two long floating shelves fixes this issue completely. You just lean your framed art against the wall on the shelf. This lets you swap out artwork every single season without tools. Layer smaller frames directly in front of larger frames for depth.
Make your shelf display look professional with these tips.
- Buy shelves with a raised front lip so frames never slide off.
- Overlap the corners of your frames by an inch or two.
- Mix a tall vertical frame with a short horizontal one.
- Place a small trailing houseplant on the end of the shelf.
I use this setup to display my seasonal holiday prints. It takes me five minutes to swap everything out in December. Use a sturdy drill to anchor the shelves into the wall studs.
12. Black And White Minimalist
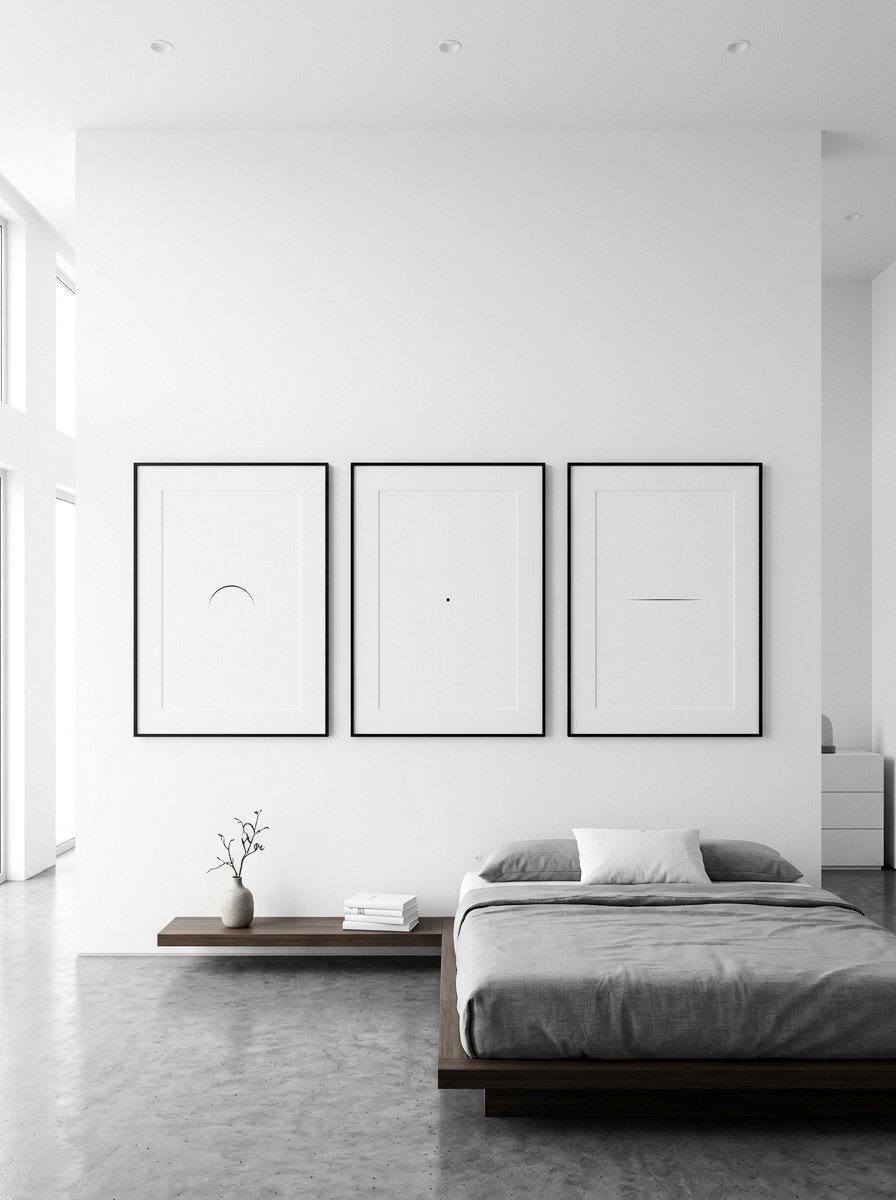
Sometimes you want your room to feel completely empty and quiet. A minimalist approach uses very few frames with tons of empty space. Pick three oversized frames and hang them in a straight line. The frames should be very thin black metal. The art inside should be simple single line drawings or typography.
Stick to these strict minimalist rules for a clean space.
- Leave at least six inches of empty wall space between each frame.
- Use extra large white mats around very small art prints.
- Keep all three frames at the exact same height on the wall.
- Avoid using any brightly colored artwork or busy patterns.
I style modern apartments using this exact simple formula often. It gives the eye a place to rest. You spend less money buying frames while making a massive visual statement.
13. The Woven Basket Breakup
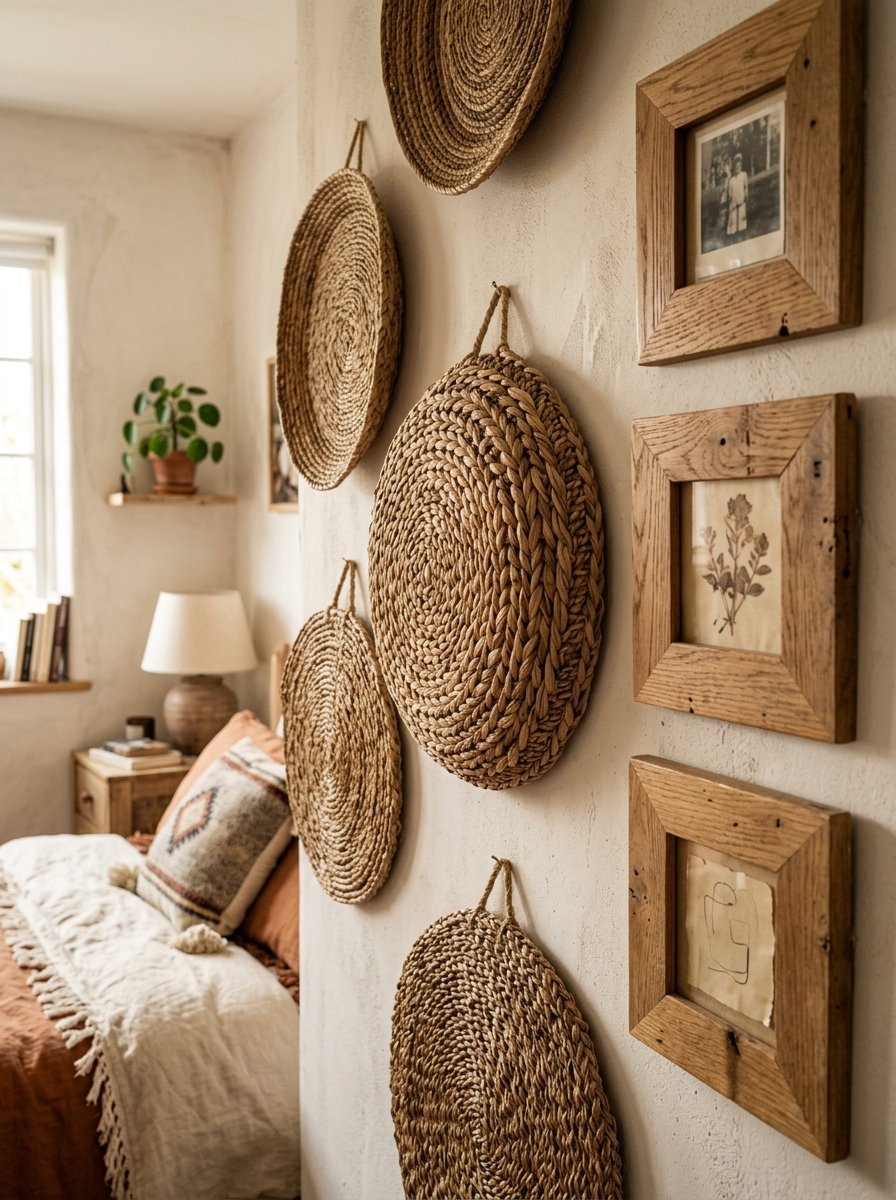
Solid square frames can start to feel very heavy and rigid. You need round objects to soften the sharp angles of the glass. Shallow woven baskets give amazing texture and break up the grid. You can find flat seagrass baskets at thrift stores for pennies. Pin them flat against the wall right next to your artwork.
Try these ideas for mixing baskets with your art.
- Pick baskets that feature black or brown woven patterns.
- Use tiny finishing nails right through the center of the basket.
- Place a large round basket next to a tall vertical picture frame.
- Group three tiny baskets together in a tight cluster.
This is a perfect vintage wall decor idea for a cozy home. I hung several African woven bowls in my master suite recently. They give a totally tactile element to the flat wall space.
14. Leaning Frames On A Picture Ledge
A picture ledge is much shallower than a standard floating shelf. It hugs the wall tightly and holds art perfectly upright. You can install one long ledge directly behind your bed. Stack overlapping frames along the entire length of the wood piece. This is one of my favorite hanging photos on the wall ideas.
Get the most out of your picture ledge with these tricks.
- Paint the wooden ledge the exact same color as your wall.
- This makes the ledge disappear so the art simply floats.
- Start with your tallest frame in the exact middle of the ledge.
- Tuck tiny square frames right in front of the bigger ones.
I use a dry Norwex cloth to dust my ledge every Sunday. The shallow depth means you will not bump it when walking past. It holds tons of art in a very tight space.
15. Moody Dark Academia Layout
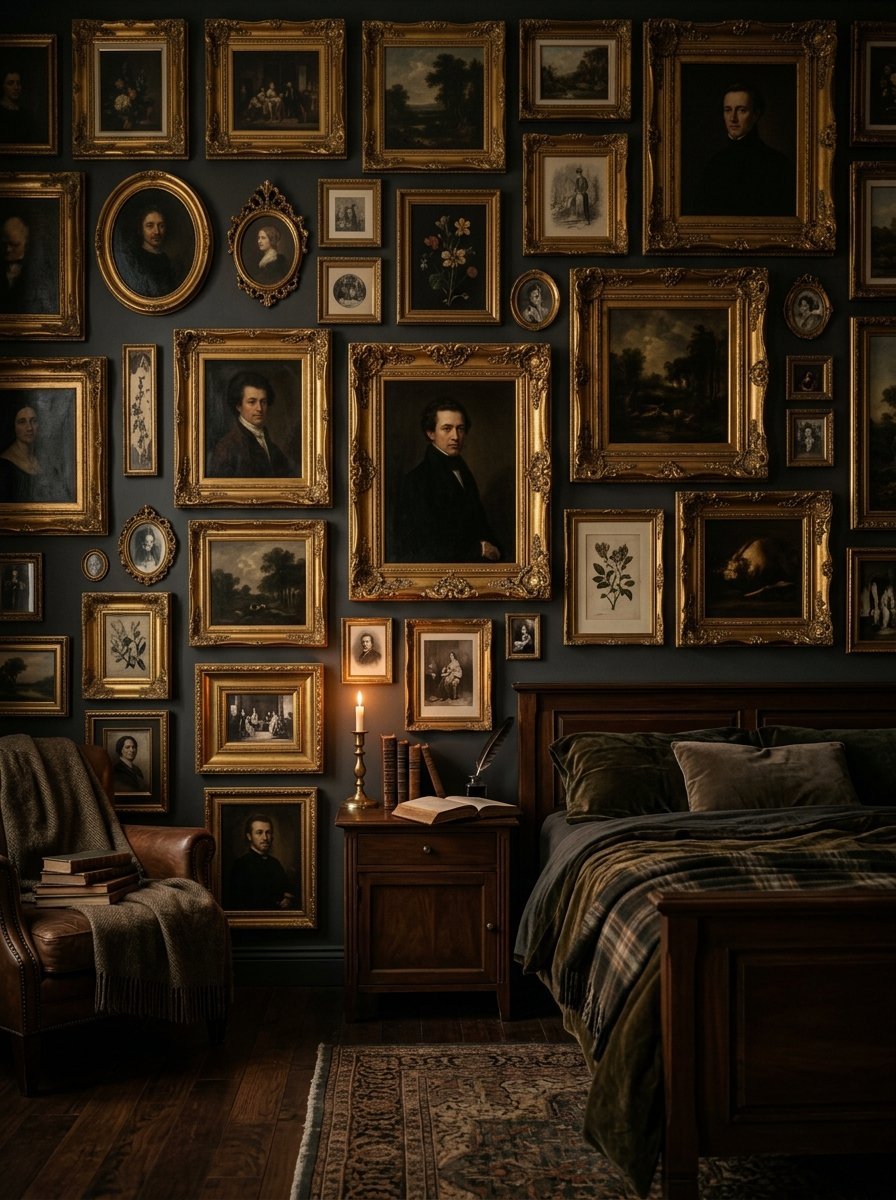
Dark painted rooms need artwork that matches the heavy atmosphere. Paint your wall a deep charcoal or hunter green first. Use ornate vintage gold frames to hold moody oil paintings. Think dark landscapes, classic portraits, and still life bowls of fruit. The gold finishes pop brilliantly against the dark wall paint.
Get a moody aesthetic with these specific steps.
- Search for downloadable public domain oil paintings online for free.
- Print them on matte canvas paper so they look like real paintings.
- Remove the glass from your frames so the canvas texture shows.
- Pack the frames very closely together for a full wall of art.
I spent weeks gathering art for my brother in his new office. We skipped the glass entirely and the prints look like museum originals. This setup feels rich, warm, and very cozy in the winter.
16. Symmetrical Gold Frame Stack
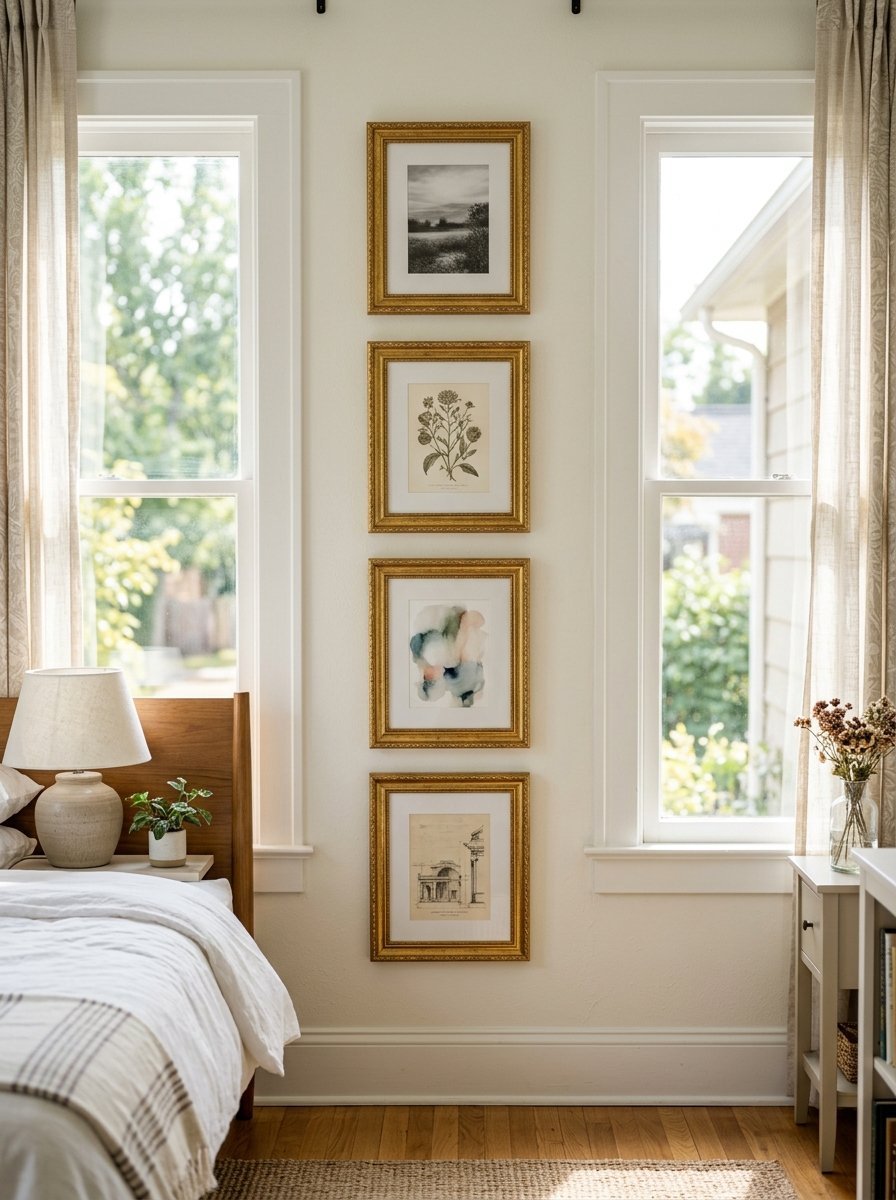
Sometimes you only have a very narrow slice of wall space available. A vertical stack of matching frames fits perfectly between two windows. Pick three or four identical gold frames for this space. Hang them in a perfectly straight vertical line going down the wall. This fills the awkward gap and makes the room look finished.
Keep your vertical stack looking neat with these rules.
- Measure the exact center point between the two windows first.
- Use a laser level to drop a perfect vertical line down the wall.
- Leave exactly three inches of blank space between each gold frame.
- Put similar artwork in each frame so they feel like a matching set.
I fix awkward bedroom layouts with this trick all the time. It turns a blank wasted strip of drywall into a beautiful feature. Make sure you use a small level on the top of every frame.
17. Thrifted Vintage Frame Collection
Hunting for old frames is my absolute favorite weekend activity. Local antique shops and charity stores are goldmines for cheap decor. You can find solid carved wood pieces for under five dollars. This approach makes for amazing vintage wall decor ideas. I look for pieces with chipped paint or detailed floral carvings.
Use these tips when shopping for second hand pieces.
- Take out the old artwork and throw away the dusty paper backing.
- Use a glass cleaner to scrub decades of dirt off the glass.
- Do not worry if the frames are different colors or wood tones.
- Paint them all flat black if you want them to match perfectly.
I like to lay all my thrifted pieces on the carpet first. You can play with the arrangement without putting holes in the plaster. Mix gold finishes and dark wood tones together for a rich look.
18. Family Heritage Photo Wall
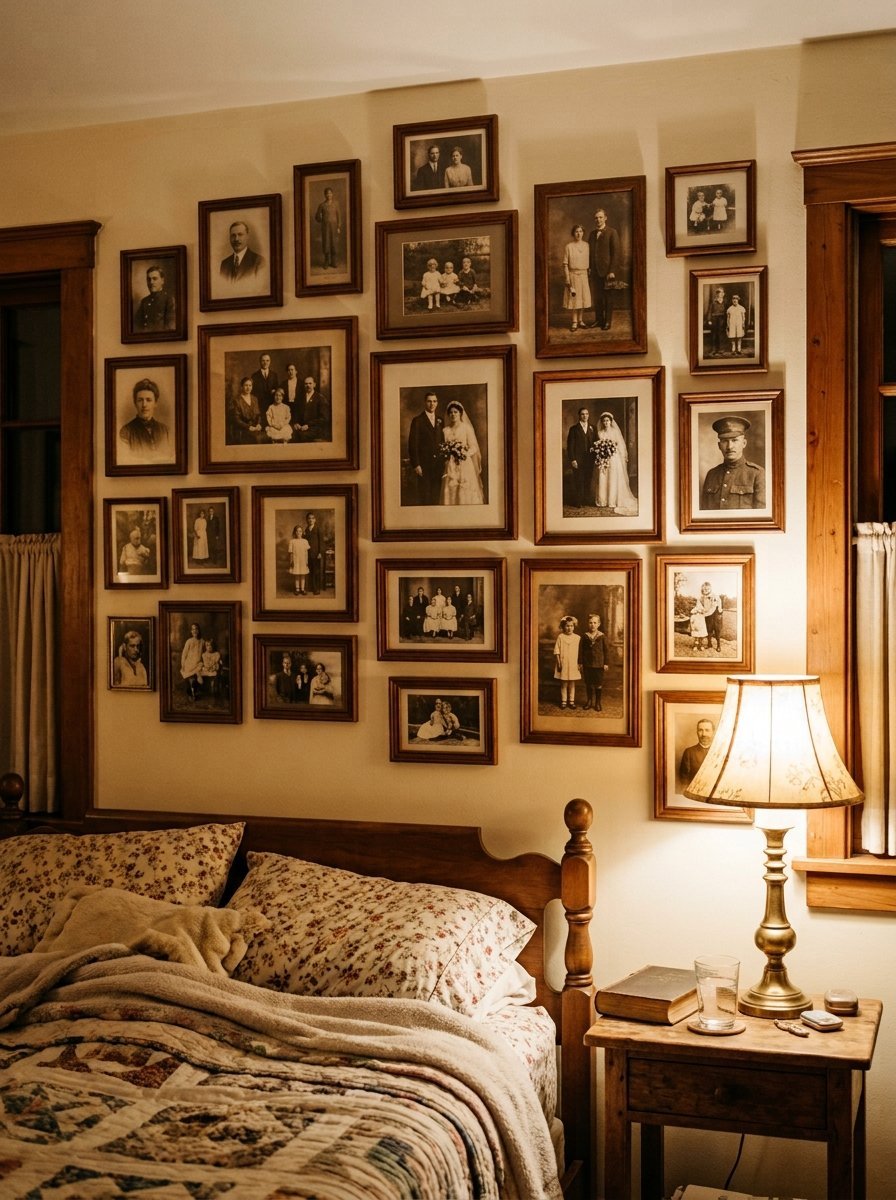
Bedrooms are highly personal spaces meant for your closest memories. Framing old family photos honors your history in a beautiful way. Dig out photos of your grandparents and parents from their youth. Scanning them into a computer lets you fix any tears or fading. Print them all in sepia tone for a warm cohesive feeling.
Make a heritage display without looking cluttered using these tips.
- Pick simple matching wood frames so the old photos stand out.
- Include a handwritten recipe card or old letter in one frame.
- Use acid free mats to protect the old original paper documents.
- Place the oldest photos near the top of the arrangement.
I made one of these displays for my mother two years ago. She absolutely loves looking at her family history every single morning. It gives the room a deep sense of belonging and roots.
19. The Small Space Vertical Stack
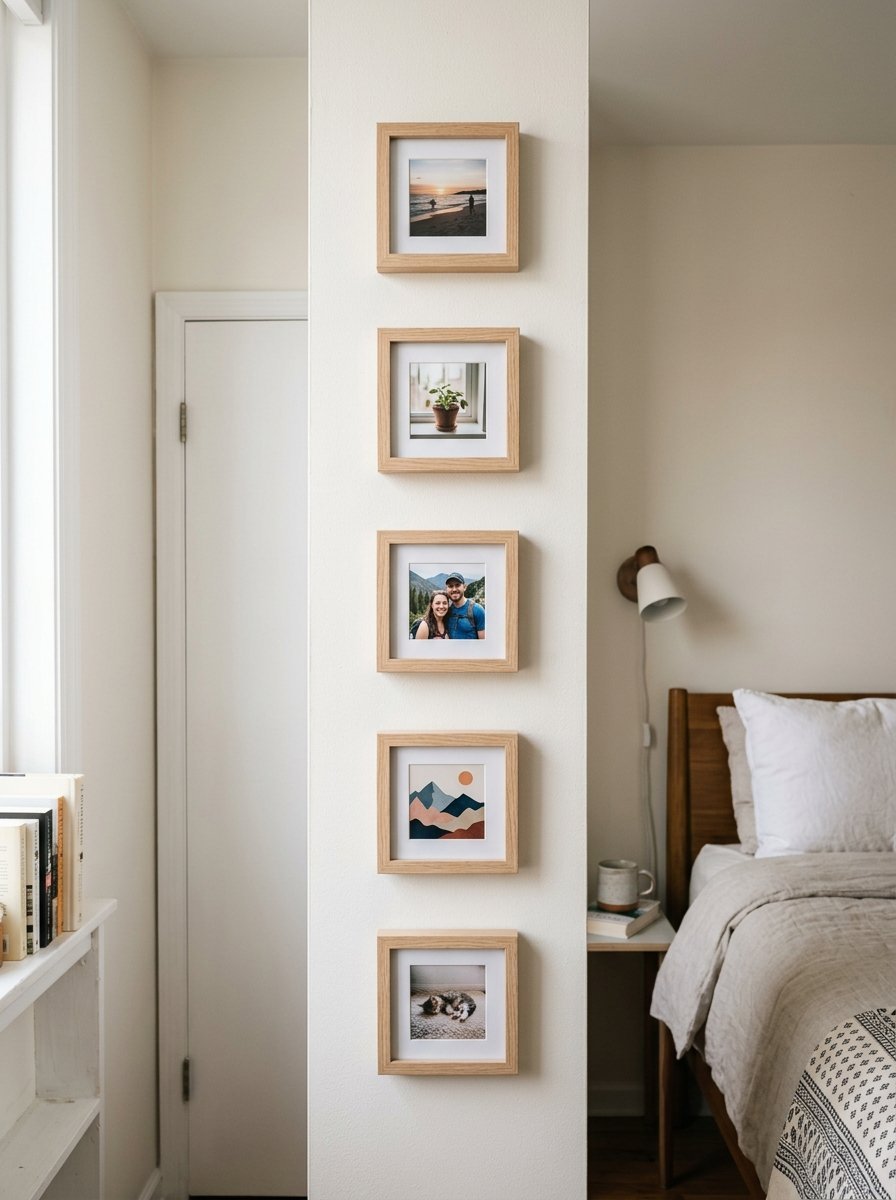
People with tiny bedrooms often think they cannot have a gallery wall. You just need to stack up instead of spreading out. Pick one narrow strip of wall right next to your closet door. Stack five small square frames in a single column from top to bottom. This takes up zero floor space but shows massive personality.
Make a small vertical stack work with these easy rules.
- Keep the frames small, around five by five inches maximum.
- Hang the middle frame right at your natural standing eye level.
- Space them tightly, leaving just one inch between the edges.
- Use matching frames so the tight column does not feel chaotic.
I lived in a tiny studio apartment for three years. This was the only way I could display my travel photos. It forces your eyes to look up and appreciate the room height.
20. Oversized Anchor Piece Setup
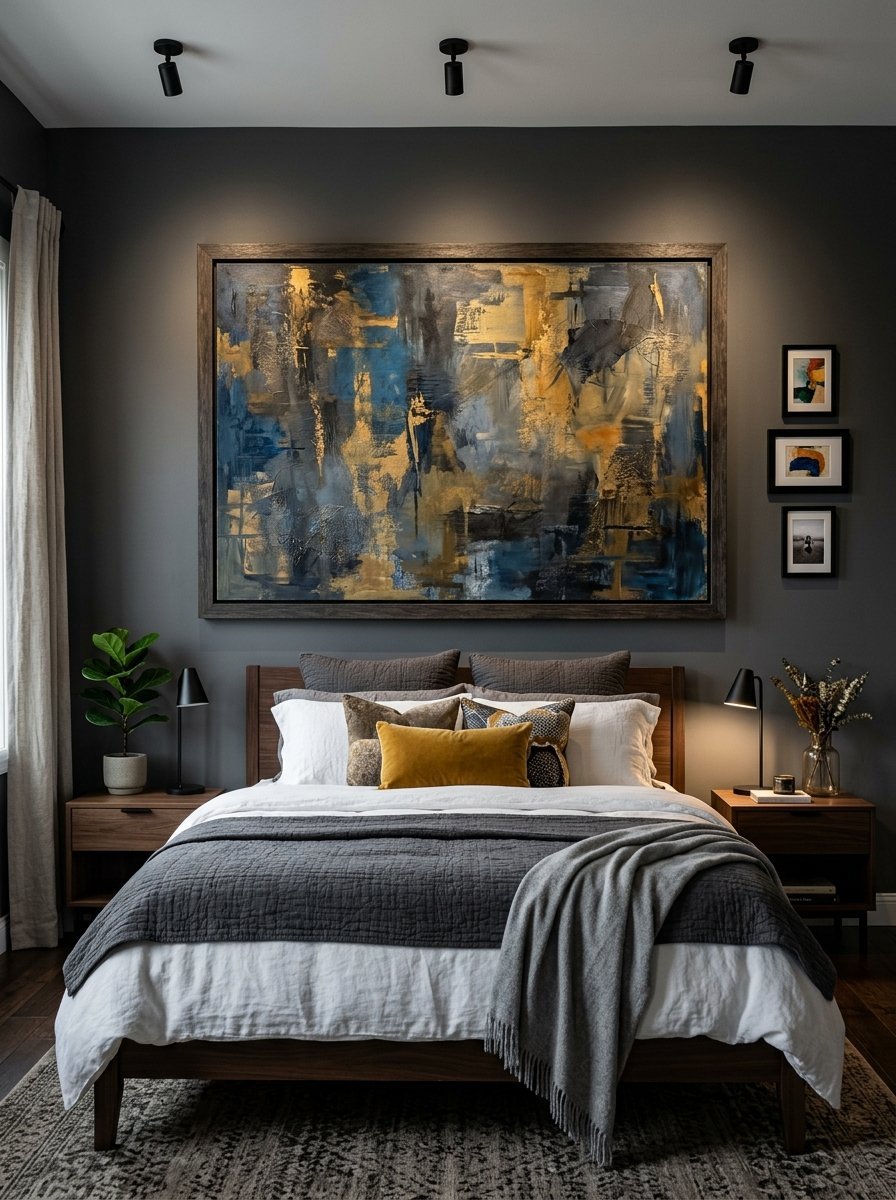
A bunch of tiny frames can sometimes look like scattered clutter. You need one massive piece of art to ground the entire display. Buy one huge piece that takes up most of your wall space. Hang this giant piece dead center above your bed or dresser. Then tuck three or four tiny frames right next to it.
Balance a massive anchor piece with these placement tricks.
- Hang the large piece first and make sure it is perfectly level.
- Cluster the small frames on just one side of the big piece.
- Match the color of the small frames to the large frame.
- Pick small artwork that shares colors with the giant central painting.
I bought a huge abstract canvas at a flea market last summer. I paired it with two tiny black and white ink sketches. The contrast in scale makes the whole wall look incredibly custom.
21. Polaroid And Washi Tape Grid

You do not always need heavy glass and wood to hang art. A casual teenager room or dorm looks great with an unframed grid. Print your photos in a retro square format with a white border. Stick them straight to the drywall using pieces of colorful washi tape. This requires zero hammer swings and costs almost nothing to do.
Make a tape grid look purposeful with these easy steps.
- Buy paper washi tape so it never peels the paint off your drywall.
- Place one piece of tape right in the top center of each photo.
- Arrange the photos in a perfectly straight geometric grid pattern.
- Swap the photos out every month as you make new fun memories.
My niece uses this method in her college dorm room. It gives her chic decor without risking her security deposit. You can take the whole thing down in two minutes flat.
22. Textile And Tapestry Accents
Framed art does not have to be paper or canvas paintings. Framing vintage textiles gives incredible warmth and softness to a hard room. You can frame an old silk scarf or a piece of embroidered cloth. The fabric brings a completely different texture to your smooth wall layout. Mix these framed fabrics in with your regular paper art prints.
Frame fabrics at home easily using these simple tricks.
- Iron the fabric perfectly flat before you try to frame it.
- Remove the glass from the frame so you can touch the material.
- Pull the fabric tight around a piece of stiff cardboard.
- Tape the fabric to the back of the cardboard so it stays tight.
I found a beautiful mud cloth scrap at a market recently. Pinning it inside a shadow box made it look like expensive art. It breaks up the shine of the other glass frames perfectly.
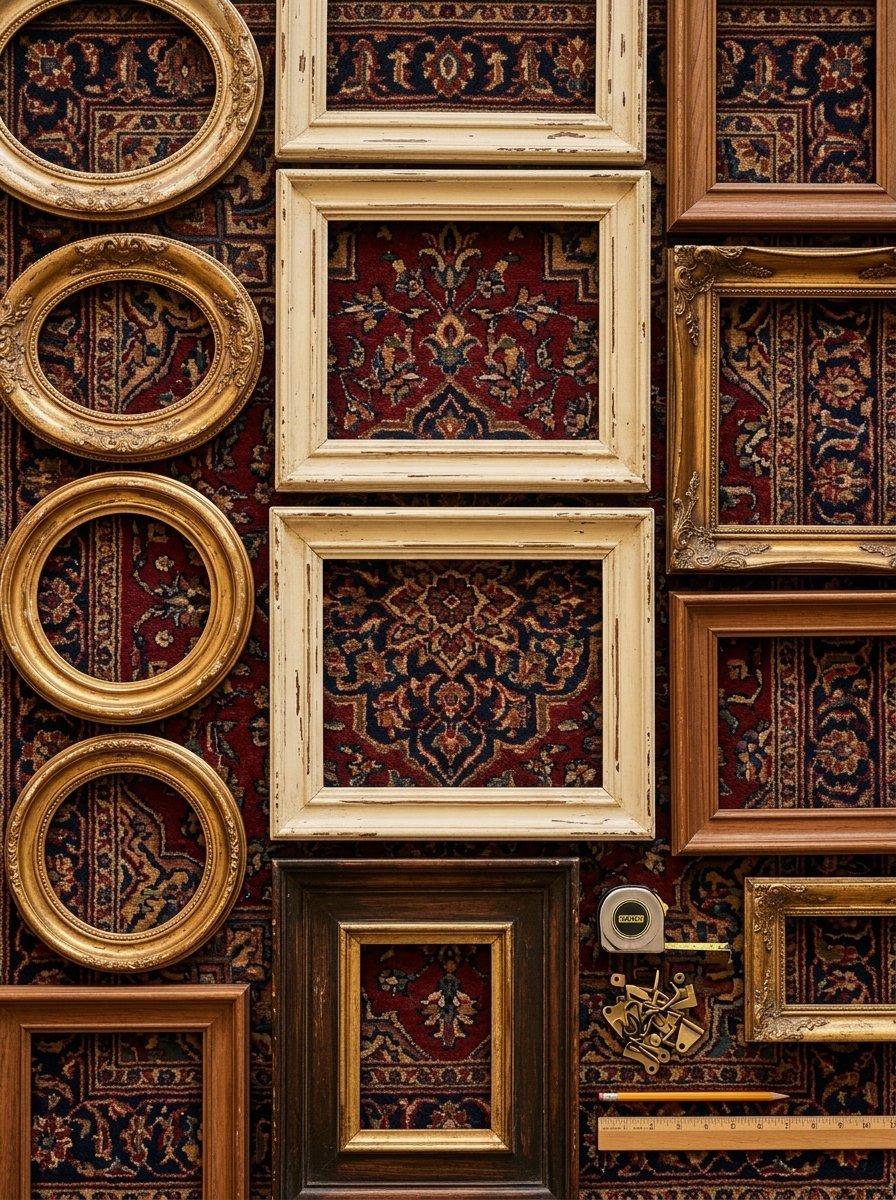
23. Empty Frame Architectural Setup
Sometimes the frame itself is far more beautiful than any art inside. Collecting highly detailed plaster frames is a fun hobby. You can hang these ornate frames on the wall completely empty. The wall paint color shows right through the empty middle space. This creates amazing shadows and architectural interest without looking heavy.
Nail the empty frame look with these specific styling choices.
- Paint all the empty frames the exact same color as your wall.
- This creates a subtle 3D texture that looks like custom molding.
- Group six or seven empty frames tightly together in a cluster.
- Mix rectangles, ovals, and squares together for visual interest.
I saw this in a high end boutique hotel in downtown Chicago once. I immediately went home and copied the exact look in my hallway. It provides a quiet chic decor element that never goes out of style.
24. The Constellation Scattered Layout
Some rooms have weird angled ceilings or off center windows. A rigid grid layout will show these architectural flaws instantly. A scattered constellation layout fixes this problem perfectly. You spread your frames out in an organic flowing cloud shape. The artwork drifts across the wall like stars in the night sky.
Master the scattered look without making a mess.
- Start in the middle of the wall and slowly work your way outward.
- Use circular frames mixed with rectangles to break up straight lines.
- Leave completely random amounts of space between every single piece.
- Let the arrangement drift upward toward the highest corner of the room.
I used this trick to hide a weird thermostat box on my wall. The eye follows the flowing art right past the ugly plastic box. It feels completely custom and fits any weird wall shape perfectly.
25. Nursery Room Storyboard
Designing a room for a baby requires soft and joyful artwork. A nursery needs a display that tells a sweet visual story. Buy classic children book illustrations and frame them in light white wood. Mix in a wooden initial letter of the baby name. Include a framed pair of their tiny newborn hospital socks.
Keep a nursery display safe and cute with these rules.
- Never hang heavy frames with glass directly over the baby crib.
- Use lightweight acrylic plastic instead of real glass for safety.
- Hang the arrangement over the changing table or rocking chair instead.
- Pick pastel colors that soothe the baby before nap time.
I helped my sister make a storyboard wall for her new baby. We framed some pages from a vintage Peter Rabbit book she owned. It makes the nursery feel incredibly nostalgic, safe, and warm.
Frequently Asked Questions
How do I plan a layout without putting extra holes in my wall?
Trace all your frames onto cheap kraft paper and cut the shapes out. Tape these paper shapes to your drywall using blue painters tape. You can move the paper around for days until you love the setup. Once you are happy, hammer your nail directly through the paper mark. Tear the paper away and hang your frame perfectly on the first try.
What is the absolute best way to hang heavy vintage mirrors?
Never trust string or old wire on the back of heavy antique mirrors. You must install metal wall anchors directly into your wooden wall studs. If you cannot find a stud, use heavy duty toggle bolts. These metal wings open up behind the drywall and hold fifty pounds easily. This prevents your beautiful mirror from crashing down in the middle of the night.
How do I stop my picture frames from shifting or going crooked?
Doors slamming and heavy footsteps will make your perfectly level frames tilt over time. Buy a pack of clear sticky putty or double sided foam tape. Place a tiny piece on the two bottom corners of every single frame. Press the frame firmly against the drywall once you have it perfectly leveled. This locks the artwork in place permanently until you decide to move it.
Final Thoughts Before You Pick A Layout
You now have twenty five distinct ideas ready for your blank walls. Styling your space should feel deeply personal and fun, never stressful or strict. Start with cheap thrifted frames and simple paper templates to build your confidence first. Take your time finding art that actually means something special to you.

Amelia Hart is the Senior Design Editor at Vellora Interiors, where she curates small-space and apartment content. With a background in color theory and years spent designing under-500-square-foot rentals, she’s the editor who’ll tell you exactly which paint sheen, curtain length, and lamp height to choose, no guessing. A former design lead at a boutique studio, her work has been featured in several home and lifestyle publications. Her guiding belief: “Good design isn’t about more, it’s about choosing better.”